Last updated on January 3rd, 2023 at 12:20 pm
BitLocker on removable drives is known as “BitLocker to go”, but I will just refer to it as BitLocker in this writing. Requiring BitLocker on removable drives is fairly easy with the built-in Intune Endpoint Security profile templates. Some of you may be thinking removable storage should be completely blocked for security reasons. I agree in most cases, but there are still use cases where removable storage may be necessary. For example, I worked with a law enforcement agency in the past where evidence needed to be stored on USB storage if it was sent off-site. To further enhance security on removable devices, we can do some additional things, such as disabling write access to removable storage drives if they were not BitLocker encrypted from a corporate Intune enrolled device.
After I started doing some testing, I wanted the BitLocker recovery keys to be uploaded to Azure AD, but there was no native way to enforce this with the provided BitLocker templates. The selection to “Require device to back up recovery information to Azure AD” is not available for removable drives. Also, there is no way to “auto encrypt” a removable storage device. We can enforce requiring BitLocker for removable storage, but this still requires user interaction to complete the encryption process. There is no way around requiring some user interaction for the encryption process, but I wanted to figure out a way to automatically escrow removable storage BitLocker recovery keys to AAD. If we are requiring BitLocker for removable drives, we need a way, as Admins, to unlock removable drives. I created a script that does this, but I needed a trigger to run the script when a removable drive is encrypted. I eventually found a pretty simple solution using a scheduled task to trigger the script on EventID 768, when a drive starts encrypting with BitLocker. This post is longer than usual, but walks through the following items:
- How to enforce BitLocker on removable storage
- How to enforce read-only permissions on removable storage devices not encrypted on a company-owned device
- The PowerShell script used as the action in our scheduled task to upload the recovery key to AAD
- Deploying the scheduled task to workstations as a Win32 app
- Locating a Drive’s Key ID & Recovery Key so you can unlock a drive. (This is useful if a device was lost and returned or found and we do not know which PC encrypted it)
An animated GIF of the end result is below, followed by all the details and steps:
How to Enforce BitLocker for removable storage devices:
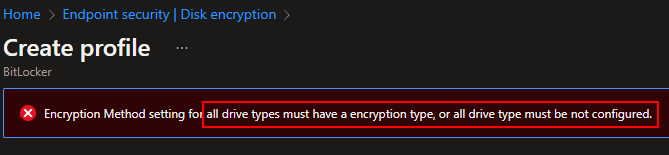
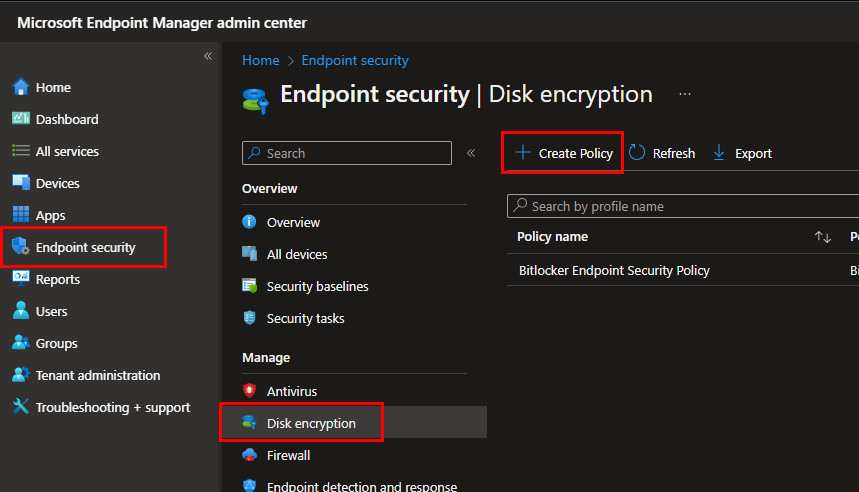
- Within the Intune admin dashboard, select Endpoint security > Disk Encryption. Make a new Policy or edit an existing policy. A quick note about making a new policy 0
- A quick note if you’re making a new Policy – the encryption type for each drive type is a required field. If you are making a new policy, you still must “configure” the other drive types and select an encryption method, or you will receive an error. If this is a new policy and you’re only interested in enforcing removable storage, you’ll need it set at least like the screenshot below, or you’ll get an error when trying to create the policy. If you already have a BitLocker Policy you are editing, you can disregard this.
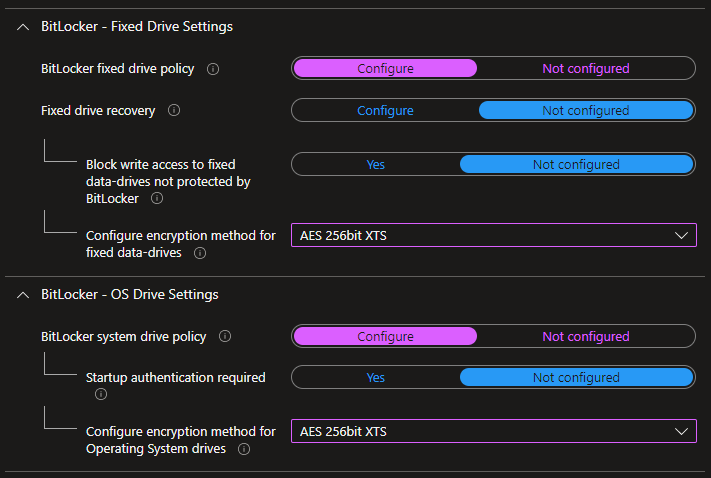
- At a minimum, set like this to avoid the above error:
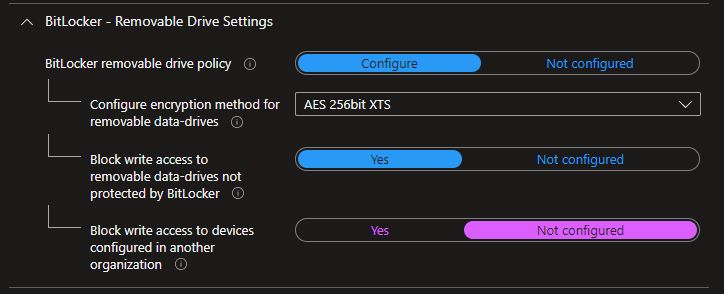
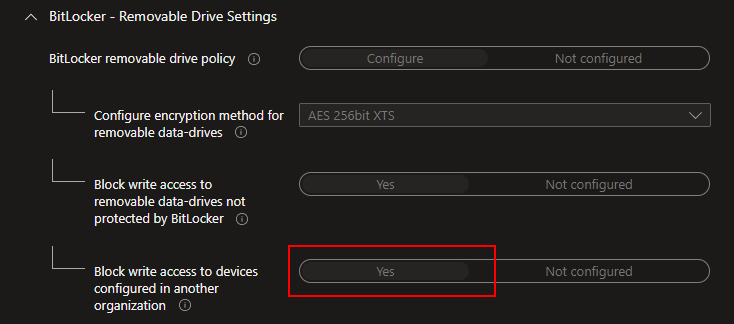
- Under BitLocker – Removable Drive Settings, configure like the below screenshot. Depending on your environment, you may want to use CBC encryption instead of XTS. If we want to enforce that all removable storage is encrypted, we want to block write access to removable drives until they are BitLocker encrypted. We will get to the fourth option to block write access configured in another organization in the next section.
- Per Microsoft: For removable drives, you should use AES-CBC 128-bit or AES-CBC 256-bit if the drive will be used in other devices that aren’t running Windows 10, version 1511. (https://learn.microsoft.com/en-us/windows/client-management/mdm/bitlocker-csp#encryptionmethodbydrivetype)
- Save your configuration profile and apply to your target groups.
- Once the device receives the policy, this is what will happen if a user inserts a removable storage device:
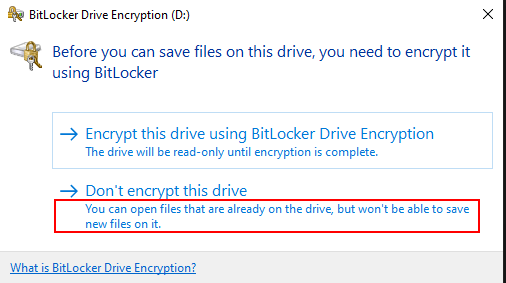
- They will be required to encrypt the device if they want to write files to it. Since its very likely corporate data will be written to the drive, this is a good practice.
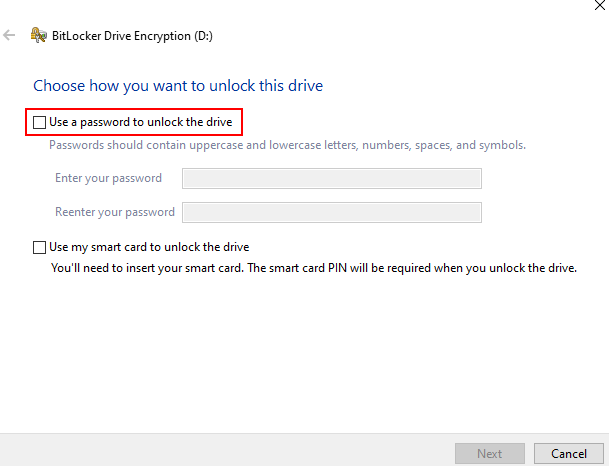
- When they select to Encrypt the drive, they’ll be prompted to set a password or use a smart card. In the vast majority of situations, they’ll be setting a password:
- They’ll need to save the recovery key somewhere. Assuming you have BitLocker enforced on your system and data drives (which you should), they’ll need to use the print option since you can’t save a BitLocker recovery key to a BitLocker-protected volume. They can print to a PDF file and save that on the local computer. Later on, we will show you how this can be auto-escrowed to AAD.
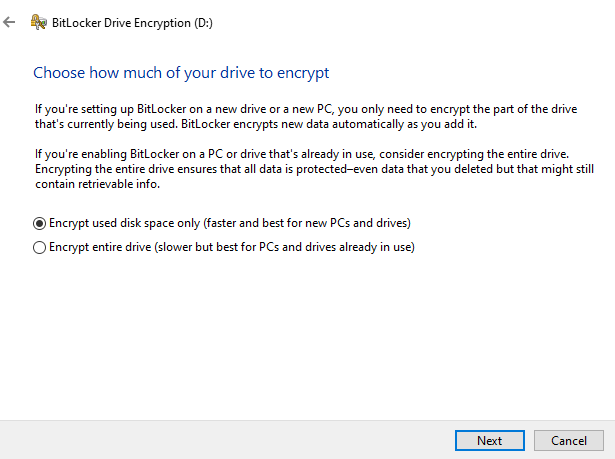
- In most situations, they can select Encrypt used space only. However, depending on the sensitivity of your data, and if you’re enforcing this in an environment where sensitive data has already been stored and deleted from removable drives, it may be better to encrypt the entire drive:
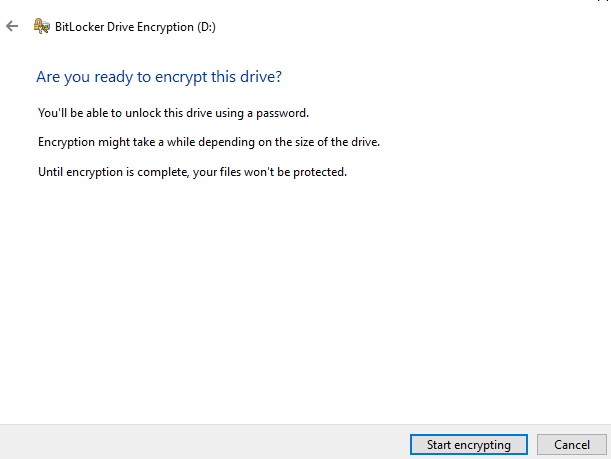
- Click Start encrypting:
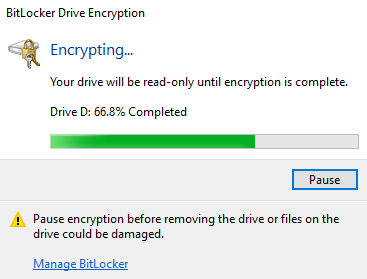
- Wait for the drive to finish the encryption process:
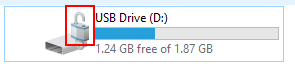
- When completed, you can see the drive showing it’s protected by BitLocker:
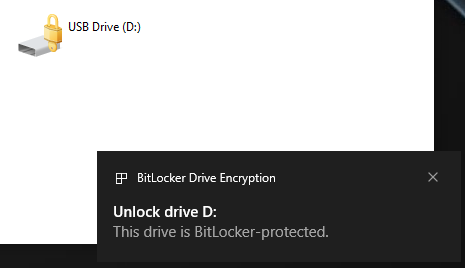
- If the drive is removed and reinserted or inserted into another PC, the user will be required to unlock it to access the contents:
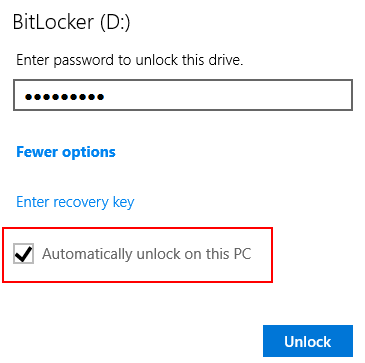
- They have the option to remember the device if it will be used frequently on their device:
- They will be required to encrypt the device if they want to write files to it. Since its very likely corporate data will be written to the drive, this is a good practice.

Disable write access to removable storage devices unless encrypted from a corporate device:
Enabling this setting will prevent write access to a removable storage device unless it is BitLocker encrypted from a corporate-owned device.
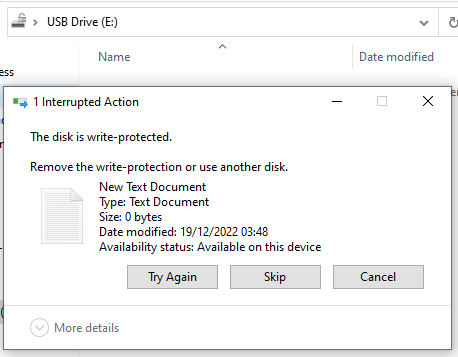
- In your BitLocker policy, enable “Block write access to devices configured in another organization”
- Once Enabled, if a user inserts a drive that was BitLocker encrypted on a device outside of your organization, they’ll still be promoted to unlock the device, and can read data on the device, but if they try writing to the device they will be blocked with an error stating the drive is write protected:
- If needed, the drive can be decrypted and re-encrypted on the user’s device if they need to write to the storage device
Automatically Escrow removable storage device key to AAD – The Script
The script that escrows the recovery key for a removable storage device to AAD is only four lines, and it’s simpler than many might think. The biggest hurdle with this script was only identifying removable storage drives. The rest of the script uses the same commands we use to upload regular fixed or OS drive BitLocker recovery keys to AAD. The script is below with some details. Remember, this script will be triggered from our scheduled task based on the EventID generated when a drive begins encrypting.
$USBDrives = Get-WmiObject -Class Win32_logicaldisk | where {$_.DriveType -eq "2"} | Select-Object DeviceID
foreach ($DeviceID in $USBDrives)
{
$BLV = Get-BitLockerVolume -MountPoint $DeviceID.DeviceID
BackupToAAD-BitLockerKeyProtector -MountPoint $DeviceID.DeviceID -KeyProtectorId $BLV.KeyProtector[1].KeyProtectorId -ErrorAction Continue
}
The top line with the $USBDrives variable identifies any removable storage drive plugged into a device. It accomplishes this by only selecting disks with a drive type of “2”, which is a removable storage device. It then only selects the DeviceID field, which is the letter the drive mounts as. We need this to identify the mount point later in the script:

The rest is pretty simple. We have a Foreach statement to process the commands to upload recovery keys to AAD for each drive letter identified as a removable storage drive. This is necessary because if Drive D is inserted and was previously encrypted, but a second USB drive is inserted and encrypted (E:), we need to process the commands for each drive letter to ensure they’re escrowed to AAD. Duplicates are not created in AAD if the recovery key for a drive already exists. A successful upload of recovery keys to Azure AD will result in EventID 845 in the Microsoft-Windows-BitLocker-API/Management log.
Automatically Escrow Removable Storage Recovery key to AAD – The Scheduled Task
The reason I chose to use a scheduled task, is we want the recovery key escrowed to Azure AD as soon as possible. We also want the drive connected while this happens. Proactive remediations are preferable to scheduled tasks in most cases, but currently, proactive remediations can only be run at certain intervals. For this task, I want it to trigger based on an event ID, and a scheduled task can do that. The details of the scheduled task are:
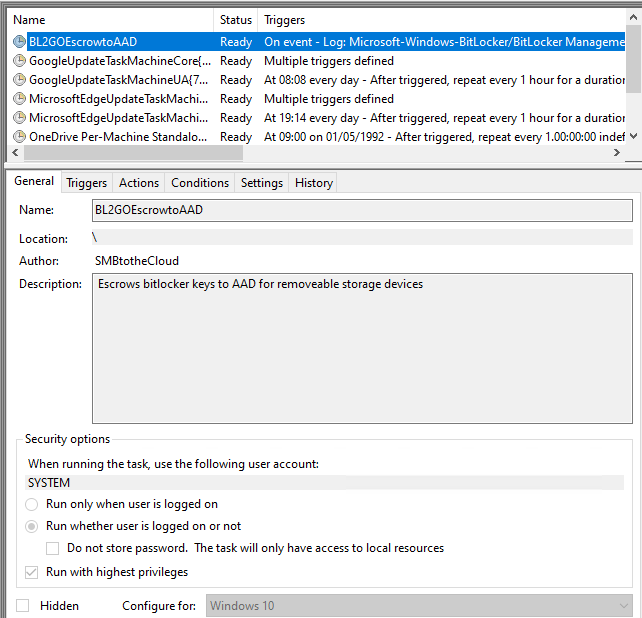
- It runs as system
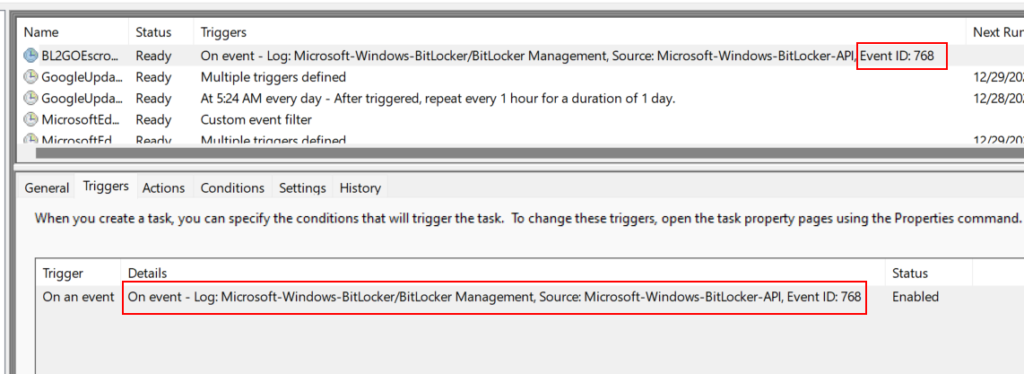
- The trigger is the event ID when a drive starts BitLocker encryption – EventID 768 from the Microsoft-Windows-BitLocker-API/Management log
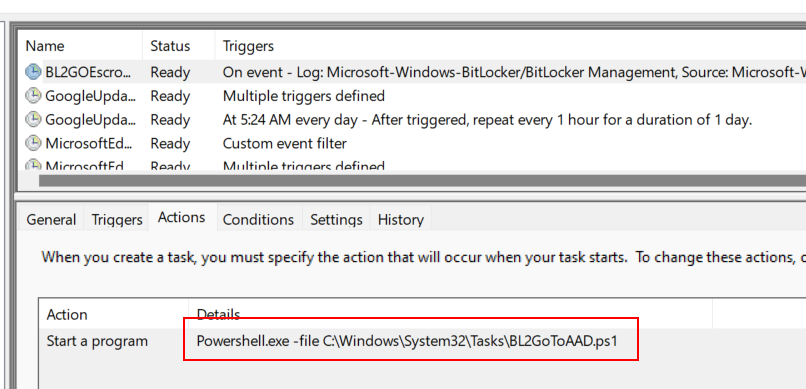
- The action is the script from the previous section. I have the script being copied to the %windir%\system32\tasks directory. This is where the scheduled tasks are stored, and access to that directory requires local admin rights. So, users can’t go into that directory and delete or edit the files.
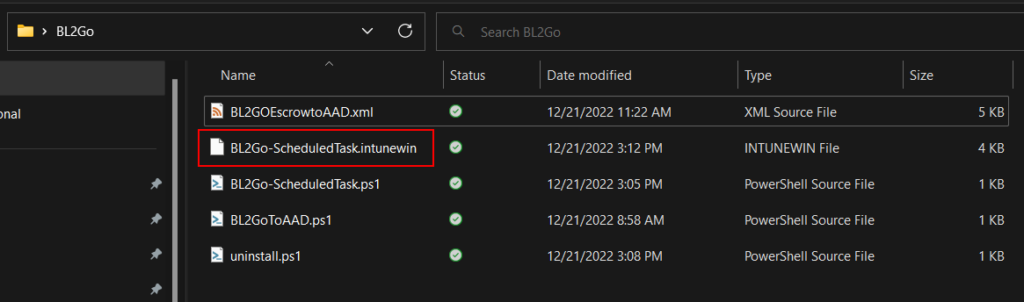
I won’t get into the weeds on how to deploy a scheduled task with Intune. For that, see my other blog post here – https://smbtothecloud.com/deploy-scheduled-tasks-with-a-win32app/. To begin, we need our scheduled task XML file, our script to escrow recovery keys to AAD, a PowerShell script to create the scheduled task, and an uninstall script if we want to remove the scheduled task. All of this, including the .intunewin file if you want to deploy this exact solution, is available on my Github here. A quick review of the necessary files is here:
- BL2GOEscrowtoAAD.xml – This is our Scheduled task XML we will be importing
- BL2GoToAAD.ps1 – this is our action script that escrows the recovery keys to AAD
- BL2Go-ScheduledTask.ps1 – this is our install script for the Win32 app to create the scheduled task and also copy our action script, BL2GoToAAD.ps1, to the %windir%\system32\tasks directory
- Uninstall.ps1 – this will remove the scheduled task if we want to uninstall the Win32 app from Intune
As I previously mentioned, I won’t go into details on the Scheduled Task XML file in this post – see my other blog post linked above for more details on that. But here are the other scripts we use for this solution. The BL2GoToAAD.ps1 script was shown in the previous section, so no review is needed here. Below are the Install and uninstall scripts for the Win32 App:
Our Install script, which creates the scheduled task and copies the action script to %windir%\system32\tasks:
$taskdir = "C:\WINDOWS\System32\Tasks"
Copy-Item ".\BL2GoToAAD.ps1" -Destination $taskdir -Force
Register-ScheduledTask -xml (Get-Content '.\BL2GOEscrowtoAAD.xml' | Out-String) -TaskName "BL2GOEscrowtoAAD" -Force
And our uninstall script, which removes the scheduled task if we ever want to delete it:
unregister-scheduledtask -taskname BL2GOEscrowtoAAD -confirm:$falseNow, some of you can skip this part, but for those of you who want the steps to create the Win32 App, here they are. I’m assuming you know how to wrap files as a .intunewin file already. Move all the above files into the same directory and wrap them into a .intunewin file like below:
Create a new Win32 app in Intune and upload your .intunewin file when prompted. Provide a name and description and click Next:
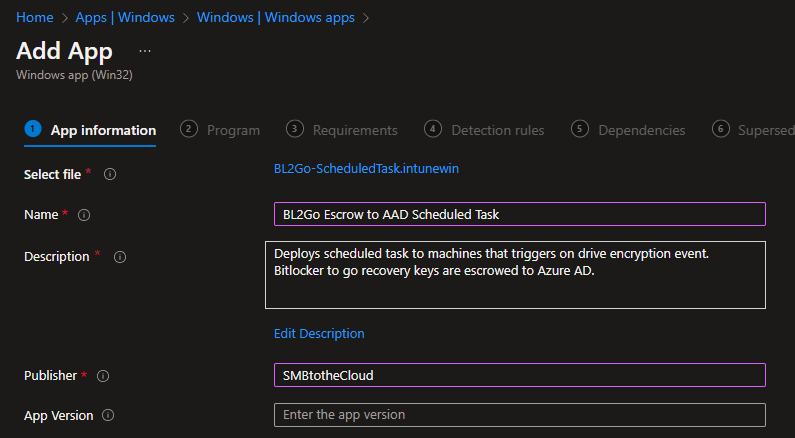
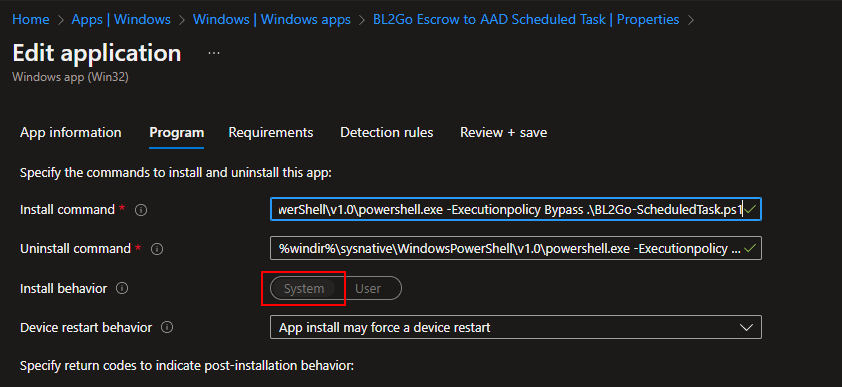
Under Program, we want our install and uninstall commands to be exactly like they are below. If you do not use %sysnative%, the task will be created properly, but our action script will be uploaded to C:\Windows\SysWOW64\tasks. If you aren’t familiar with using %sysnative%, see this blog post for more information – https://smbtothecloud.com/make-registry-changes-with-intune-win32-apps/. We also want to make sure the install behavior is System.
- Install Command: %windir%\sysnative\WindowsPowerShell\v1.0\powershell.exe -Executionpolicy Bypass .\BL2Go-ScheduledTask.ps1
- Uninstall Command: %windir%\sysnative\WindowsPowerShell\v1.0\powershell.exe -Executionpolicy Bypass .\uninstall.ps1
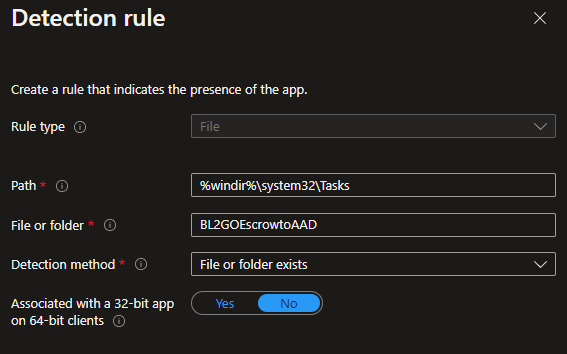
Add the requirements you want for your deployment and move on to detection rules. We will add two detection rules. The first is to make sure the scheduled task exists. The second is to make sure our action script exists. We will use file detection for both. Here are the scheduled task detection rules. Note that although this file is technically an XML file after the XML is imported and the scheduled task is created, the .XML extension is removed. This is why there is no file extension on the BL2GOEscrowtoAAD file.
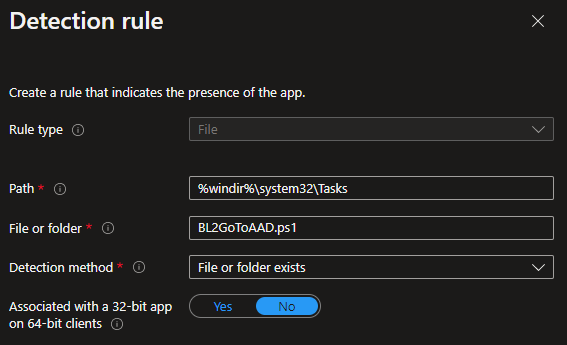
And the detection for the action script:
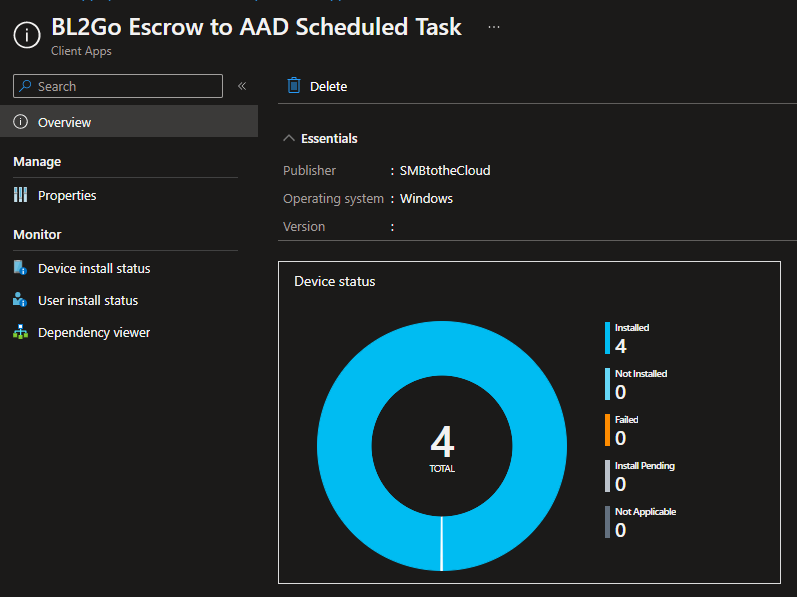
Complete the remaining steps and deploy the app to your devices. You should start getting successful installs after devices check-in. If you don’t want to wait, you can restart the Microsoft Intune Management Extension service on devices to force them to check in:
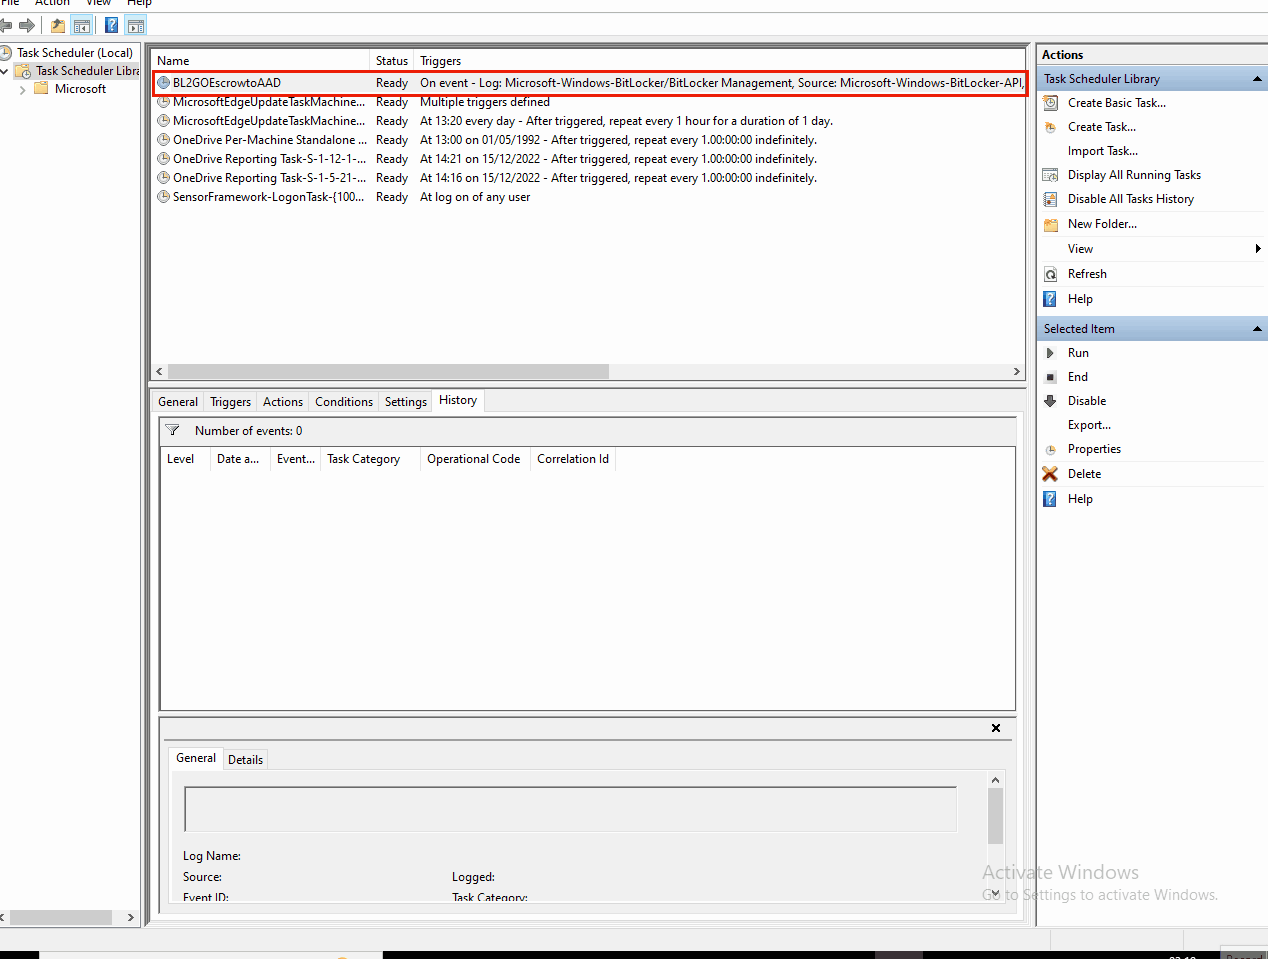
Here is what the task looks like on the devices after it’s deployed. You may need to open task scheduler as an admin to see the task:
And the trigger:
And the Action:
Locating the Recovery Key for a removable storage device if you don’t know which device encrypted it:
This is important. After all, what’s the point of enforcing BitLocker on removable storage if it’s going to be a huge pain to locate the recovery key? If a device needs to be unlocked but we don’t know which PC encrypted it, we can use the Graph API to locate the device object in AAD where the recovery key is stored. We do this based on the device Key ID.
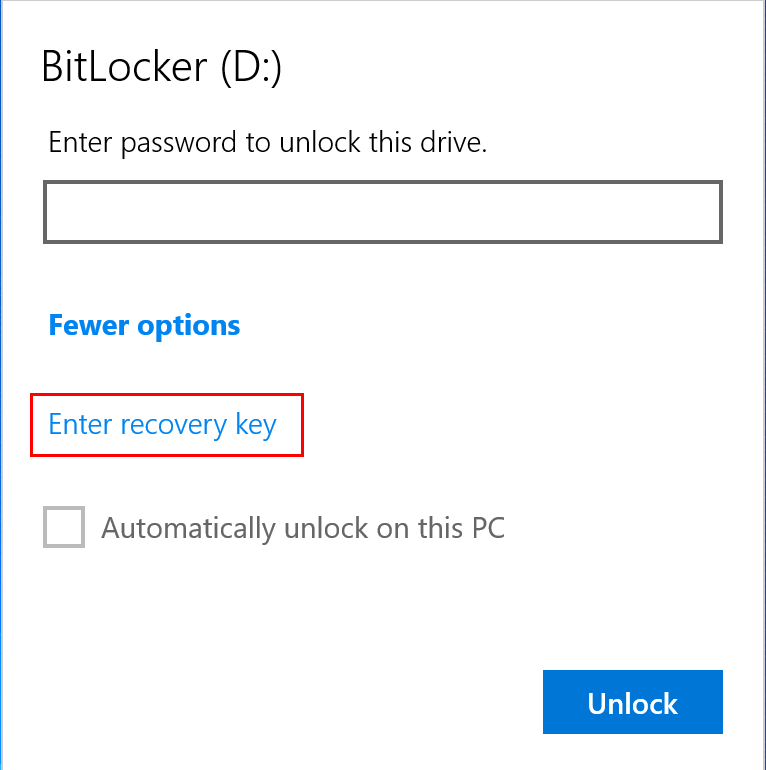
- Insert the protected volume into a PC, when prompted to unlock it, select enter recovery key:
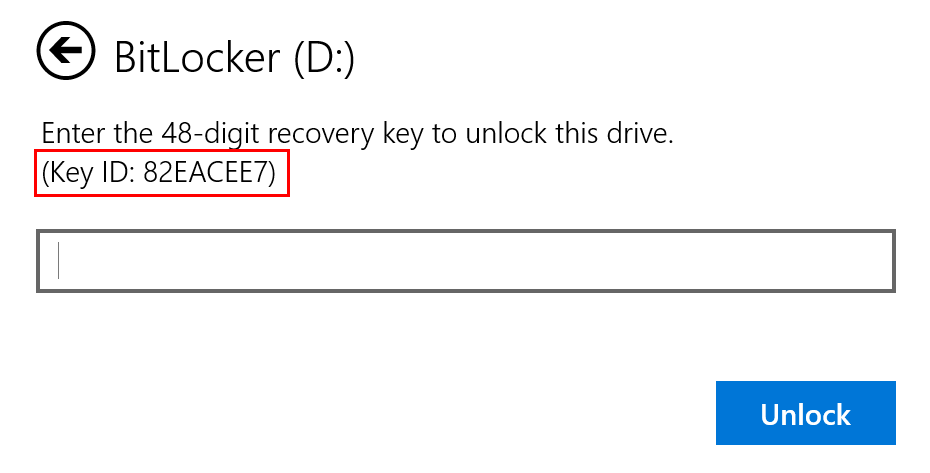
- The first 8 digits of the Key ID will be shown on your screen, record this:
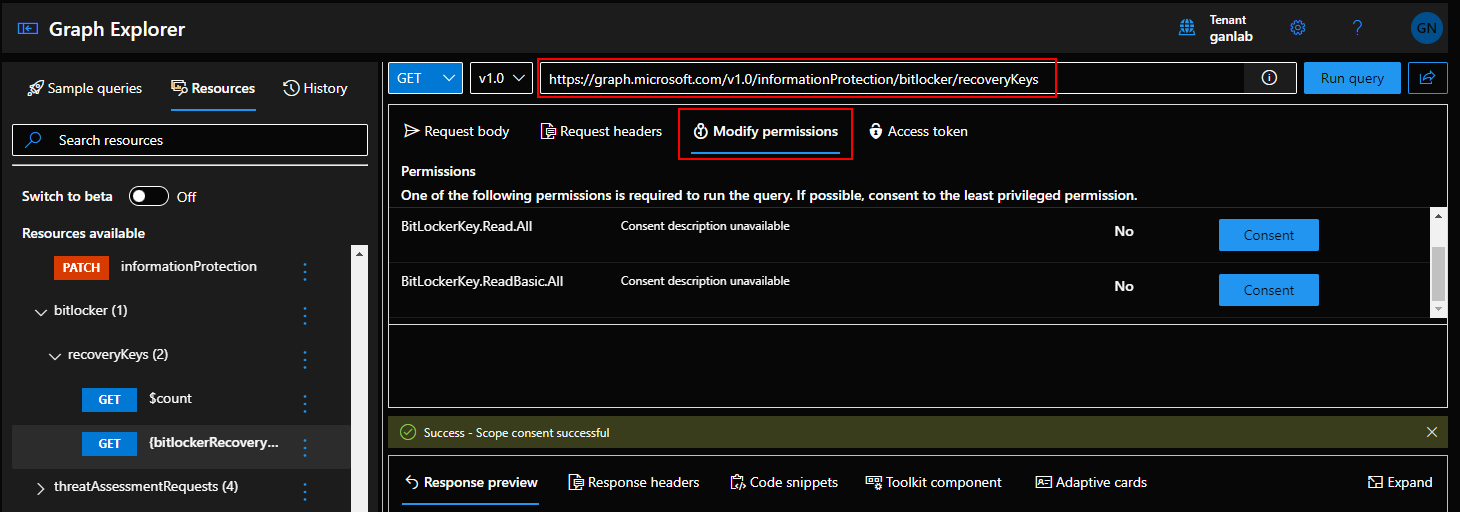
- Next, go to the graph Explorer and authenticate to your tenant – https://developer.microsoft.com/en-us/graph/graph-explorer
- Select the Information Protection resource, and drill down to Bitlocker > RecoveryKeys. Or, enter this string into the query input: https://graph.microsoft.com/v1.0/informationProtection/bitlocker/recoveryKeys. Remove {bitlockerRecoveryKey-id} from the query search if its there so the query returns all keys in your tenant. Also, make sure you consent to the necessary permissions before running the query.
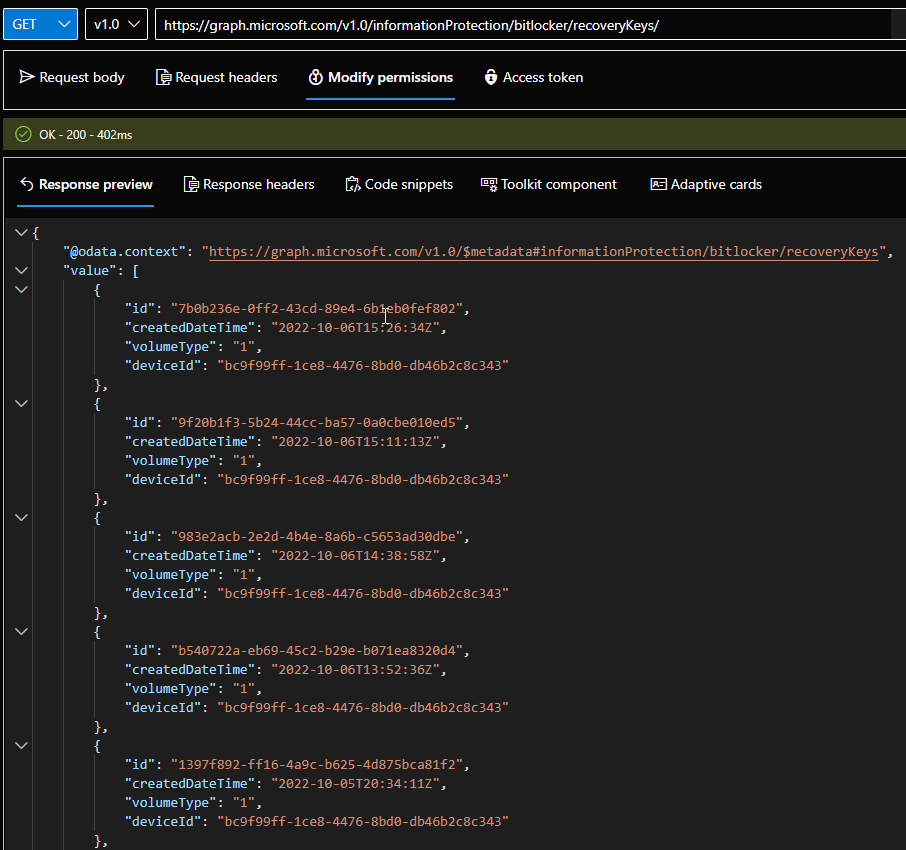
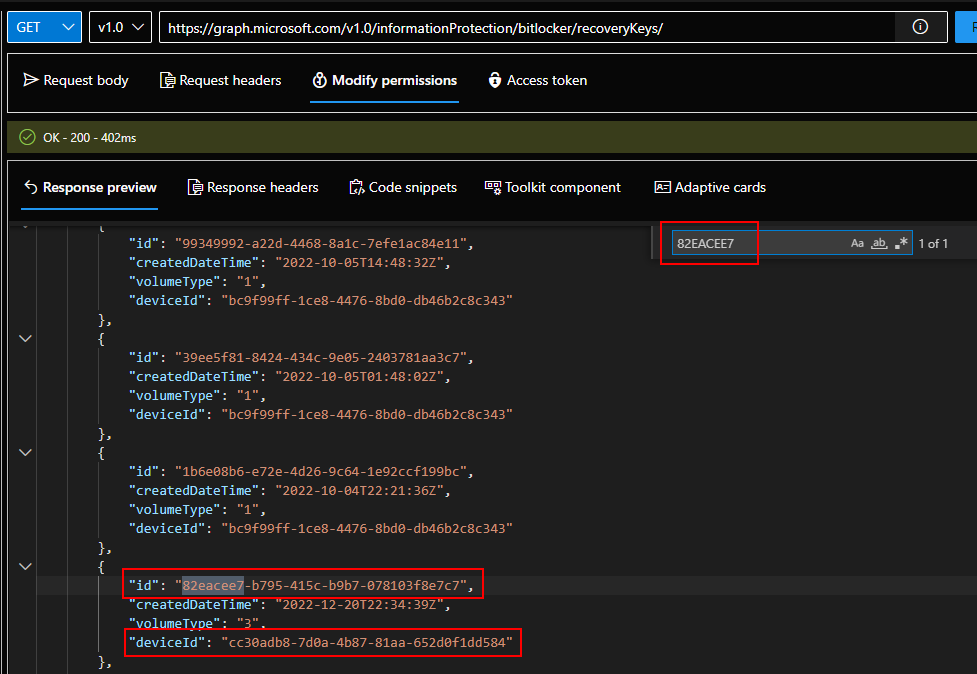
- After consenting, run the Query. All the Key ID’s with the device ID where they were encrypted should be returned, like the screenshot below:
- Press CTRL+F to search, and enter the value we recorded in step 2. In this example, we are searching for a key that starts with 82EACEE7. Our results show the full Key ID, along with the DeviceID for the device that encrypted the device:
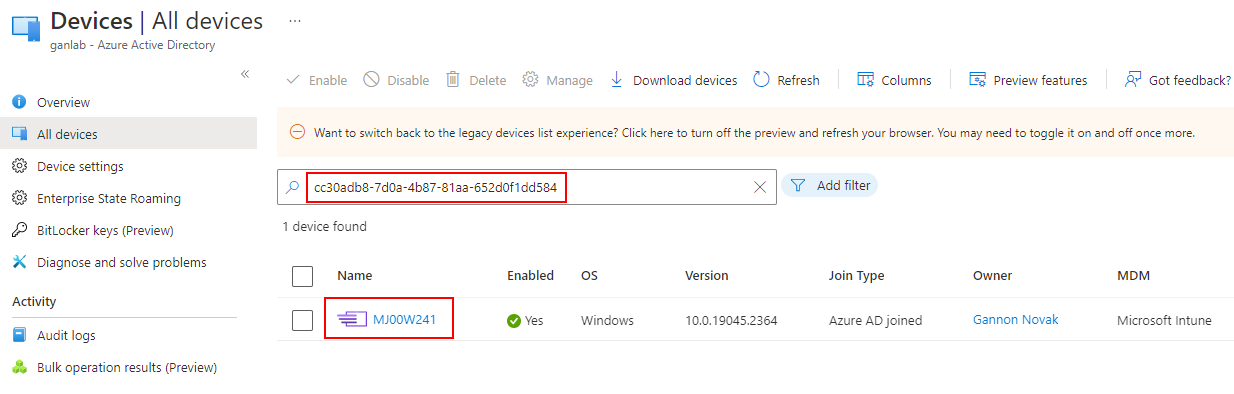
- Go to Azure AD, and search for the device ID that encrypted the drive. The device ID in our example is cc30adb8-7d0a-4b87-81aa-652d0f1dd584. This will return the device Object in the Azure AD GUI:
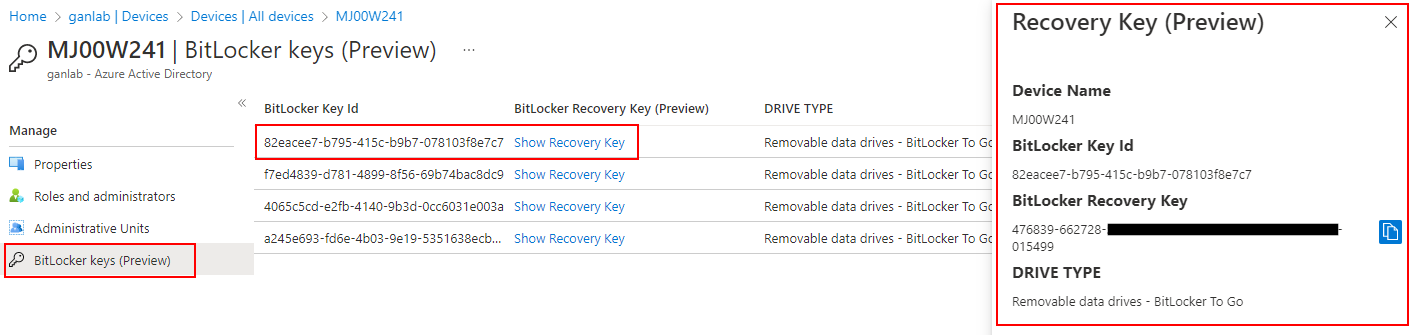
- Select the device, and then click on BitLocker keys. Find the Key ID, and the corresponding recovery Key to unlock the device: