Last updated on June 8th, 2022 at 11:22 am
This post will review how to make registry changes on target machines by utilizing Win32 apps. Several months ago I had to make some reg changes on remote machines. I had done this numerous times in the past with group policy or local scripts and figured it would be easy to whip up a script to import some reg settings, package it in a Win32 app, and deploy it without issues. I was running into issues though and couldn’t determine why my reg keys were missing after the deployment. This didn’t make sense at first, because the reg script worked perfectly if executed locally. After some troubleshooting I found an article describing that Win32 app install scripts are executed in 32-bit context. That gave me the idea to change my detection method for my Win32 app to associate with a 32-bit app on 64-bit clients.
Shortly after, the application showed as successfully installed, even though the reg keys were not where I wanted them. So, what happened? Well, the reg changes were deployed, but they ended up in the 32-bit WOW6432Node parent key (standing for Windows on Windows64). A detailed write up on 64-bit vs 32-bit Windows is found here – https://www.samlogic.net/articles/32-64-bit-windows-folder-x86-syswow64.htm. The Win32 app and script were working correctly. The changes were being deployed, but to the wrong key. I needed the install script to run in 64-bit context.
I located a great write up describing this exact situation – https://www.samlogic.net/articles/sysnative-folder-64-bit-windows.htm. After reading through this and doing some more testing, I was able to get the Win32 App script to run as a 64-bit program and add the registry keys to the proper parent key. Here’s how to accomplish this:
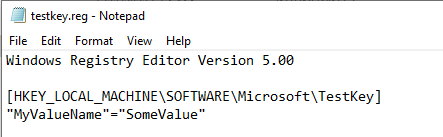
For this example, I want to add a key named “testkey” to HKEY_LOCAL_MACHINE\SOFTWARE\Microsoft. There is more than one way to accomplish this, but I will be using a reg file and importing it with PowerShell. Create your reg file with the keys/values you want to add. Here is my example reg file named testkey.reg:
Next, we need a vehicle to merge this reg file on our targeted machines. With PowerShell we can use reg import and name the fine install.ps1. Only one line is needed pointing to out reg file. Since this is a win32 app, we add .\ in front of our reg file to specify the reg file is in the current directory of the script:

Lastly, we need an uninstall script in the event we want to remove this registry entry from our targeted machines. We can use a PowerShell script to remove the keys/values and name it uninstall.ps1:

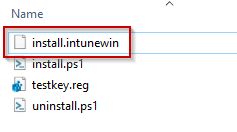
Now that all our files are created, wrap them as a Win32 App using the Win32 content prep tool (https://github.com/Microsoft/Microsoft-Win32-Content-Prep-Tool). Put all three of the files in the same directory. Run the Win32 content prep tool. Specify install.ps1 as the install file and set a destination for your intunewin file. I output it to the same directory:
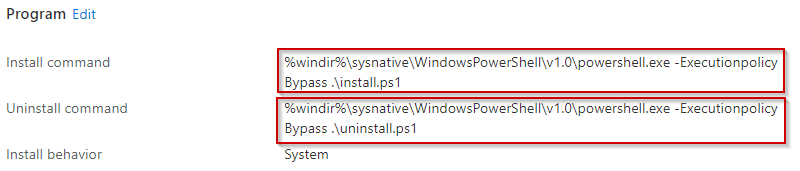
Create your Win32 app in Endpoint Manager and specify our install.intunewin file. Everything here is cookie cutter until we get to the install and uninstall commands. Fill out a name and any other fields you want until you get the install command. When we get here, we need the app to run in 64-bit context. To accomplish this, we use the hidden “sysnative” path. This will use the native OS architecture to open 64-bit PowerShell. Reading the two links above will shed some more light on this. You must use the sysnative path or this will not work. So, our install and uninstall commands look like this. Make sure you select System for the install behavior.
- %windir%\sysnative\WindowsPowerShell\v1.0\powershell.exe -Executionpolicy Bypass .\install.ps1
- %windir%\sysnative\WindowsPowerShell\v1.0\powershell.exe -Executionpolicy Bypass .\uninstall.ps1
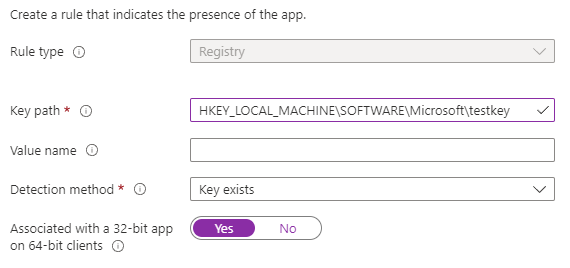
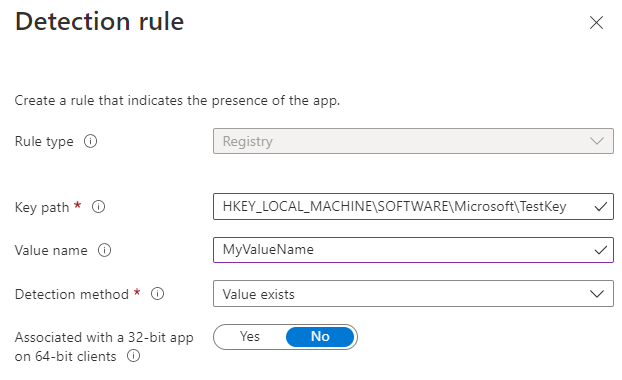
Add requirements, and when you get to the detection rule, use the key and value you are deploying. If you are deploying multiple keys/values, you can add more than one. Make sure you mark NO for associated with a 32-bit app on 64-bit clients. This tells it to look in the 64-bit registry. If we were to select YES here, it would look in HKEY_LOCAL_MACHINE\SOFTWARE\WOW6432Node\Microsoft. We don’t want that.
Finish creating the app and deploy it to your targeted groups. Since its deployed as a Win32 app, we can track deployment progress. If for some reason you have any local admins out there that try reverting or changing these registry entries, the Win32 app will change them back 🙂
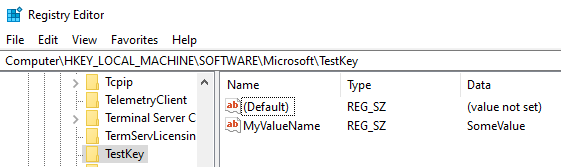
Here is a targeted machine with the registry value successfully created:
Pingback: Deploy Shared Network Printers (SMB) with Intune - SMBtotheCloud