You’re probably familiar with toast notifications in Windows. They are the notifications that pop up in the bottom right-hand corner of your screen. They can be purely informational or have action buttons to click, such as opening a website. I wanted to figure out how to create custom notifications and use the action buttons to perform certain tasks for the signed-in user, such as running a PowerShell script. A similar example is a recent post by Damien Van Robaeys (https://www.systanddeploy.com/2022/02/a-toast-notification-to-display-warning.html) to show a toast notification warning a user if their device has not been rebooted in a certain amount of days. It took me several weeks of on-and-off research and testing to get a solid understanding of how toast notifications work. The biggest hurdle for me was having the action buttons run PowerShell scripts. I broke this post into two separate parts since there is so much to cover. If you aren’t interested in what’s happening on the backend, and you purely want to start making custom toast notifications, I suggest you install the BurntToast PowerShell module and start using that. It was something I stumbled across when I began researching custom toast notifications. It’s a great module and uses simple commands to build and deliver a Toast notification. However, I wanted to figure out how toast notifications work and how to build them from scratch, so that’s what this post will mostly focus on.
This post is a compilation of much research and testing, and there were a few resources in particular that were a huge help. If you ever want to use custom toast notifications, I hope this covers all basic steps and save you time from doing a lot of R&D. This is a deep topic, and toast notifications can be much more complex than what is covered here. My goal was to make custom notifications and have the action buttons do more than simply launch a website (which is what they do in most cases). I wanted to run custom PowerShell scripts with the action buttons. We will review the nuts and bolts of toast notifications and then walk through setting up a toast notification to check if any 30+ day-old 500+MB files exist in the user’s downloads folder. The user will have three action buttons – 1. Open the user’s downloads folder, 2. Open a PowerShell Gridview of the affected files, or 3. Auto deletes those files. All files used in these posts are available on my github. Also, I understand Storage Sense is a better solution for cleaning up the downloads folder, but this is an easy example that can be modified to do other things. Here is everything this post will cover:
Part 1:
- Sources I used for my learning on this topic. There were a few community contributors who provided great learning content on toast notifications
- Toast Notification XML files and how to customize them
- Triggering a toast notification from PowerShell
- Running custom scripts from the action buttons and how to create a custom protocol handler
Part 2:
- Files needed for deploying toast notifications with Intune
- Deploying the needed files to our target machines
- Deploy custom toast notifications as a proactive remediation
- Deploy custom toast notifications as a scheduled task
- A Quick Review of the Burnt Toast PowerShell module
Let’s get into Part 1 of this post. I added a table of contents below since this is a longer-than-usual post:
Table of contents
Sources and Credits
Before I begin, I need to give some other people credit for the content they have out there. These contributors have great content which helped me learn about toast notifications.
- Josh King (Creator of the BurntToast module). Josh’s content is mainly geared toward the BurntToast module, but it also provides great insight into how Toast Notifications work in general.
- Ben Whitmore’s blog post on Toast Notifications with MEMCM also provides great information on Toast notifications and helped me figure out how to initiate a Toast Notification using PowerShell.
- Adam Driscoll – his module review of the BurntToast module also has details on creating a custom protocol handler. This allows us to run PowerShell scripts from the action buttons on the toast notifications.
Toast notification XML files and how to customize
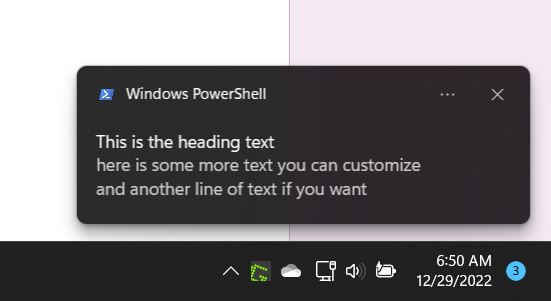
When I first dove into this, I had no backend knowledge of Toast notifications. I simply knew what they were. So, I had to start almost from scratch. The first step was determining how they are built. A Toast notification is simply an XML file that Windows reads to display the nice-looking notifications we receive. Remember, this is only the payload for the notification. We still need something to trigger or initiate the notification, which we get to in the next section. Additional info on the structure of the notifications and other features can be found here – https://learn.microsoft.com/en-us/windows/apps/design/shell/tiles-and-notifications/adaptive-interactive-toasts?tabs=xmlAt. The XML for a very basic Toast notification to show some text is displayed below:
<?xml version="1.0" encoding="utf-8"?>
<toast>
     <visual>
        <binding template="ToastGeneric">
            <text>This is the heading text</text>
            <text>here is some more text you can customize</text>
            <text>and another line of text if you want</text>
        </binding>
    </visual>
</toast>
This XML displays the toast notification below:
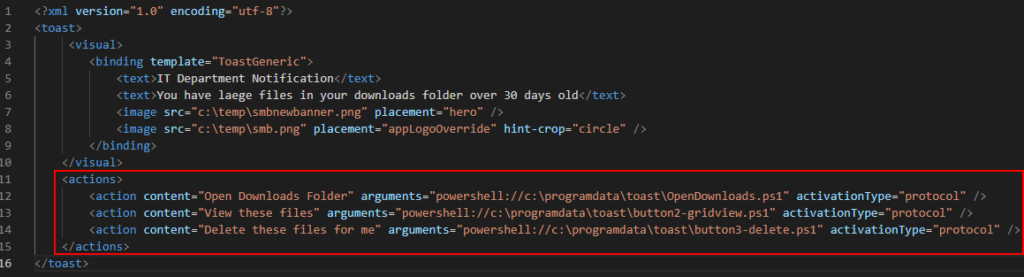
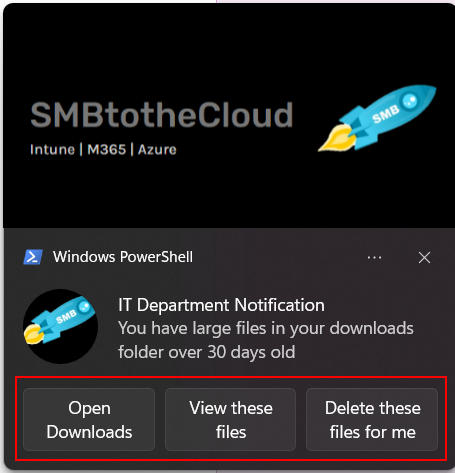
We can add many customizations to a Toast notification, but as previously mentioned, we won’t go too deep into this. What I wanted were some action buttons for scripts. I also wanted to make it look nice with some additional images. Something pertaining to your company or your IT department will make the notification appear more professional and real to the end users. The resulting XML I used to accomplish my goal is below along with a screenshot pointing to the various fields and how they’re displayed in the notification. A quick note on the hero image – the recommended size of the image is 364×180.
<?xml version="1.0" encoding="utf-8"?>
<toast>
     <visual>
        <binding template="ToastGeneric">
            <text>IT Department Notification</text>
            <text>You have large files in your downloads folder over 30 days old</text>
            <image src="c:\temp\smbnewbanner.png" placement="hero" />
            <image src="c:\temp\smb.png" placement="appLogoOverride" hint-crop="circle" />
        </binding>
    </visual>
    <actions>
        <action content="Open Downloads Folder" arguments="powershell://c:\programdata\toast\opendownloads.ps1" activationType="protocol" />
        <action content="View these files" arguments="powershell://c:\programdata\toast\button2-gridview.ps1" activationType="protocol" />
        <action content="Delete these files for me" arguments="powershell://c:\programdata\toast\button3-delete.ps1" activationType="protocol" />
    </actions>
</toast> 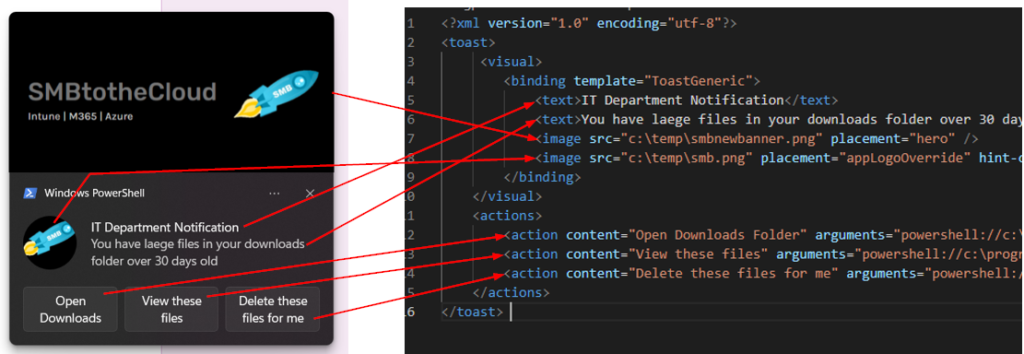
You can do more with your notifications if you’d like, but for me, this checked all the boxes for what I wanted and it’s easy to repurpose in the future.
Initiating a Toast Notification from PowerShell
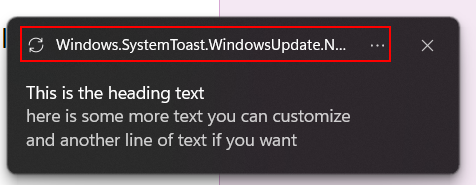
Now that we have our XML file, we need a way to trigger a toast notification. This is where Ben Whitmore’s blog post was a big help to me. We accomplish this with PowerShell by importing the ToastNotificationManager and XmlDocument Windows Runtime classes. This allows PowerShell to read the XML file and trigger a toast notification. This allows us to manually test our XML notification files – just make sure to change the $XMLString variable to the location of your XML file. The resulting PowerShell script to trigger a notification from our XML file is below.
$AppId = 'Windows.SystemToast.WindowsUpdate.Notification'
$XMLString = Get-Content -Path C:\temp\BasicNotification.xml
[Windows.UI.Notifications.ToastNotificationManager, Windows.UI.Notifications, ContentType = WindowsRuntime]
[Windows.Data.Xml.Dom.XmlDocument, Windows.Data.Xml.Dom.XmlDocument, ContentType = WindowsRuntime]
$ToastXml = [Windows.Data.Xml.Dom.XmlDocument]::new()
$ToastXml.LoadXml($XmlString)
$Toast = [Windows.UI.Notifications.ToastNotification]::new($ToastXml)
[Windows.UI.Notifications.ToastNotificationManager]::CreateToastNotifier($AppId).Show($Toast)
Note that we have an AppID variable. This is a required field and displays on the Toast Notification as the app where the notification came from. We can get a list of these by using the PowerShell command Get-StartApps. You can use the AppID value for the App you want to use as displaying the notification. I use Windows PowerShell as the app, but this quick example shows how we can change it to something else.
In our real-world example, we don’t want a notification triggering unless there is at least one file older than 30 days and larger than 500MB in the user’s downloads folder. Since my downloads folders in my lab have barely any items, I modified the script to be 1 day instead of 30 and 1 MB instead of 500 so I could properly test. You can adjust these values as needed. I also use PowerShell as the AppID in my script.
$DownloadsFiles = get-childitem -Path $env:USERPROFILE\Downloads -File -Recurse | Where-Object {$_.Length -gt 1MB} | Where-Object {$_.CreationTime -lt (Get-Date).AddDays(-1)}
$AppId = '{1AC14E77-02E7-4E5D-B744-2EB1AE5198B7}\WindowsPowerShell\v1.0\powershell.exe'
$XMLString = Get-Content -Path C:\temp\NotificationXML.xml
[Windows.UI.Notifications.ToastNotificationManager, Windows.UI.Notifications, ContentType = WindowsRuntime]
[Windows.Data.Xml.Dom.XmlDocument, Windows.Data.Xml.Dom.XmlDocument, ContentType = WindowsRuntime]
$ToastXml = [Windows.Data.Xml.Dom.XmlDocument]::new()
$ToastXml.LoadXml($XmlString)
$Toast = [Windows.UI.Notifications.ToastNotification]::new($ToastXml)
If ($DownloadsFiles.count -gt 0) {
    [Windows.UI.Notifications.ToastNotificationManager]::CreateToastNotifier($AppId).Show($Toast)
    }
Running Scripts from our Action Buttons & Creating a custom Protocol Handler
This part was a headscratcher at first, and for a little while, I didn’t think I’d be able to figure this out (or if it was even possible). I first attempted to simply point my XML action to open a program based on the file path. I then tried pointing it at a script to launch a program or run an action, but it continued to fail. As I continued to research, I discovered that toast notification actions rely on URL schemes, which rely on Protocol Handlers. Anything that does not have a protocol handler built into Windows needs a custom protocol registered. For example, Windows already knows what to do for URL schemes such as HTTP:// HTTPS:// FTP:// or FILE://. This basically tells the OS how to handle a URL with a defined protocol handler. So, we need to create one for powershell:// that can launch PowerShell scripts. This was not as easy as it sounds. After a while of testing and searching for help online, I found a YouTube video from Adam Driscoll that clarified everything for me. It is linked above, but the portion of the video from 4:30 – 7:45 clarifies using a PowerShell protocol handler. Another good explanation for using a protocol handler for PowerShell is here – Custom Protocol Handler and PowerShell (Part 2) – IT Constructors.
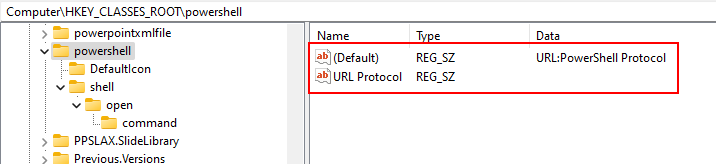
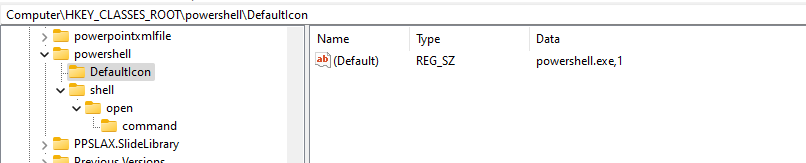
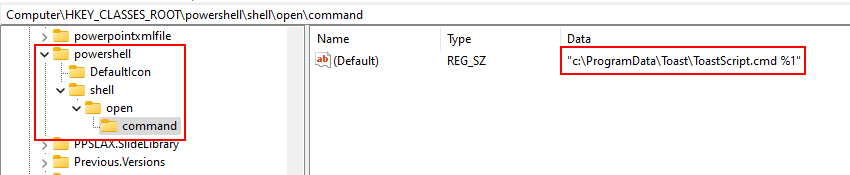
To create a custom protocol handler, we need to add some registry Keys. They will be placed in the HKEY_CLASSES_ROOT hive. The Reg File is below along with screenshots of the registry keys and values. The value under the command key is the script called (or program launched) when using the parent key in URL format. For example, PowerShell: or PowerShell://. We will use a CMD script to launch PowerShell. More clarification on all this is below. I did my best to simplify it since this was the most difficult part of this project (for me). Here are the reg keys needed when creating a custom protocol handler. I also have this available as a PowerShell script to add the keys and values on my github. Keep in mind you’ll need the command key default value pointing at your location of the ToastScript.cmd file.
Windows Registry Editor Version 5.00

[HKEY_CLASSES_ROOT\powershell]
@="URL:PowerShell Protocol"
"URL Protocol"=""

[HKEY_CLASSES_ROOT\powershell\DefaultIcon]
@="powershell.exe,1"

[HKEY_CLASSES_ROOT\powershell\shell]

[HKEY_CLASSES_ROOT\powershell\shell\open]

[HKEY_CLASSES_ROOT\powershell\shell\open\command]
@="C:\\ProgramData\\toast\\ToastScript.cmd %1"
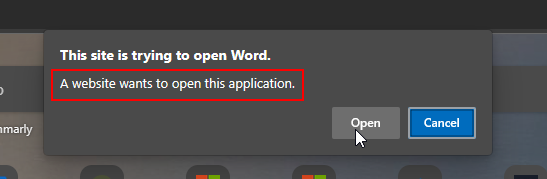
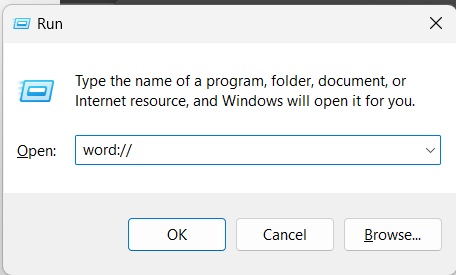
Before we move on, let’s take a step back and look at another example. A much simpler example is if we wanted to create a protocol handler that launched an application. For example, perhaps you want to send a weekly toast notification with a reminder to complete a timesheet or submit regular data to an application, and you wanted that application to open with a toast notification button. If we use Microsoft word as an example, we can make a protocol handler for word:// to launch Microsoft word:


After creating the above registry entries, if we use the word URL protocol (word: or word://) it will launch Microsoft Word. We can do this from a browser, PowerShell, or a Run prompt:

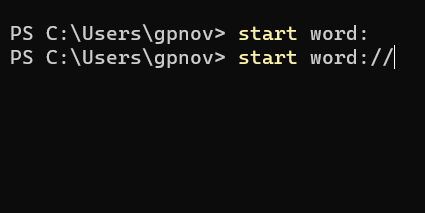
OK, so now that we have a basic understanding of protocol handlers (and there is much more to them, but this was as far as I needed to go for what I needed to accomplish), let’s get back to how PowerShell it’s being launched for our custom protocol handler. Since we want to run actual scripts, we need a way to pass those scripts to the custom protocol handler. Here is our ToastScript.cmd file, which is what runs when the PowerShell:// URL protocol is called.
powershell.exe -WindowStyle hidden -NonInteractive -NoLogo -NoProfile -Command "& '%1'.Replace('powershell://', '').Trim('/')"The script launches PowerShell with some additional parameters to keep it hidden. The key to how this works is the -Command “& ‘%1’.Replace(‘powershell://’, ”).Trim(‘/’)” portion of the script. The %1 variable in the registry value (see below) passes our PowerShell:// URL and additional test after the // into the script where the ‘%1’ variable is.

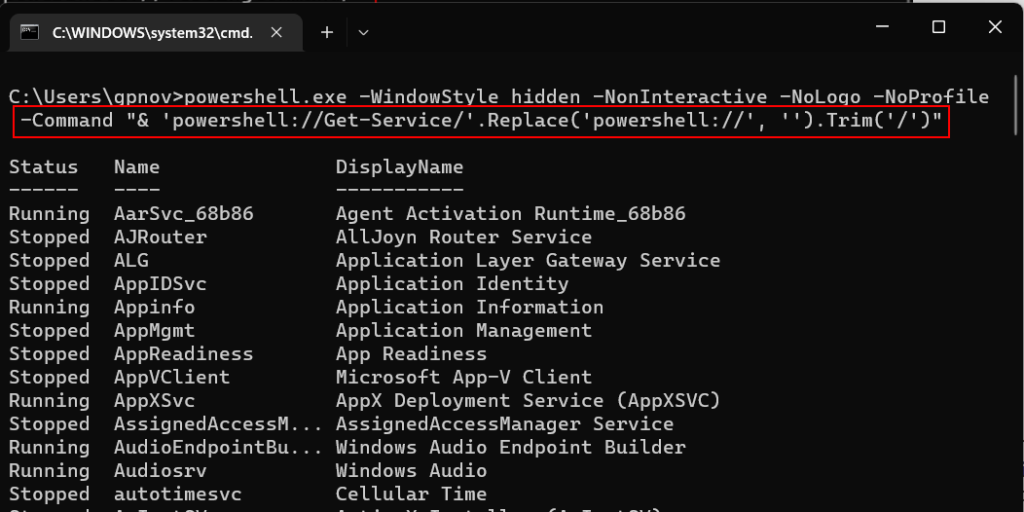
We can see how the script interprets this if we remove the .Replace(‘powershell://’, ”).Trim(‘/’)” part of the script, add a pause at the end, and then try passing some characters. An example is below. I’ve shortened the toastscript.cmd so it no longer contains “.Replace” and everything after, and added a pause so the window stays open and we can see what happens. You can see below the URL “powershell://testingcommand” was successfully passed into our toastscript.cmd in place of the %1 variable.
powershell.exe -WindowStyle hidden -NonInteractive -NoLogo -NoProfile -Command "& '%1'
Pause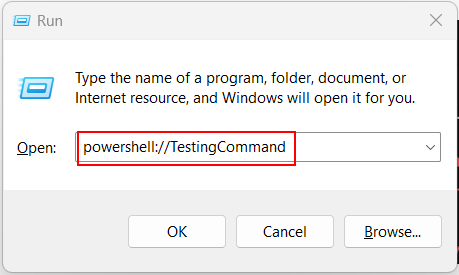
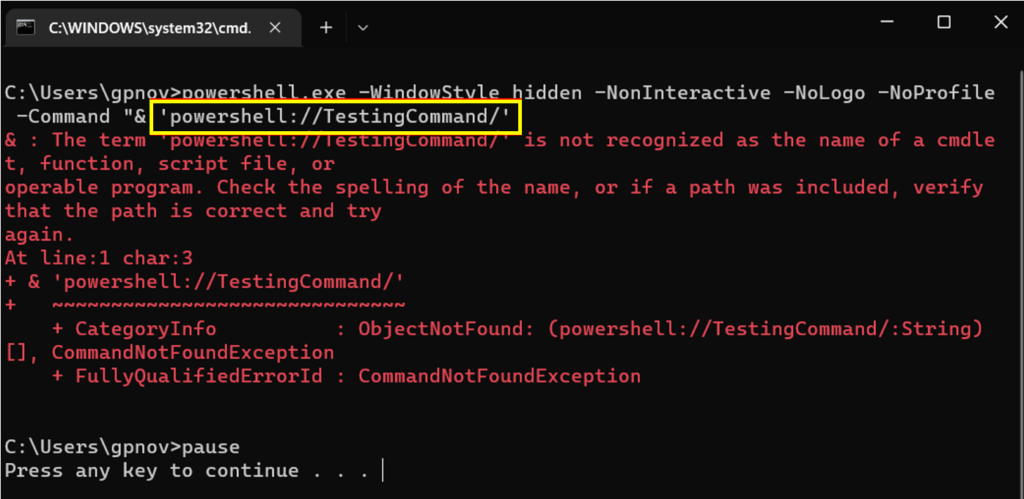
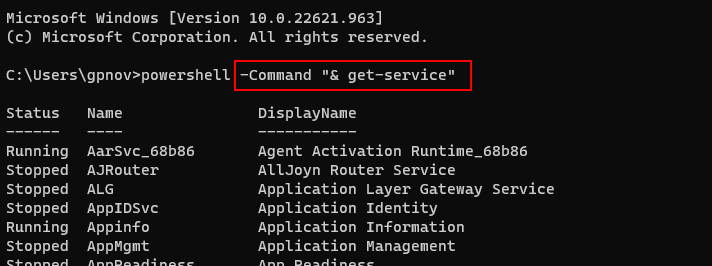
Now that we have tested the script and passed the variable so we can see it’s working correctly, We need to strip some of the characters out so it represents real PowerShell syntax. If we consider the example above, we need to get rid of these highlighted characters – ‘powershell://TestingCommand/’ which will then leave us with only what we add after the URL handler – powershell://TestingCommand. To accomplish this, we add the .Replace(‘powershell://’, ”).Trim(‘/’)” back to our script, which will remove our unneeded characters. To demonstrate, we will use the get-service cmdlet. Our complete toastscript.cmd is shown below along with the example. I am leaving the pause in the script so we can see the output, but remember to remove the pause once you’ve tested successfully.
powershell.exe -WindowStyle hidden -NonInteractive -NoLogo -NoProfile -Command "& '%1'.Replace('powershell://', '').Trim('/')"
pause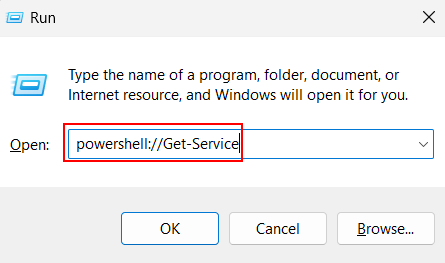
We can see that our test cmdlet was successful. The above picture really ends up from the Windows command line like this in the background:
This is what will be happening in the background for our toast notifications if the action buttons are clicked. The only difference is instead of our action buttons calling specific cmdlets, we will be pointing to a .ps1 file to run a script. Hopefully, now you have a basic understanding of this. It took me a lot of testing to fully understand how this all works together. Now that we understand how the scripts work with the protocol handler, let’s call the scripts we want to run for our toast notification action buttons. I have three that I am going to use:
- Open the user’s downloads folder
- Open a PowerShell gridview of the affected files
- Automatically delete the affected files
I should note that although the file protocol handler (file:) can open file paths in file explorer, it was failing to open when I was using variables like %username% or %userprofile% in the XML file. For that reason, I am using a PowerShell script to open the user’s downloads folder. Here are our scripts:
Open the logged-in user’s downloads folder:
Invoke-Item $env:USERPROFILE\DownloadsOpen a PowerShell Gridview of the affected files – The size and age of files here should match our script from above. I have it set to 1 day and 1 MB for testing purposes
get-childitem -Path $env:USERPROFILE\Downloads -File -Recurse | Where-Object {$_.Length -gt 1MB} | Where-Object {$_.CreationTime -lt (Get-Date).AddDays(-1)} | Select-Object Name,@{Name="MegaBytes";Expression={"{0:F2}" -f ($_.length/1MB)}},LastWriteTime | Out-GridView -Title "Select multiple files by holding CTRL. Click OK to delete. Click Cancel to close." -PassThru | Remove-ItemAuto-delete affected files – Same as above. Make sure your age/size here is the same as our script to detect if a notification should be triggered:
get-childitem -Path $env:USERPROFILE\Downloads -File -Recurse | Where-Object {$_.Length -gt 1MB} | Where-Object {$_.CreationTime -lt (Get-Date).AddDays(-1)} | Remove-Item -ForceThe script files will need to be placed on the local machine somewhere (or on a network share if the device will always have a line of sight). In this example, I have them in the c:\programdata\toast directory. Next, we edit our XML file. The Content field contains the names of the action buttons, and arguments contain the action to take if the button is clicked. Notice how we are using the URL protocol handler we created earlier. Clicking the buttons injects our .ps1 action script paths into our ToastScript.cmd file, which executes the action script. Test your notification out by triggering it with PowerShell to make sure the buttons are displaying properly and the scripts trigger when clicking the buttons.
Here it is an action:
That was a long section, but now we have working buttons that run specific scripts on our Notifications. Now we need to deliver this to our target machines via Intune. That will all be covered in Part 2. Thanks for reading.