Last updated on December 27th, 2023 at 12:25 pm
When organizations want to secure their company data but still allow employees to use personal mobile devices (Android/iOS), the best option is to use MAM (Mobile Application Management). MAM is accomplished by using an App Protection Policy along with a Conditional Access Policy. You can use MAM in conjunction with MDM, but this post will focus on how to implement it for unmanaged personal mobile devices. At a high level, MAM allows you to manage the data within an application. For example, you can restrict personal devices to only use the Outlook App for company email, which allows you to control how the company data is used within the Outlook app. You can also remotely wipe the company data on a personally owned device in the event someone is terminated or leaves the organization. This post has been broken down into four sections:
- How MAM works and why a conditional access policy is required
- Creating the app protection and conditional access policies in
MEMIntune - The user experience after MAM is implemented
- How to wipe company data from a user’s personal device
- Monitoring App Protection Status and Troubleshooting sign-ins
How does MAM work?
MAM is all about controlling data within an application. The controlling of the data in a specified app happens with the enforcement of an App Protection policy. This allows you to choose the apps where you have control over company data. You can create and apply an app protection policy and apply it to users and it will work on its own. However, the issue when using an app protection policy without conditional access is there is no true enforcement of the app protection policy. For example, you can assign an app protection policy to a user, but it will only apply if the user is using a compatible app (e.g. – Outlook). They’d still be allowed to add their work account to the native mail app, which is not protected by the app protection policy. This is why we need to use a conditional access policy, also. The conditional access policy will Require that users access company data from an app that can be protected by an app protection policy. This includes the most common Microsoft Apps (list of apps here). Once the CA policy is assigned, users will only be allowed to access corporate data from an application if an app protection policy is assigned.
The key to how all this works is what Microsoft calls the “broker application” on the mobile device. This is the Microsoft Authenticator app on iOS and the Company Portal app on Android devices. Microsoft has a well-written description of how this all works here, but at a high level, think of the broker app as a translator between the device and Entra ID. When the app protection and conditional access policies are enforced against a user, the user will not be able to access company data until the broker app is installed (they’ll be prompted to install it if it’s not installed). The broker app’s job is to retrieve the app ID of the app trying to sign in to access company data. It relays that appID to Entra ID to determine if the app trying to access the company data is an app that can be protected by an app protection policy. If so, it allows the sign-in to proceed and applies the app protection policy. If not, it blocks the sign-in. A few other important notes are below:
- Users targeted by the policies still need a valid Intune license for the app protection policy and at least an Entra ID P1 license for the conditional access policy.
- One of the requirements for using conditional access is that a device is REGISTERED to AzureAD. This is not the same as MDM enrollment. Users will be prompted to register their device.
- There is a common misunderstanding that users need to authenticate through the company portal app and enroll their devices for MAM to work properly. This is NOT true. The broker app simply needs to be installed – that’s it. I recommend blocking personally owned devices from being enrolled in Intune to prevent accidental enrollments.
Creating the app protection and conditional access policies:
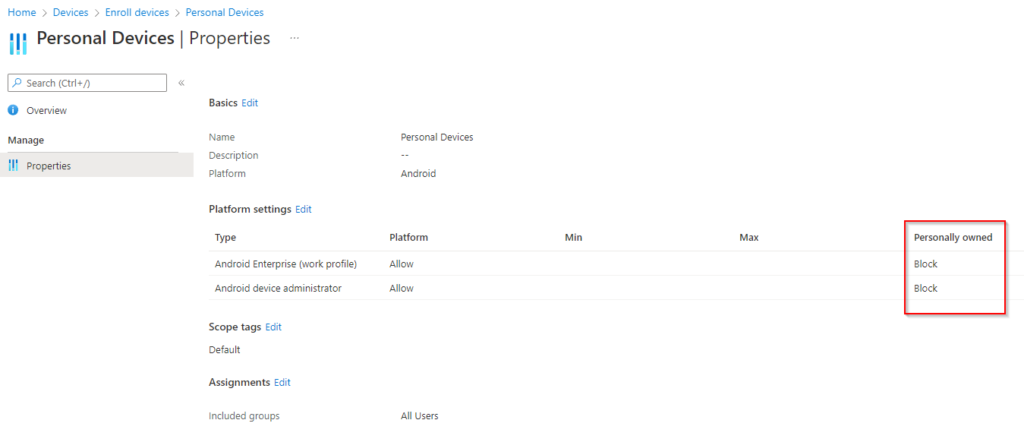
Before we create the policies, if you want to prevent users from enrolling their personal devices in MDM, we can make a device enrollment restriction for personally owned Android/iOS devices. Navigate to Devices > Enroll Devices > Enrollment device platform restrictions. Create an Android and iOS policy to block enrollment of personally owned devices:
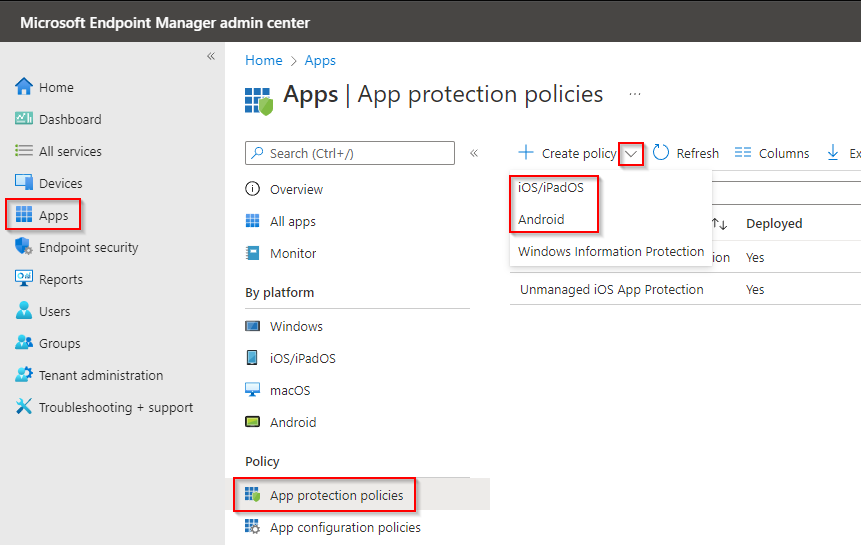
Now we will create our app protection policy. This is the policy that can control how company data is handled within approved applications. In Intune, navigate to Apps > App protection policies. Click create policy, and select iOS or Android. For this post, I’ll chose Android, but the settings are almost identical:
Name your policy. When we get to the apps selection, we want to select unmanaged devices so we are targeting personally owned, non-MDM devices. If you’ve used MAM in the past, you may notice that this next section to target apps on device types has recently changed. Existing policies will continue to work how they did, but newly created policies do not allow you to change the device type. We used to be able to specify that the policy only targets unmanaged devices, but we can’t do that anymore. See below:
The old way where we can target Unmanaged devices directly in the policy:

The new way where it is greyed out:
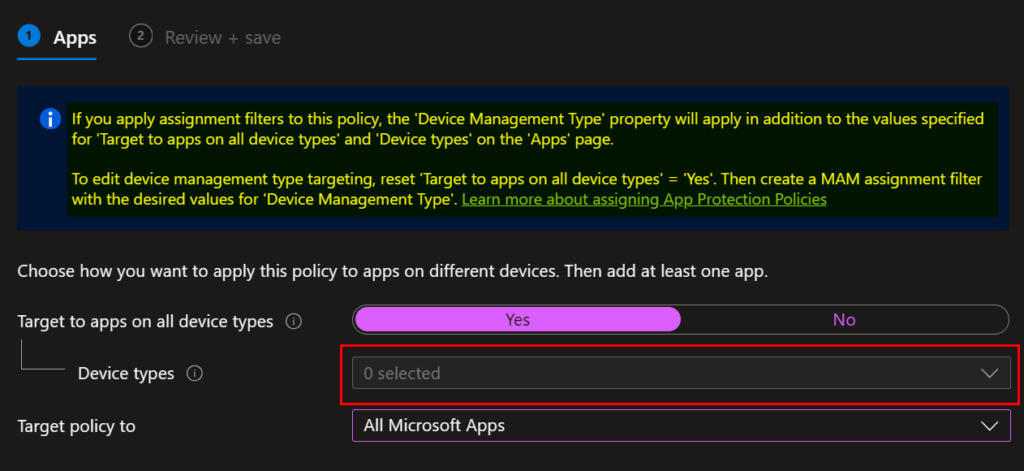
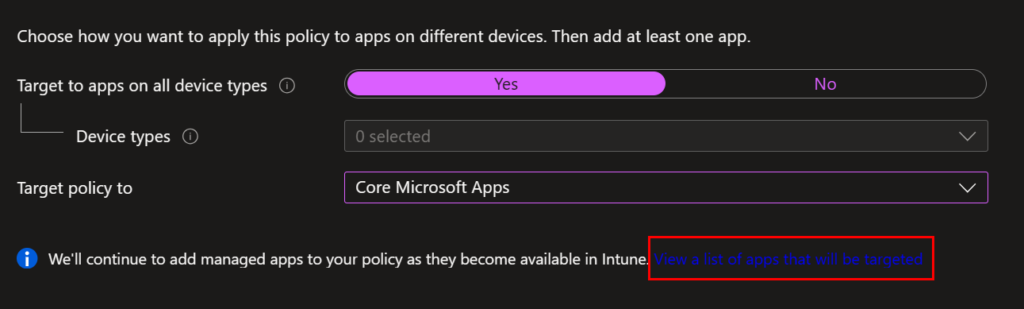
We can see a notification that’s basically telling us to make a filter. In my opinion. this notification and the link they provide just make things more confusing. What this is telling us is that you need to select “yes” for Target to all on all device types (even if you select No, the device types drop-down remains greyed out). This means that regardless of the device management type (managed/unmanaged), the app protection policy will apply. To ONLY target our unmanaged devices, we need to use ap app filter for devices. We will get there later, for now, let’s continue with our policy creation. Before continuing, select which apps you want to target your policy against. In most situations, selecting all Microsoft Apps or Core Microsoft apps is sufficient. If you’re unsure of the difference between the selections, make a selection and then click the link to “View a list of apps that will be targeted”. Continue after making a selection.
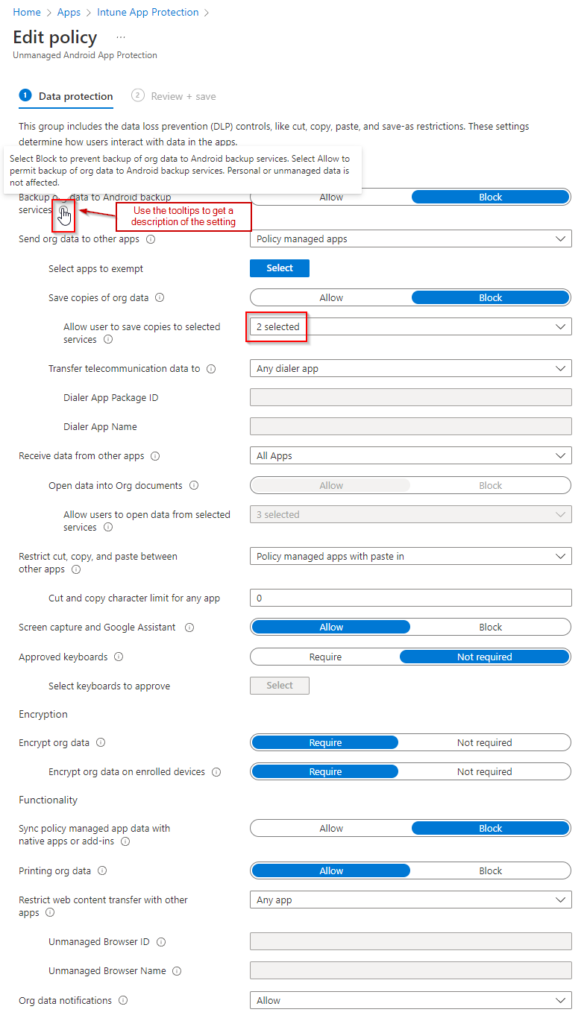
The data protection settings allow us to control how data is managed within the targeted applications. This includes things like allowing copy/paste, printing org data, and saving copies of data. You can set these how you want, but the below image is a good template you can start with. The tooltips next to the settings give a good description if you are unfamiliar. The two selected apps that allow users to save copies of data are SharePoint and OneDrive.
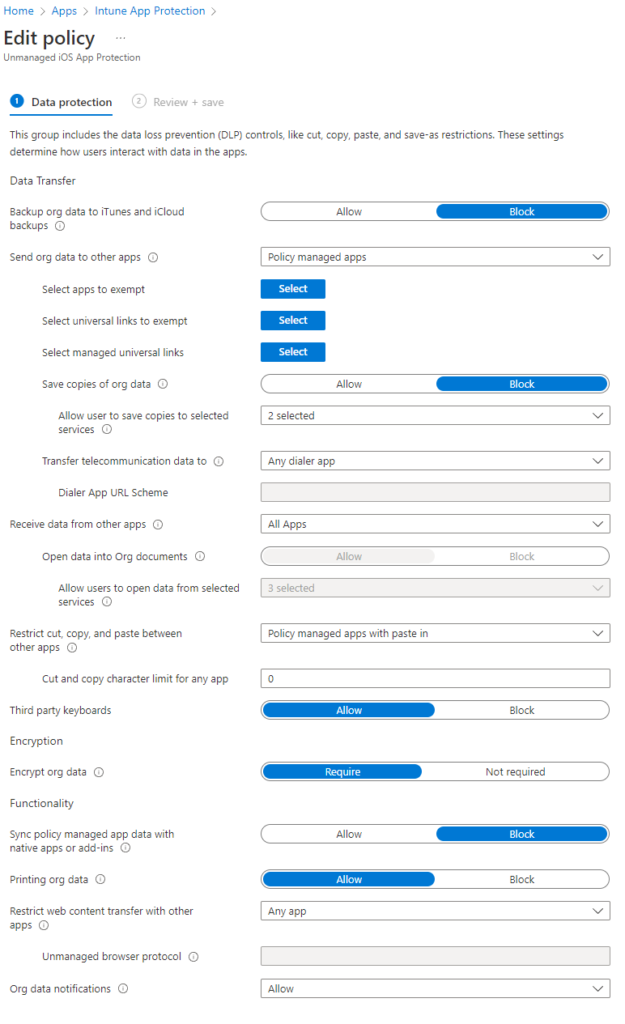
Here are the equivalent iOS policy settings. The defaults are left for the selected apps to exempted and managed apps/links:
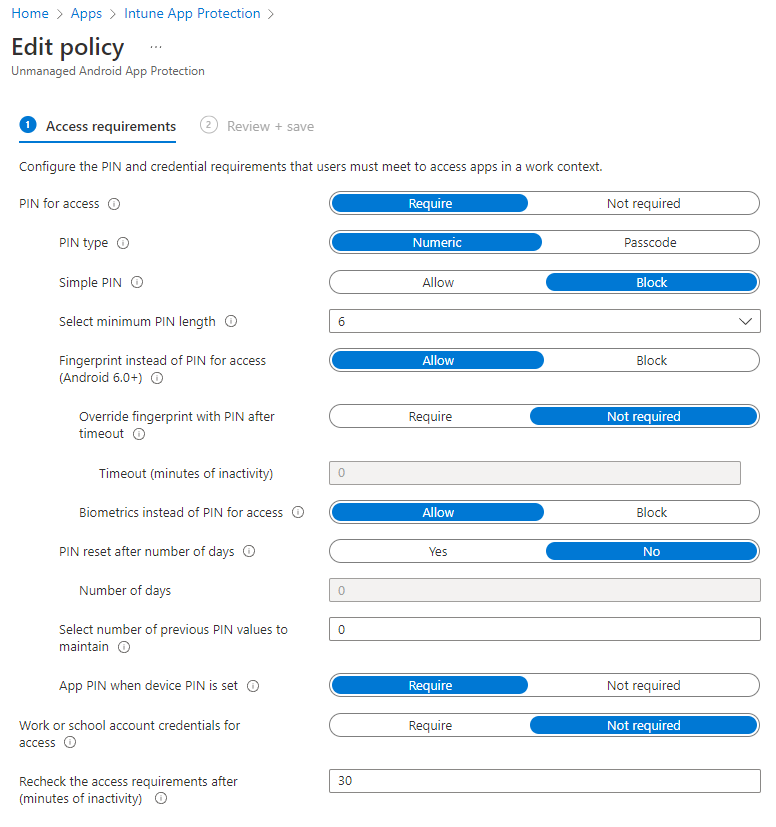
Next, we need to configure access requirements. These are the settings used to allow access to the app containing the company data. It is good practice to require a PIN so we can ensure that even if a user does not have a passcode on their personal device, accessing the Apps containing the company data will require a passcode. This can be overridden with a biometric if they have a biometric unlock on their device.
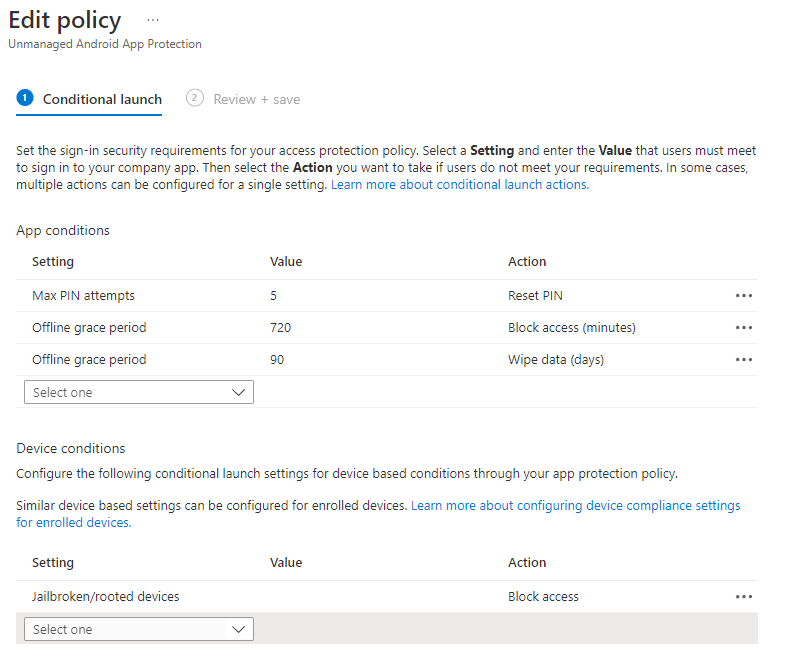
Lastly, we can edit the conditional launch settings. These are pretty self-explanatory. Click next to continue and move on the the assignments section.
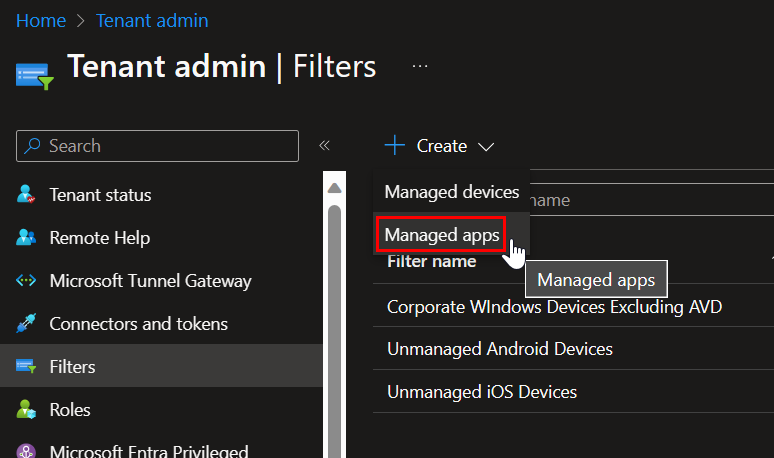
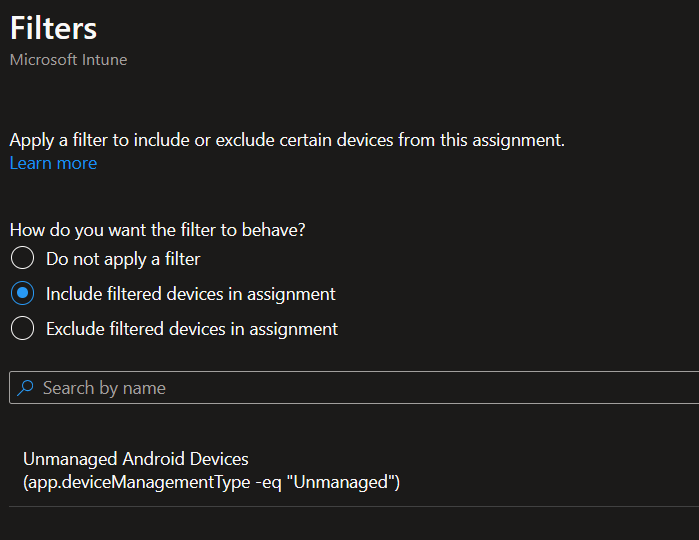
We’ll want to make a filter before we assign the new app protection policy. This is so we can specifically target unmanaged devices. If you’re following along, do this in a new tab, or finish your app protection policy but don’t assign it until you have the filter created. To create a filter, navigate to Tenant Administration > Filters. From the drop-down, we want to create a managed app filter.
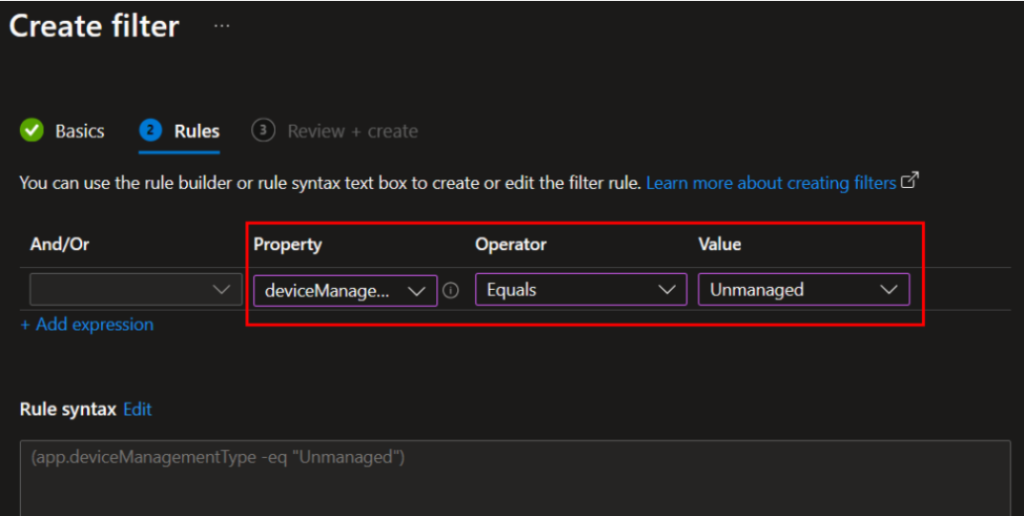
Provide a name for your Filter (e.g. – Unmanaged Android Devices) and click next. For the filter rules, create a rule specifying device management equals unmanaged. Save the finish creating the filter. Repeat the process so you have a filter for both iOS and Android devices.
Once your filter is created, we can assign the app protection policy. Assign your policy to your target group and then click the Edit Filter link:
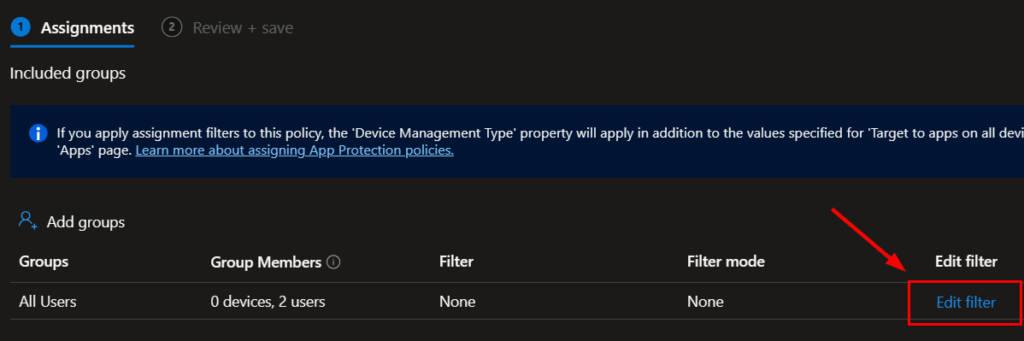
Select to include the filtered devices in the assignment and select your filter for unmanaged devices:
That completes the App Protection Policy portion. Now we need to make a Conditional Access Policy to enforce our App Protection Policy:
Conditional Access Policy
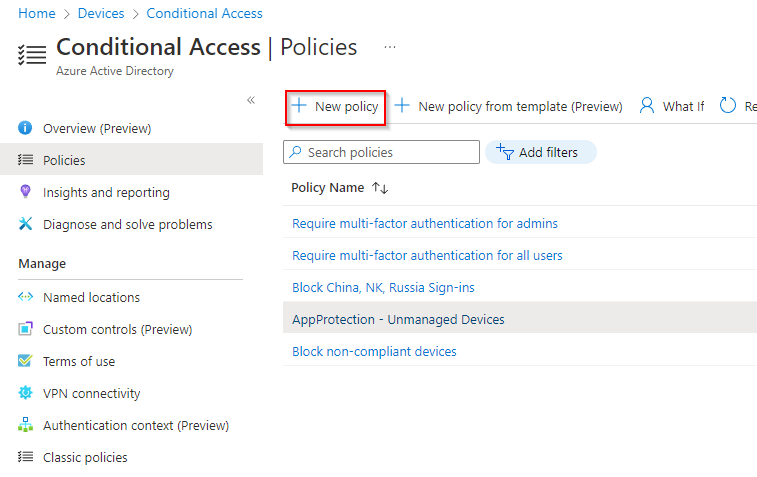
From Intune, Navigate to Devices > Conditional Access, and click New Policy:
Name your policy and navigate to the users or workload identities tab. Select the user group you want to assign the policy to. In most situations, you’ll select all users and then make any necessary exclusions in the exclude tab.
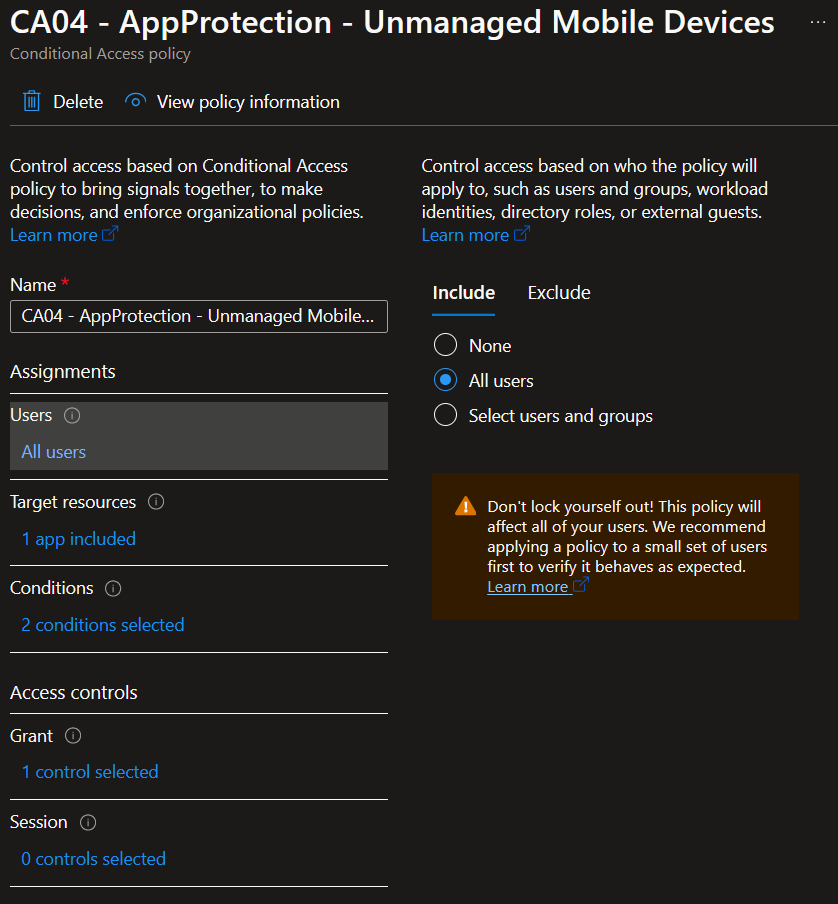
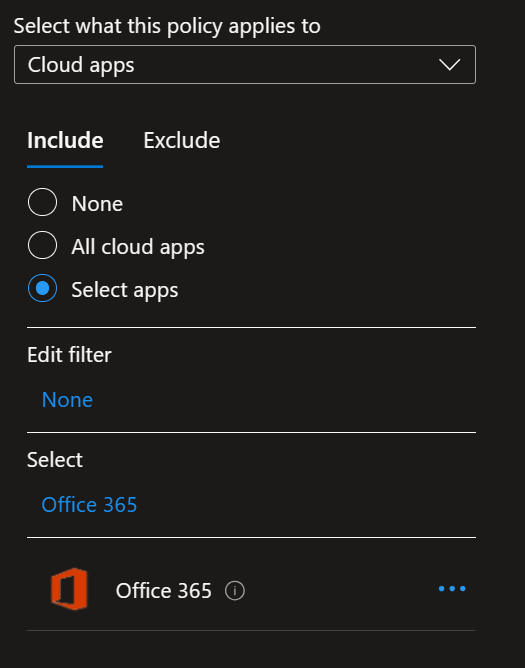
Next, select Office 365 from the cloud apps or actions tab. A list of the apps included in the Office 365 selection can be found here – Office 365 App in Conditional Access reference – Microsoft Entra ID | Microsoft Learn.
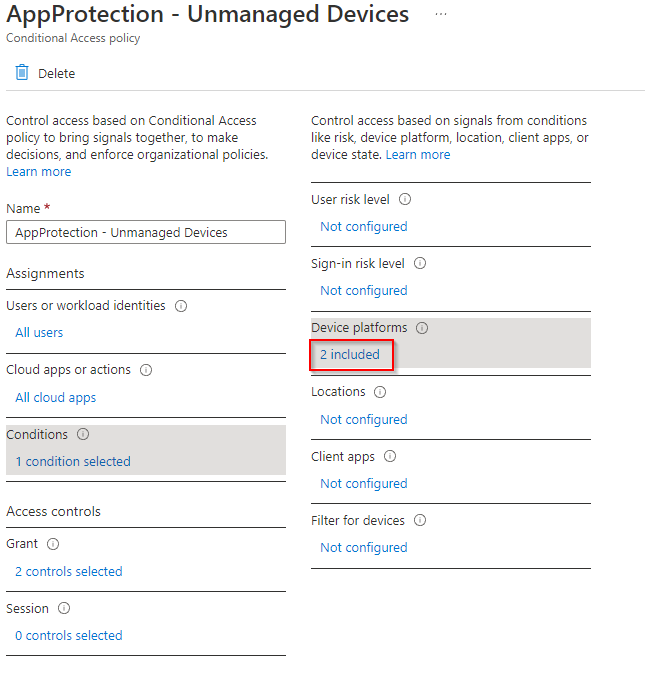
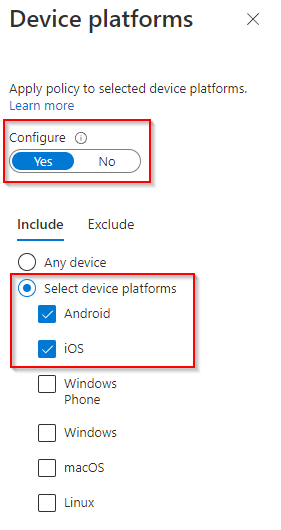
In the conditions tab, we need to set the device platforms to Android and iOS:
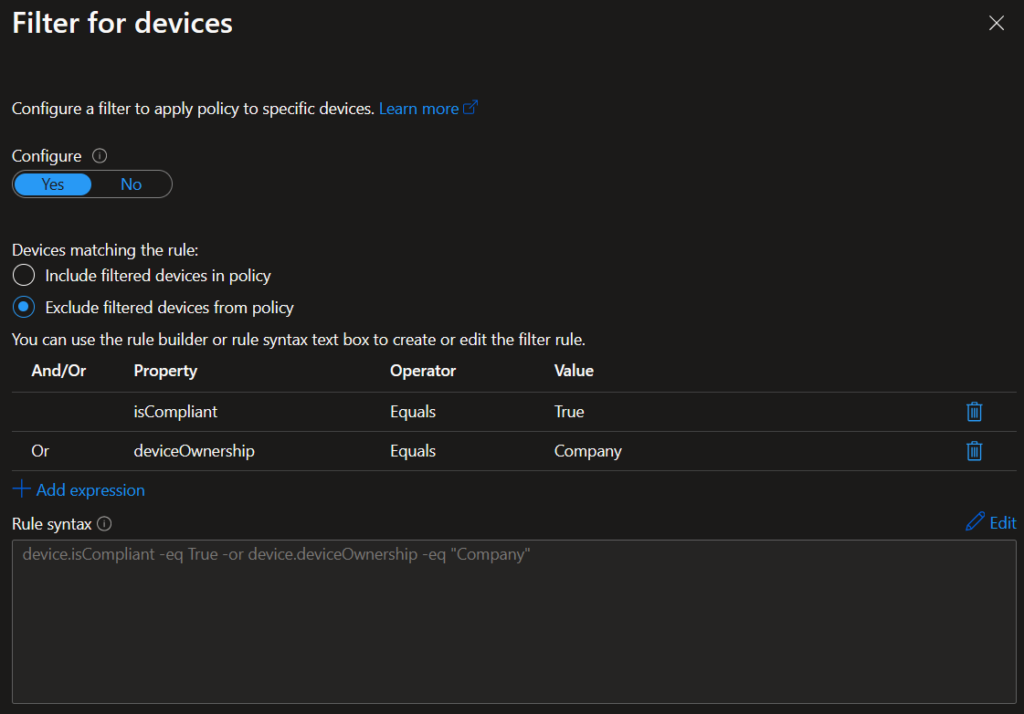
We also need to filter for devices since we only want to target unmanaged devices. Under conditions > filter for devices, we want to exclude company-owned MDM devices. We’ll choose to exclude filtered devices from the policy. You can either exclude compliant devices or exclude those that have ownership of company:
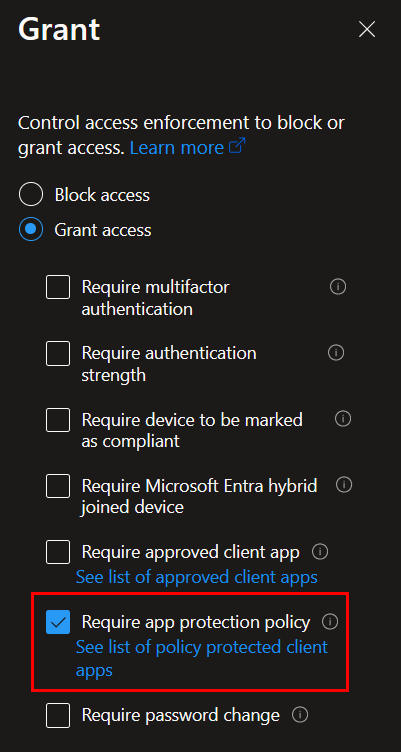
Under Access controls, configure grant access to require approved client app and require an app protection policy. For a list of client apps that support this setting, check this link.
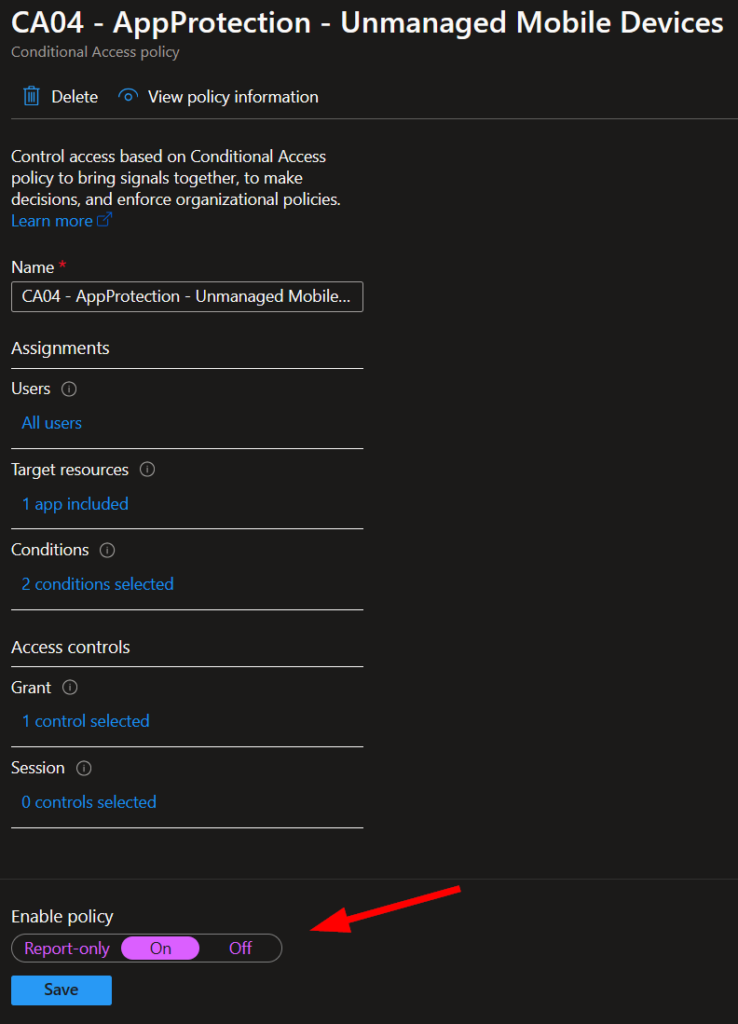
Lastly, review your policy and enable it when you’re ready:
That concludes the creation of the app protection and conditional access policies. Let’s look at the user experience in the next section.
User Experience after policies are applied:
Since I only have an Android device to test this on, that will be shown in this section. However, the iOS process is very similar. The main difference is iOS can use the Microsoft Authenticator app as the broker app, but Android must use Company Portal. The user experience is almost the exact same.
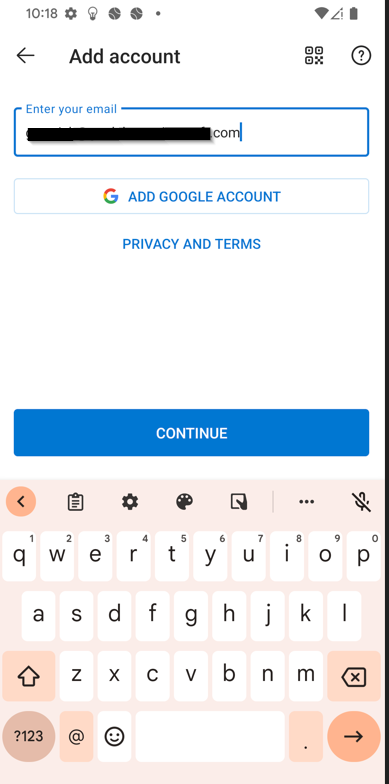
We will start from the beginning when a user tries adding their work account to the Outlook app. Have them sign in with their credentials:
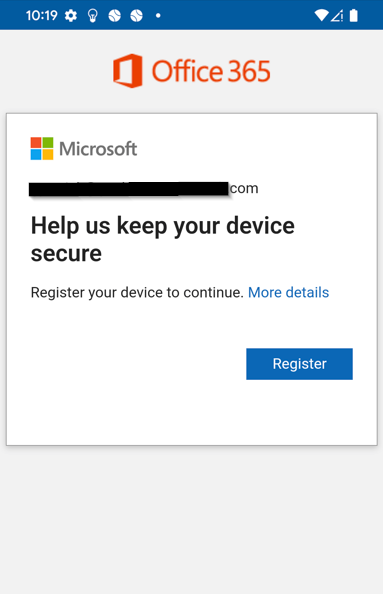
After signing in, they will be required to register the device. Remember, this is not MDM enrollment, its just registering the device with AzureAD.
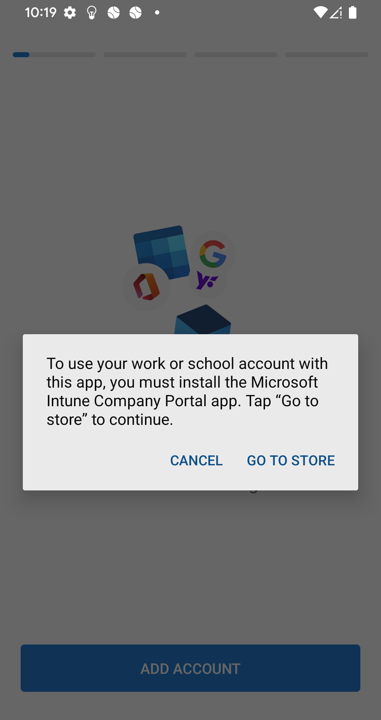
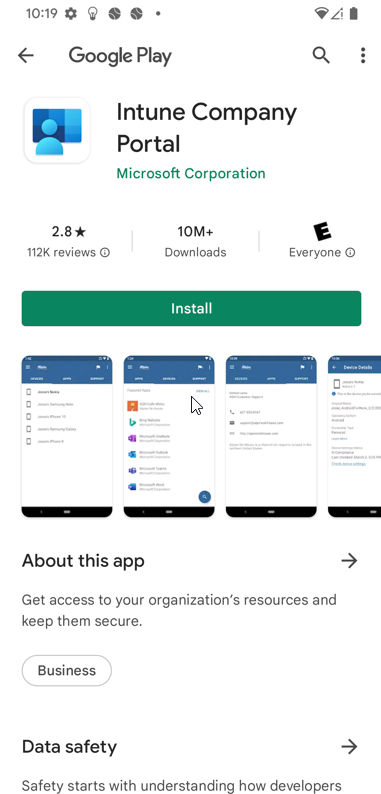
When the device registration completes, you will be notified that you need to install the Company Portal app to continue (unless its already installed). If the user was previously signed into the Outlook app before the MAM policies were applied, this is what they will receive the first time they open the Outlook app. Tap go to store:
Install the company portal app:
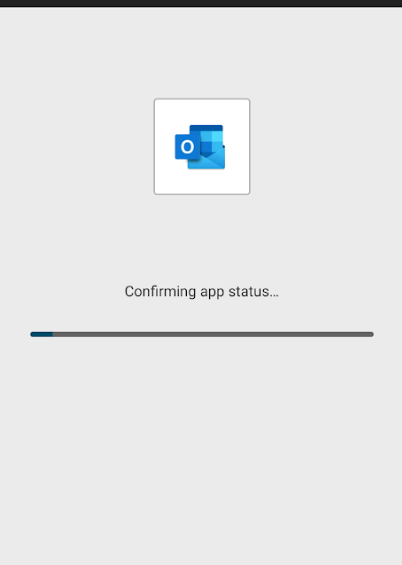
When Company Portal finishes installing, it should redirect you back to the Outlook app. If not, open the Outlook app again. Outlook will show a screen for 5-10 seconds confirming app status:
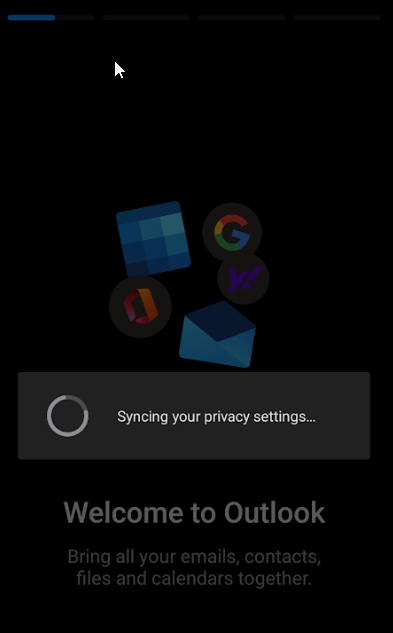
Next, it will show syncing privacy settings for another several seconds:
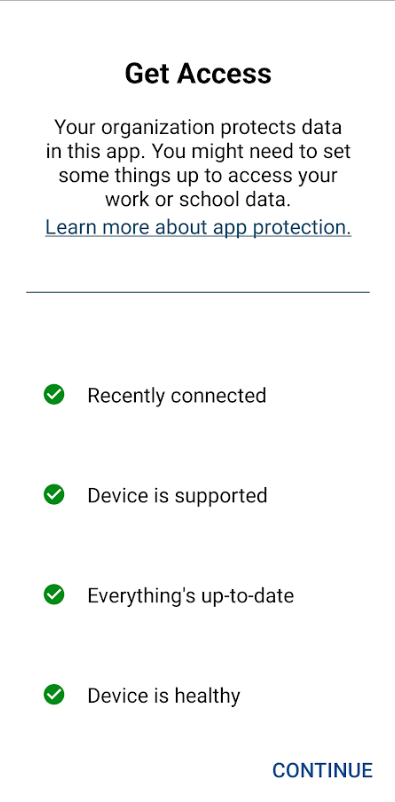
A screen like the one below will show up next informing the user that the organization is protecting data in this app. Tap continue:
The last step before they user can use the app is to set a PIN. This is specified in the app protection policy. In the app protection policy we made above, biometric authentication can be used in place of the PIN after the PIN is set:
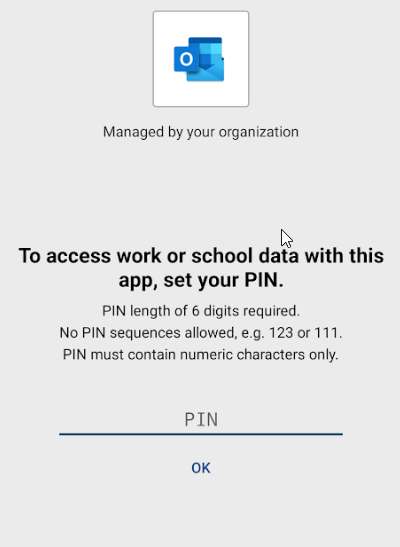
Once the PIN is set, the user can begin using the app.
Wiping company data from a user’s personal device:
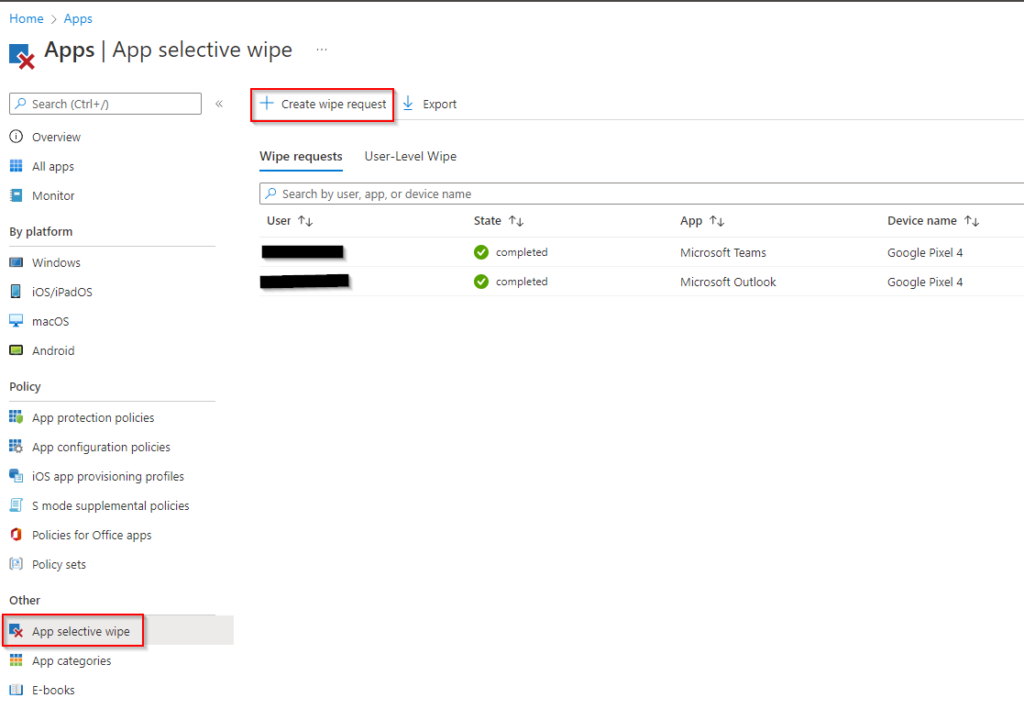
In MEM, navigate to Apps > App selective wipe > Create wipe request:
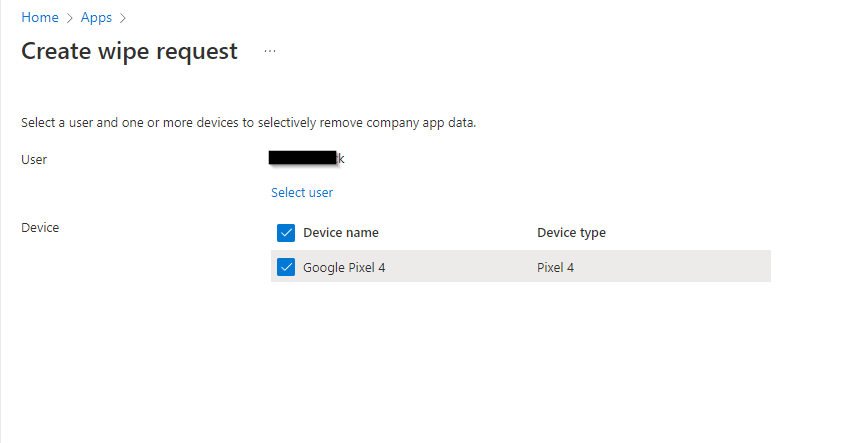
Select the user, and any associated user devices will show under Device. Select the device you want to wipe the company data from. Click create after the device is selected.
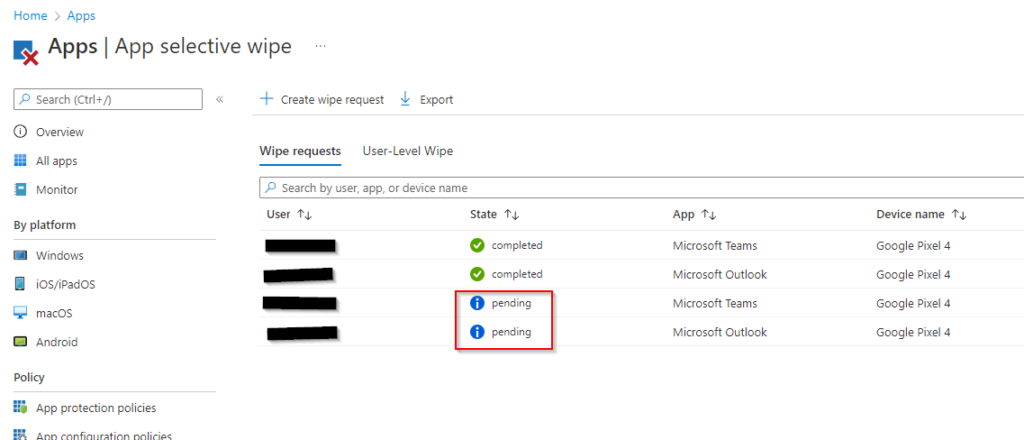
The wipe request will show as Pending until the application checks in next. Microsoft says this usually takes 30 minutes. In my testing it took just over an hour:
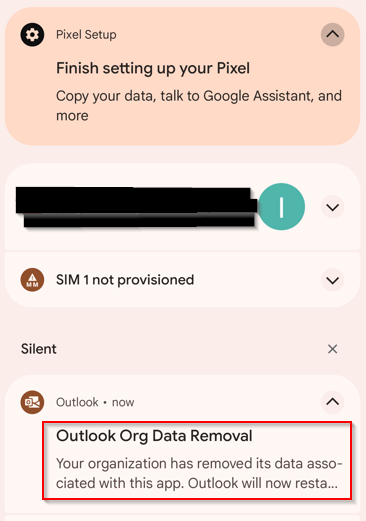
When the data is wiped from the device, the account is removed from the app, and the user will receive a notification on their device that the organization data has been removed. The wipe request will then show as complete in MEM:

Monitoring App Protection Status & Troubleshooting sign-ins
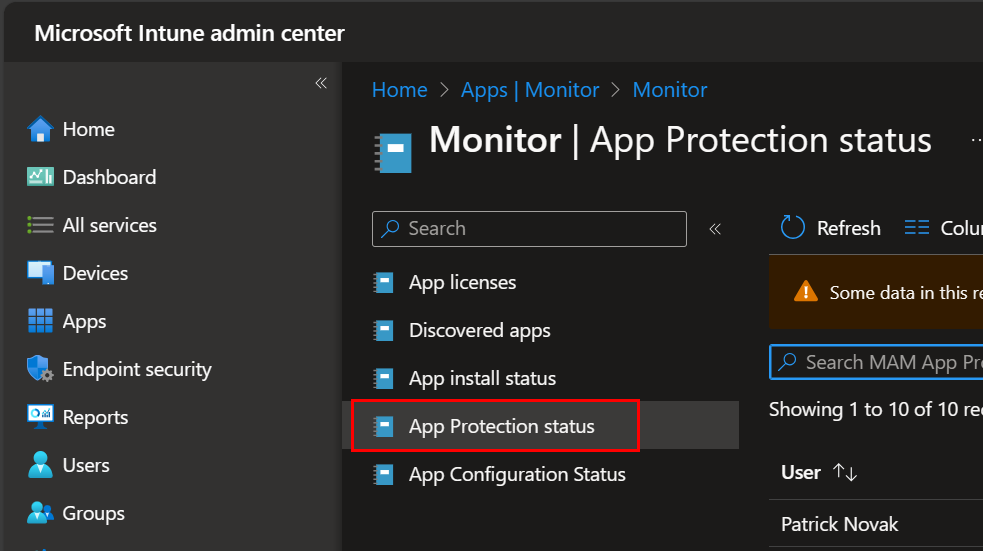
One weaker area of MAM is monitoring and reporting. Remember, when we’re targeting unmanaged devices, we will get minimal insight into the device itself since its not enrolled in MDM. We can still see some details, though. Such as the user, their device model, and the apps they’ve authenticated to that are protected by an app protection policy. Navigate to Apps > Monitor > App Protection Status:
From here, we can see a list of users with a bunch more details on the device type, if it’s managed, if it’s protected by an app protection policy, etc. There are a bunch of columns so a screenshot won’t display nicely in this post. This can be exported to a CSV and cleaned up, because it’s a busy report.
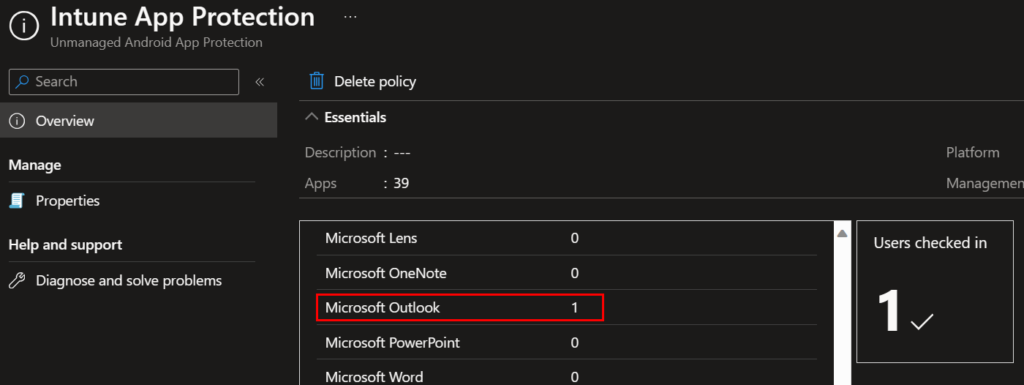
You can grab a quick overview of the number of users that have the App Protection policy applied from the App Protection Policy overview page. Although, this is not very useful since you can’t see specific users. You only get a count:
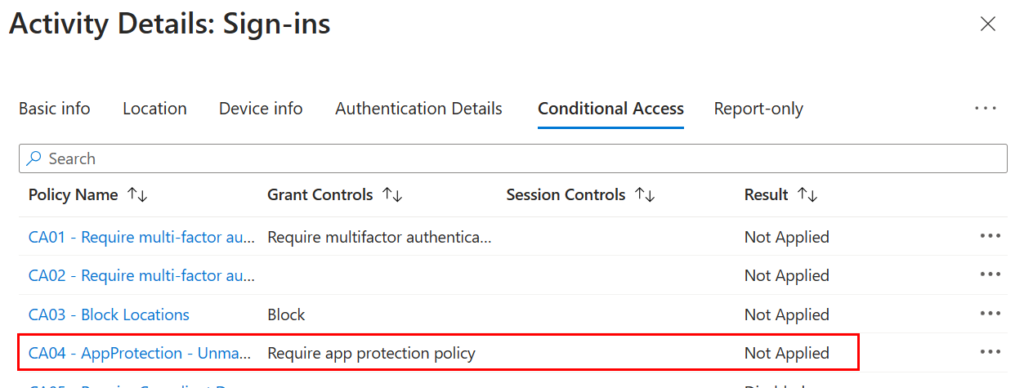
Lastly, let’s look at some common issues when trying to get users set up with MAM. I’ve seen users get caught in either an authentication loop or their apps force close right after trying to access them. In the vast majority of user issues, they either don’t have the broker app installed or reinstalling the client app will resolve the issue. Always make sure they have the authenticator app for iOS, or the Company Portal app for Android installed. If they’re still having issues, we can verify their sign-in attempt is hitting Entra and make sure a different conditional access policy is not conflicting. Here are two separate sign-in logs for a user. One of them is from an unmanaged device, and the other is from a managed device. Find the user who is having issues in the Users tab, and then select Sign-in logs to view their recent authentication attempts.
Here is the sign-in log from the managed device. We can see that the conditional access policy did not apply because the authentication came from a compliant managed device. We’ll see that the device type is managed and compliant from the device info tab:
And that the CA policy was not applied due to our device filter rule.
If we click on that CA policy from the sign-in logs, we can get more details and it will show us the device ID, and show us the device matched the filter, so it wasn’t applied:

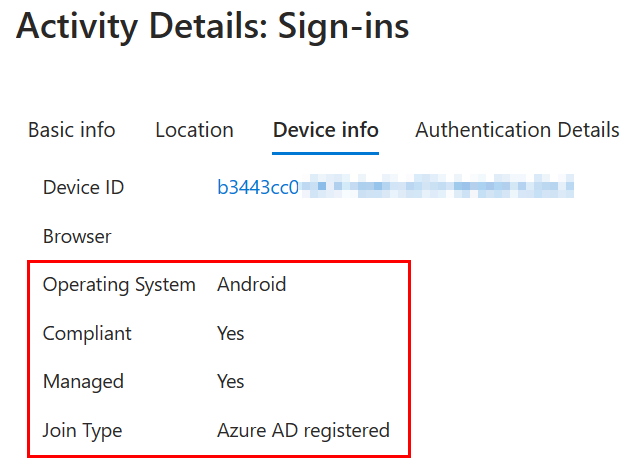
And the sign-in from an unmanaged device. Clicking the conditional access tab we can see the CA policy to require an app protection policy was successful. You can also look here for any CA policies showing failed if the user is having issues.
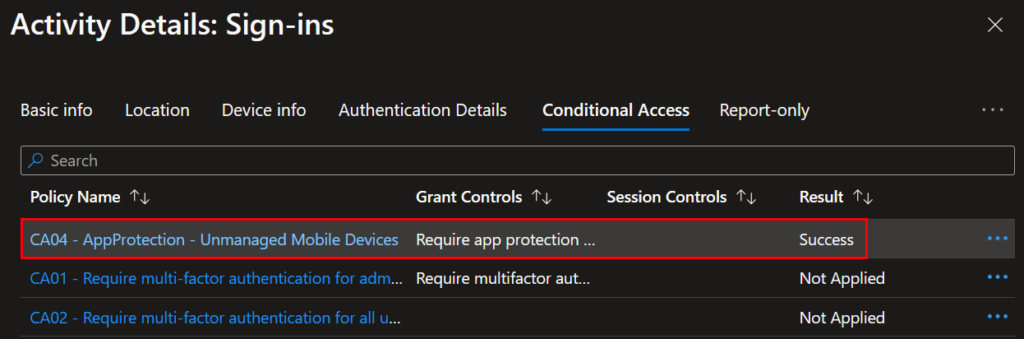
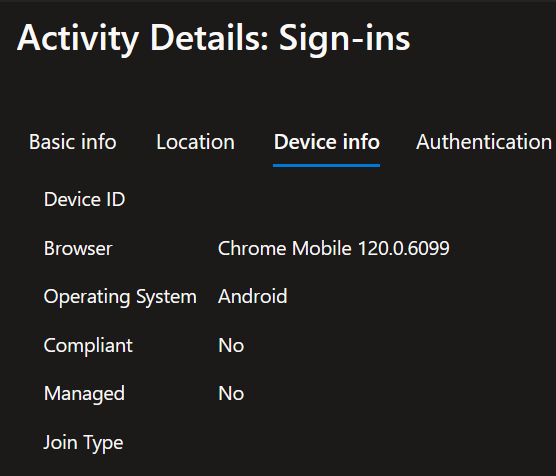
And the device information for this device shows that it is unmanaged, which applies to our conditional access policy filter.
That is all. Hopefully this helps you understand MAM and assists with your implementations.
Pingback: Endpoint Manager Newsletter – 8th July 2022 – Andrew Taylor