Intro
Several months ago I read a blog about exporting and importing Intune configuration profiles and policies between tenants (Export & Import Intune policies and configuration using Graph API (cloudsecuritea.com). This method worked well and saved a lot of time, but this method doesn’t work for settings catalog profiles. Now that settings catalogs are the preferred way to deploy most configurations, I’ve converted almost all of my configuration profiles to settings catalogs. I’ve been searching for a way to export/import settings catalogs, but continued to come up empty, and couldn’t find anything that did exactly what I wanted. While searching a few months ago, I found a blog about how to use the Edge developer tools to capture details about the graph API calls (this was before the graph x-ray tool was available). I can’t find that blog post now, so it looks like it may have been taken down. I figured this was a good place to start, and started by trying the graph x-ray tool. I hit a dead end with x-ray pretty quickly, and then moved on to exploring the edge developer tools. That is where I finally found a solution for this and was able to turn it into a PowerShell script. This post will describe how I came to this solution, show you how to export your settings catalog profiles using the Edge developer tools, save and edit them as JSON files if you’d like, import them into other tenants using PowerShell, and how to bulk import multiple policies with one script. Here is a quick gif showing how quickly you can import two profiles with PowerShell:
Exporting / Importing settings catalogs
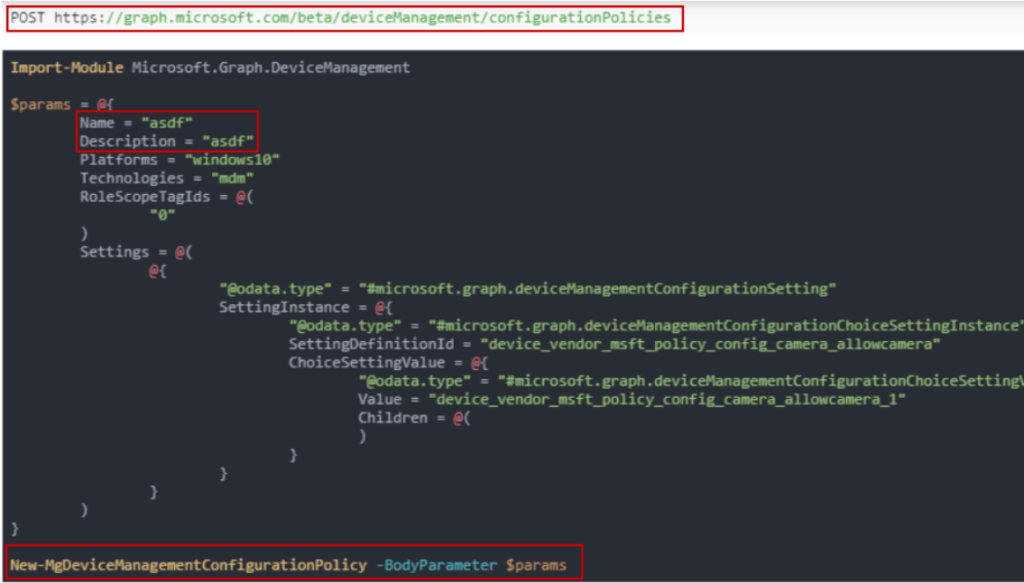
I went back into my MEM tenant and started poking around MS Graph X-Ray. At first, I thought this would be easy after seeing the exact PowerShell syntax to run when I created a test policy with the name asdf (see x-ray output below). But…. when I tried manually connecting to graph and running this in PowerShell, Set-MgDeviceManagementConfigurationPolicy was not recognized even after installing the Microsoft.Graph.DeviceManagement module. Googling didn’t provide much help either. That cmdlet isn’t even listed in either module:
- Microsoft.Graph.DeviceManagement.Actions Module | Microsoft Docs
- Microsoft.Graph.DeviceManagement Module | Microsoft Docs
I eventually gave up with graph x-ray and started exploring the Edge developer tools to see what else I could find. You can open the Edge developer tools be pressing CTRL+SHIFT+I, or selecting More Tools > Developer options from the settings drop down. I felt like if I could get the JSON from the PUT/POST requests, I could try importing the JSON with a POST request to create a new settings catalog profile. I learned a lot from this experience, specifically using the network tab in Edge developer tools (Inspect network activity – Microsoft Edge Development | Microsoft Docs). It’s a lot messier than using the graph x-ray extension, but you can see the graph API requests. After some experimenting and testing, I had an idea of what I was looking. In the network tab of the developer tools, I started capturing network activity, edited one of my settings catalog policies, saved the changes, and stopped the network activity capture. As I mentioned, depending on the length of your capture, you may have hundreds of log entries to choose from. It can get messy. Luckily, there is a search tool (there is also a filter tool once you know what you’re looking for). I typed the beginning of my policy name (Device – Time Zone) to see what pulled up. I knew I wanted to find the PUT request for the for that profile. The search returned three results, one of which was the PUT request. You can see below where the search bar is, and the PUT request in the header details. Note: You don’t need to make a change to the policy to get these results. All you need to do is edit the configuration profile and click review + save without making changes. You will still see a PUT request with no changes made to the profile.

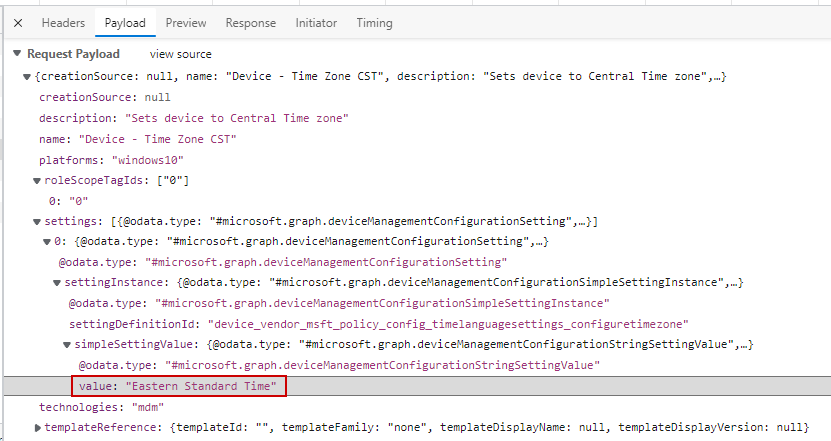
Now that we have the correct request, if we navigate to the Payload tab, we can see the data sent in the request. If you expand settings, you’ll see the settings values. Normally this policy sets the time zone to Central, but I changed the value to Eastern when I edited the policy to make sure I had the correct request data:
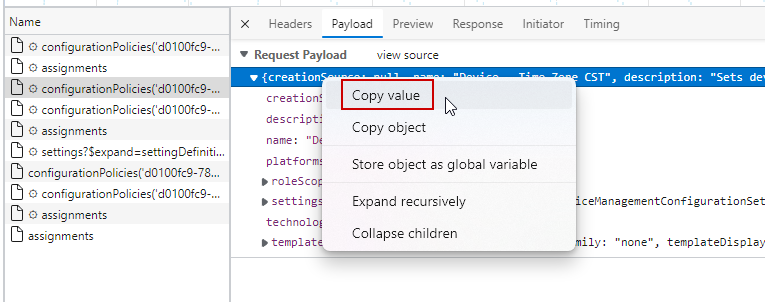
Next, we need to extract this data somehow. The Edge developer tools makes this easy. If we right click the top line of the payload, we can select copy value.
Paste the results into an editor and safe the file as a .json. Your file should look like this:
{
"creationSource": null,
"name": "Device - Time Zone CST",
"description": "Sets device to Central Time zone",
"platforms": "windows10",
"technologies": "mdm",
"roleScopeTagIds": [
"0"
],
"settings": [
{
"@odata.type": "#microsoft.graph.deviceManagementConfigurationSetting",
"settingInstance": {
"@odata.type": "#microsoft.graph.deviceManagementConfigurationSimpleSettingInstance",
"settingDefinitionId": "device_vendor_msft_policy_config_timelanguagesettings_configuretimezone",
"simpleSettingValue": {
"@odata.type": "#microsoft.graph.deviceManagementConfigurationStringSettingValue",
"value": "Eastern Standard Time"
}
}
}
],
"templateReference": {
"templateId": "",
"templateFamily": "none",
"templateDisplayName": null,
"templateDisplayVersion": null
}
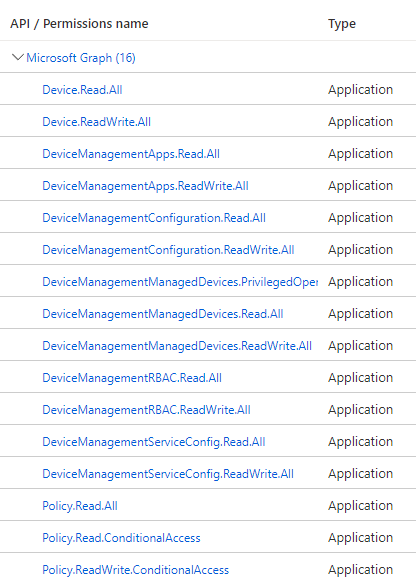
} Now we have a JSON file with the settings catalog configuration. We can attempt to import this into Intune and see if it creates another device configuration profile. Before we can do that, we need to make an app registration so we can connect to the graph api. In my previous post, I described how to automate this with a PowerShell script. The app registration I use for this is the same one I use for importing/exporting other Intune policies, so there are some more permissions assigned than what is necessary for this exact task. Its available on github. Refer to my previous post if you want to use this script, otherwise, manually create your app registration and generate a secret key. The API permissions my app uses are below:
Once you have your app created and permissions assigned (and given admin consent), we can try importing our JSON file. I’ll break down the sections of the script. First, we have to connect to graph using the app registration we created. When you run the script, you will be prompted for the client/appID, Secret Key, and tenant ID:
param(

  [Parameter(mandatory = $true)]

  [String]$client_Id,

  [Parameter(mandatory = $true)]

  [String]$client_Secret,

  [Parameter(mandatory = $true)]

  [String]$tenant_Id

)


$Body = @{

  Grant_Type    = "client_credentials"

  resource      = "https://graph.microsoft.com"

  client_id     = $client_Id

  client_secret = $client_Secret

  }


$ConnectGraph = Invoke-RestMethod -Uri "https://login.microsoft.com/$tenant_Id/oauth2/token?api-version=1.0" -Method POST -Body $Body
Next, we need to upload our JSON file we saved from the Edge developer tools. First, we need to set a variable to pull the contents of the JSON file. I have the JSON file in the same location as my script. Adjust the path to your json file accordingly:
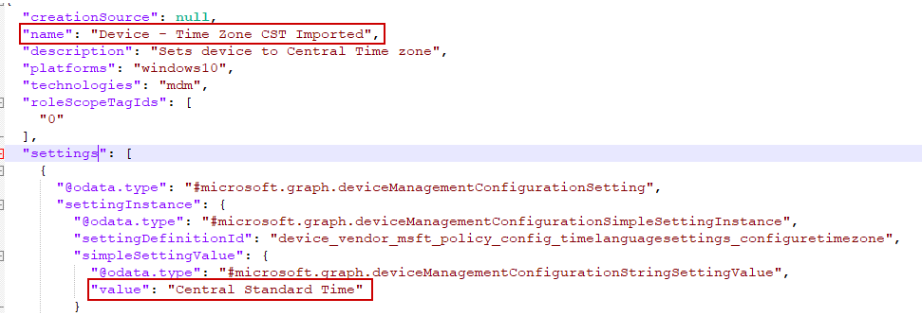
$TimeZone = Get-Content -Path .\TimeZone.jsonThe next part of the script will import the JSON and create a new Settings configuration policy. For the sake of testing, I edited the JSON and changed the name to have “Imported” added to the end, and set it back to central time. You can edit the JSON to adjust settings prior to your import if you’d like:
The rest of the script that imports the JSON file to Intune via graph API. Note that we are using POST as the method. This will create a new policy:
Invoke-RestMethod -UseBasicParsing -Uri "https://graph.microsoft.com/beta/deviceManagement/configurationPolicies" `
-Method "POST" `
-WebSession $session `
-Headers @{
"X-Content-Type-Options"="nosniff"
"x-ms-command-name"="PolicyGraphProxy_updateConfigurationPolicy"
"Accept-Language"="en"
"Authorization"="Bearer $($ConnectGraph.access_token)"
"x-ms-effective-locale"="en.en-us"
"Accept"="*/*"
"Referer"=""
} `
-ContentType "application/json" `
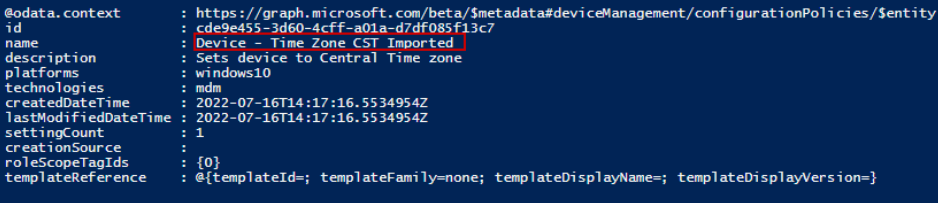
-Body $TimeZone I was surprised to see this worked on the first attempt. The script executes very quickly, and if you pause the end of the script, or run this in VScode/ISE, PowerShell will show this output if its successful. You can see the new name reflected from editing the JSON file:
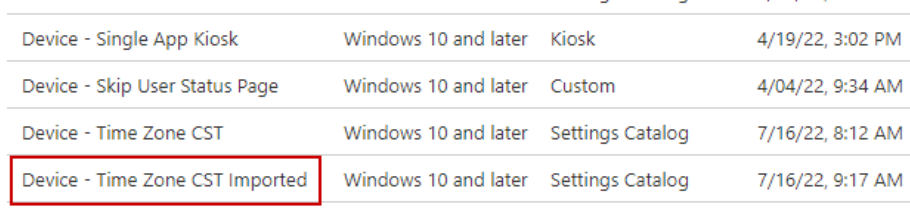
Back in the GUI, we can see our newly impoted settings catalog policy:
And lastly, the policy showing central time where we changed it in the JSON file prior the import. Note: imported profiles will not be assigned to any groups:
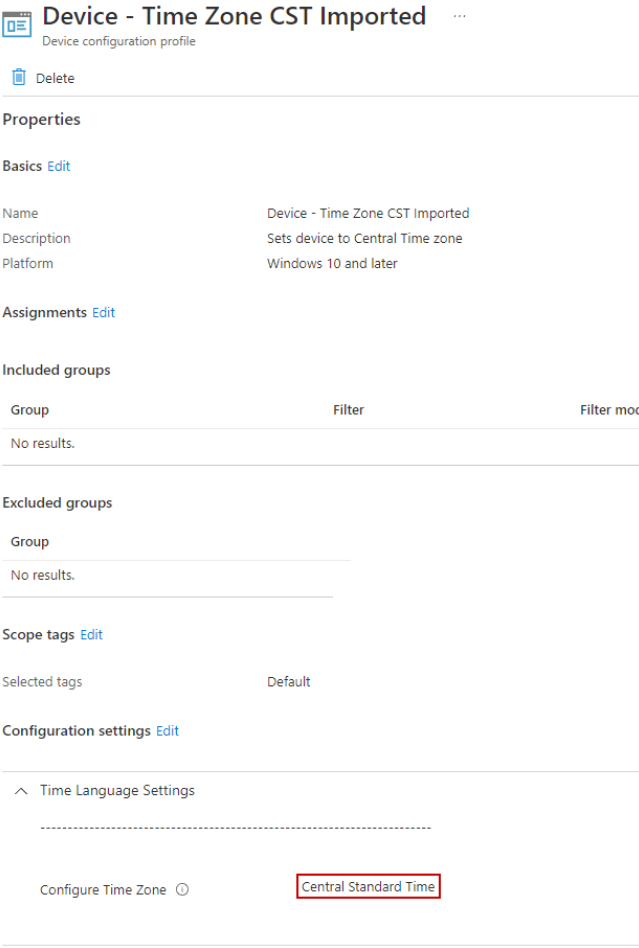
The script and Time zone json file are on my github.
Bulk importing multiple settings catalog profiles:
Above we just showed how to import a single profile. If you want to import multiple JSON files, you can specify a variable for each one, and then repeat the below syntax. if you wanted to keep copies of your settings catalog profiles in JSON format so you can easily edit them, this method isn’t bad, but there is a more efficient way. Example of the portion of the script for importing multiple JSON files:
$profile1 = Get-Content -Path .\profile1.json
$profile2 = Get-Content -Path .\profile2.json

#====================================================
#profile1
Invoke-RestMethod -UseBasicParsing -Uri "https://graph.microsoft.com/beta/deviceManagement/configurationPolicies" `
-Method "POST" `
-WebSession $session `
-Headers @{
  "X-Content-Type-Options"="nosniff"
  "x-ms-command-name"="PolicyGraphProxy_updateConfigurationPolicy"
  "Accept-Language"="en"
  "Authorization"="Bearer $($ConnectGraph.access_token)"
  "x-ms-effective-locale"="en.en-us"
  "Accept"="*/*"
  "Referer"=""
} `
-ContentType "application/json" `
-Body $profile1
#====================================================
#profile2
Invoke-RestMethod -UseBasicParsing -Uri "https://graph.microsoft.com/beta/deviceManagement/configurationPolicies" `
-Method "POST" `
-WebSession $session `
-Headers @{
  "X-Content-Type-Options"="nosniff"
  "x-ms-command-name"="PolicyGraphProxy_updateConfigurationPolicy"
  "Accept-Language"="en"
  "Authorization"="Bearer $($ConnectGraph.access_token)"
  "x-ms-effective-locale"="en.en-us"
  "Accept"="*/*"
  "Referer"=""
} `
-ContentType "application/json" `
-Body $profile2
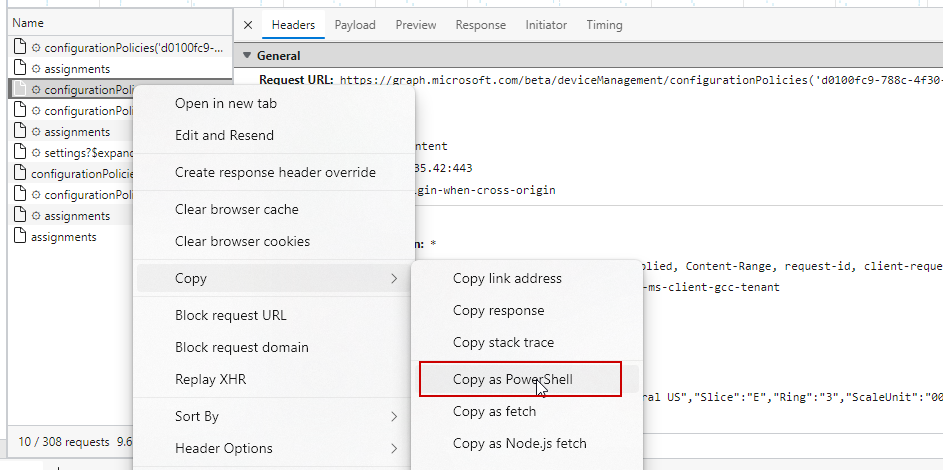
However, I stumbled on something else while doing more testing with the developer tools that makes importing multiple profiles much more efficient. If you navigate back to the Edge developer tools and open MEM. Start capturing network traffic, edit a settings catalog configuration settings, and click review + save (remember, you don’t need to make a change to the policy). Find the PUT entry (or post if it’s a new policy) in the developer tools like we did earlier. Right click that entry, choose copy, and copy as PowerShell. Paste your results in your PowerShell editor, and you’ll see the results are very similar to the script we used earlier to import our JSON file.
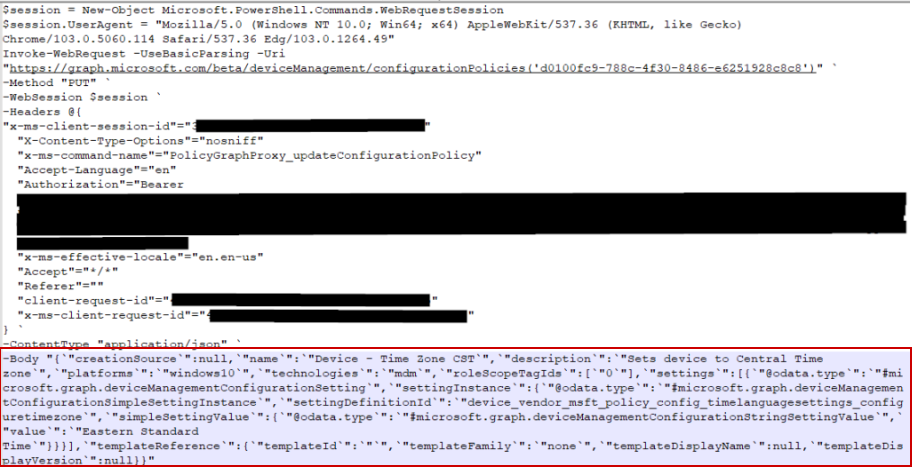
Pasted output is below. I removed most of the Authorization data to reduce the size of the screenshot. The important part is the Body. This is essentially the same JSON content we pulled earlier.
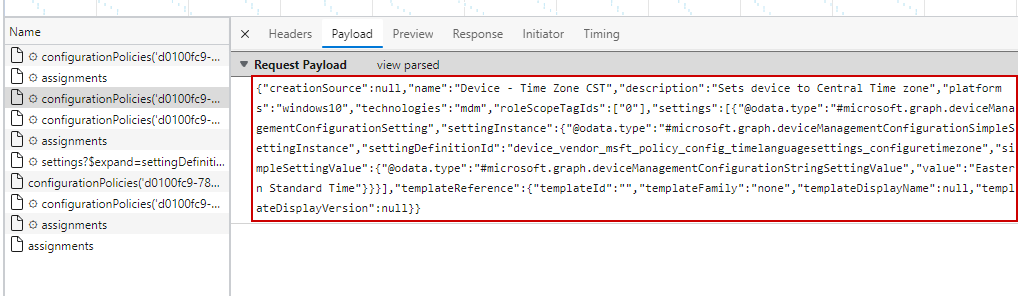
Alternatively, you can also retrieve this same data format from the payload tab by toggling view source. Copying the source payload, and we can use that in the Body section of the script:

We can repeat this syntax in our PowerShell script so numerous policies can be imported with a single script. Here is a GIF of the script in action. In the GIF example, I have two policies named “A settings catalog policy”, and “another settings catalog policy” and you can see them populate at the top of the configuration profile list when the script finishes. This script is available on github. You’ll just have to edit for your profiles.
