I’ve made it a priority recently to push organizations away from active directory domain controllers and adopt Azure AD Joined devices as much as possible. AVD has often been a hurdle since it’s usually configured to use pooled desktops, which rely on FSLogix, which use SMB shares, which rely on Kerberos authentication, which traditionally relies on AD or AADDS. Not only have Kerberos and FSLogix been keeping most AVD hosts reliant on AD/AADDS, but GPOs have traditionally been used to control FSLogix behavior and other settings. Over the last year, Microsoft has made huge strides in AVD to eliminate many of the hurdles that were traditionally reliant on AD/AADDS. It’s not quite to the point where we can accomplish this with no AD, but it’s getting close. Azure AD Kerberos still requires identities to be synced from AD, and setting permissions on an SMB share requires line-of-sight to a DC from the machine being used to edit the permissions. However, once permissions are set, there is no requirement for line of sight to a DC.
Azure AD Kerberos Authentication is the key to how this all works. In a traditional environment, to use an SMB share (think FSLogix), your user identities need to be issued Kerberos tickets to authenticate against an SMB share. The TGT and Kerberos authority is your AD Domain Controller. Azure AD can now issue Kerberos tickets natively after some configuration to your tenant and to your client machines. So, why do we still need a DC if AAD can do this now? Because as we mentioned earlier, it’s currently only compatible with hybrid user identities (Identities synced from AD via AD Connect or Cloud Sync). This does not work with cloud-native identities (yet). One of the biggest advantages of using this configuration is how much easier it will be to fully transition away from AD. Once Microsoft eliminates the requirement of hybrid user identities and line of sight to a DC for editing permissions, you can simply convert your identities to cloud managed and decom your AD without an impact on your AVD environment.
We are going to walk through the process of setting up AVD with Azure AD Joined hosts using Azure AD Kerberos authentication to Azure Files, and Deploy FSLogix settings using Intune. This allows your AVD environment to live in Azure with no line-of-sight connectivity requirements to AD or AADDS, simplifying the deployment and saving on Azure costs. Also, if you’re out of free azure credits and feel like you can’t do Azure labs because of cost, this entire lab cost me $3.36 to do in one day. It also could have been even less since I had to do some troubleshooting, made a second host, and also took the time to capture screenshots. Just remember to delete your Azure resources when you’re finished.
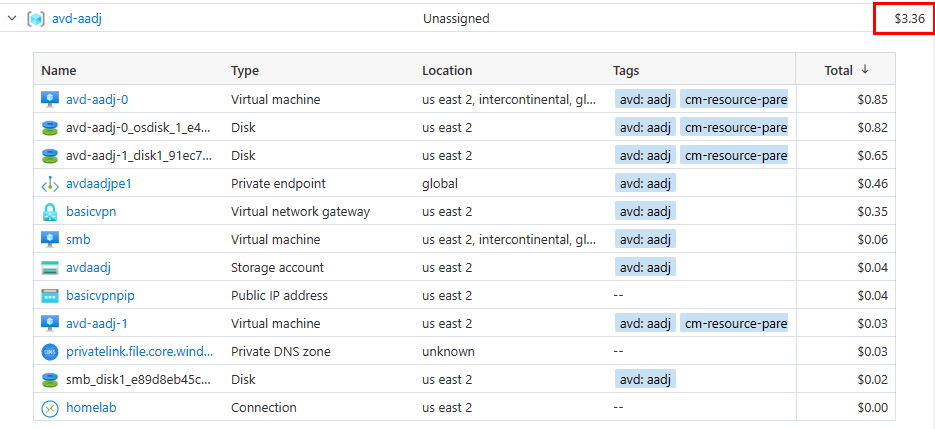
This is what you will end up with as the end result:
Creating our Azure Resources
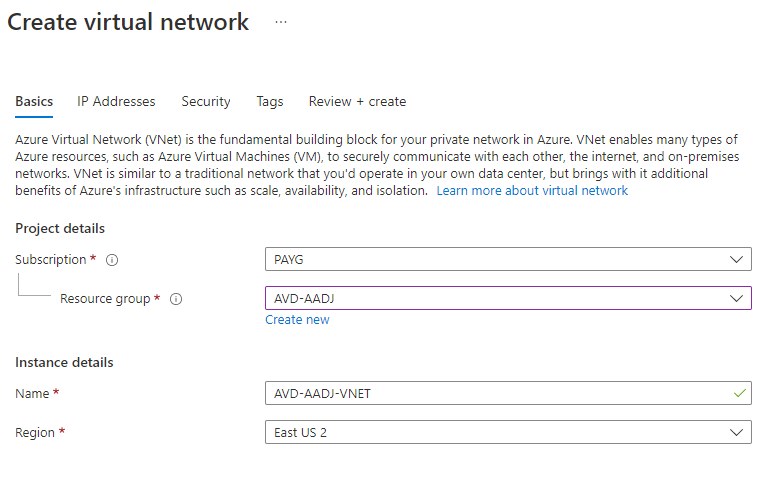
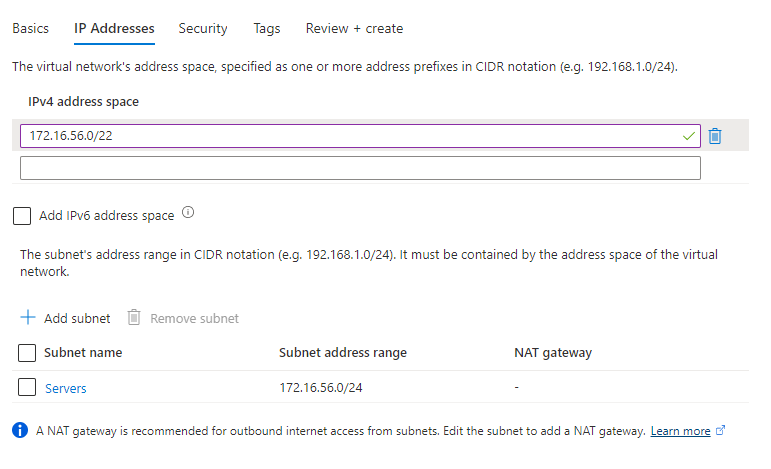
Let’s begin creating our resources and see how this all works. I am treating this like we are starting from scratch with nothing in Azure. First, create a VNET. I like to size most VNETS no smaller than a /22. This allows us a /24 for our AVD server subnet, room for a VPN gateway, Bastion (if needed), and some wiggle room if you want to add anything in the future. After adding your IP address space and subnet, complete the creation of your VNET.
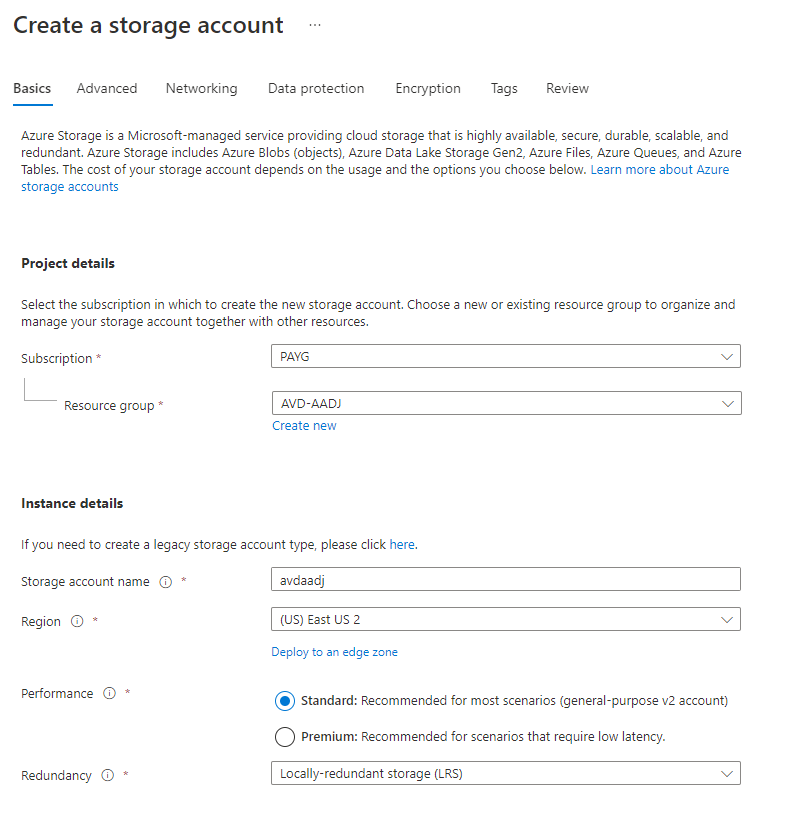
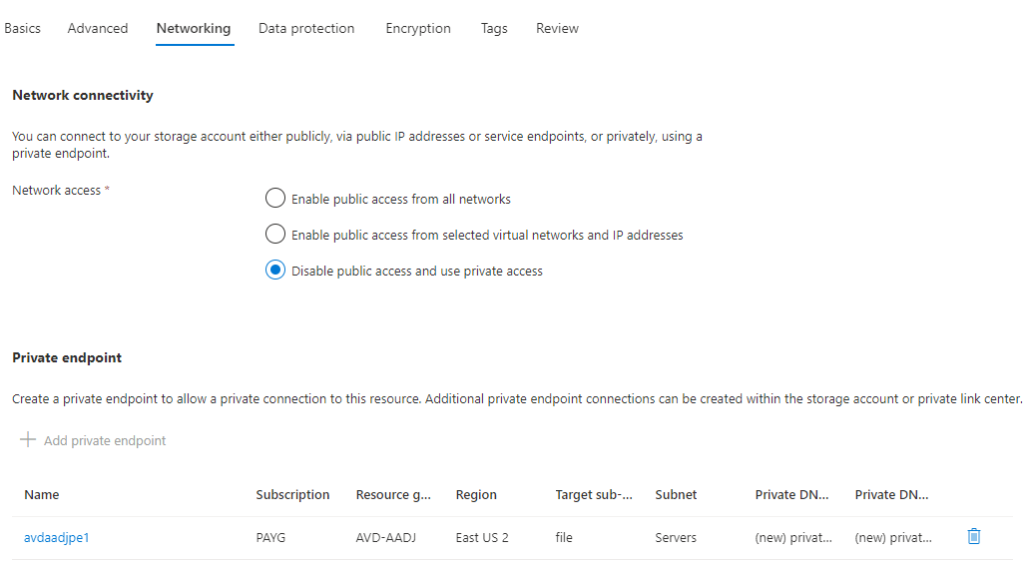
Next, create a storage account. We need this to store our FSLogix profiles. This should be straightforward. Provide a name, region, and add a private endpoint on the servers subnet we created earlier:
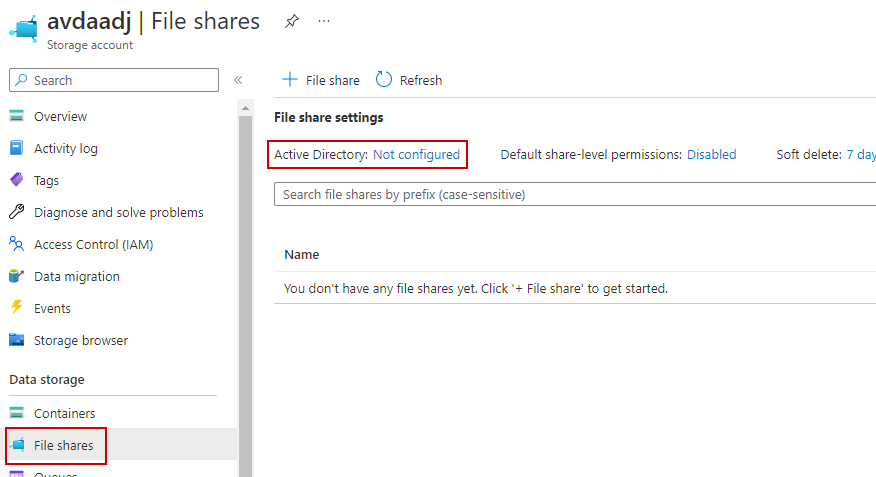
Next, we need to make our file share for FSLogix and enable Azure AD Kerberos. Select the storage account, and click File Shares. Then click the Not Configured link next to Active Directory.
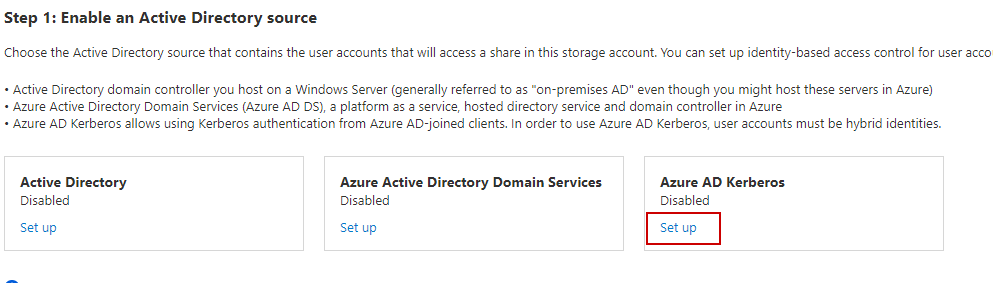
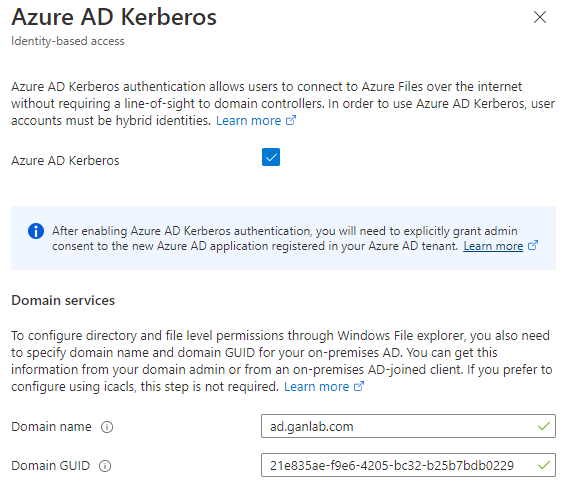
Click Set up under Azure AD Kerberos:
You’ll need to provide your AD domain name and the GUID for the domain. You can retrieve these easily by running the below powershell commands from a domain joined device and then viewing the values of the variables:
$domainInformation = Get-ADDomain
$domainGuid = $domainInformation.ObjectGUID.ToString()
$domainName = $domainInformation.DnsRoot 
Create your file share. Back in the File Shares tab for your storage account, click File Share at the top. Provide a name for the share and click save. I’ve named this one profiles since we will use it to store our FSLogix profiles.

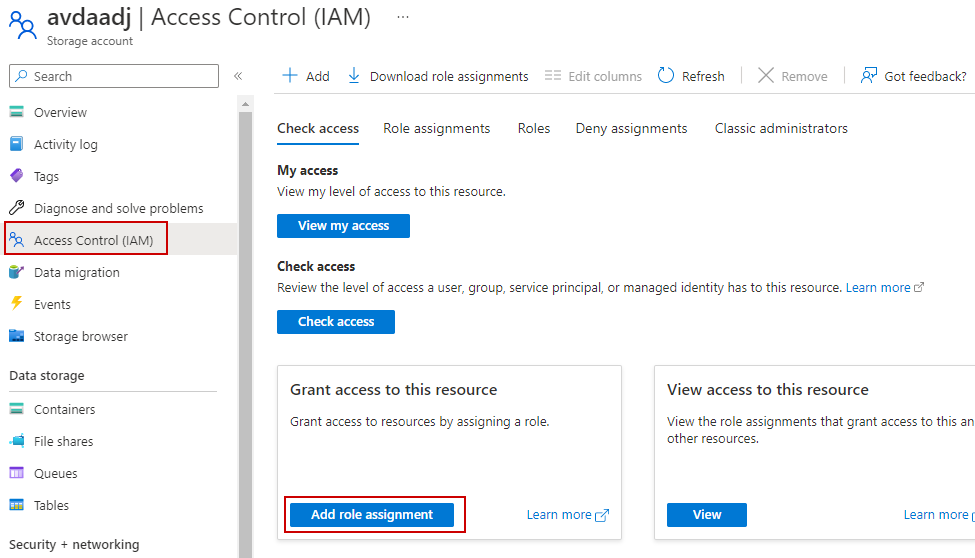
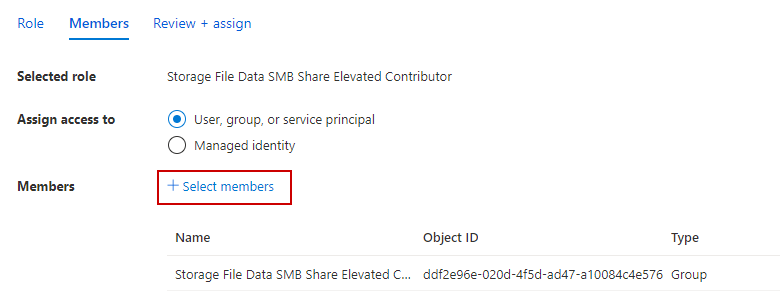
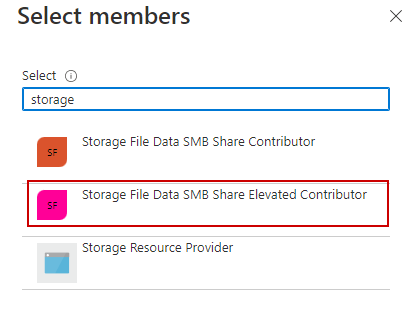
Next, we need to assign the file share permissions. There are two Roles – Storage File Data Share Contributor and Storage File Data Share Elevated Contributor. Remember, our identities using Azure AD Kerberos need to be synced from AD. Create two groups in your AD for each of the two role assignments – One for your admins who you want to have full access share permissions, and another for your standard AVD users. I named my groups the same as the role names. Add the role assignments like the below screenshots. I only show adding the elevated contributors role in the screenshots, but don’t forget to also add the contributor role group following the same process.

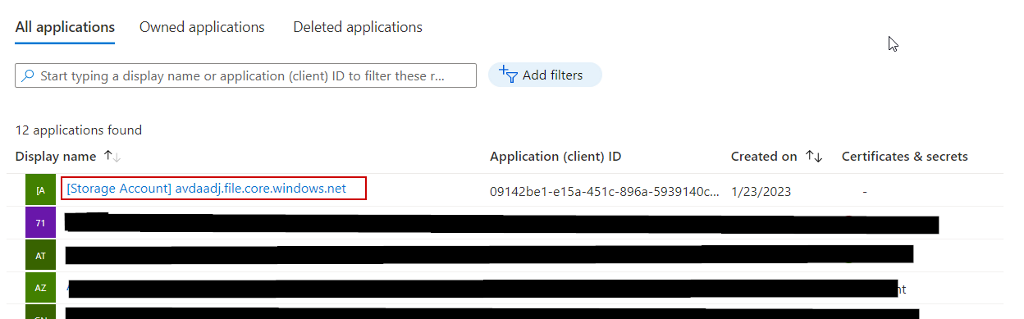
Next, we need to grant admin consent to the new service principal which was created when we enabled Azure AD Kerberos. Go to Azure AD > App registrations, and select the all applications tab. Locate the application with your storage account name:
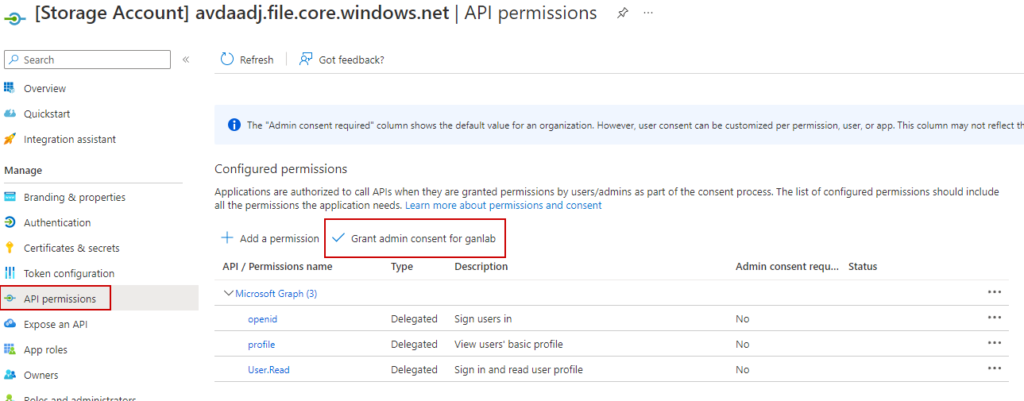
Select API permissions on the left pane and grant admin consent:
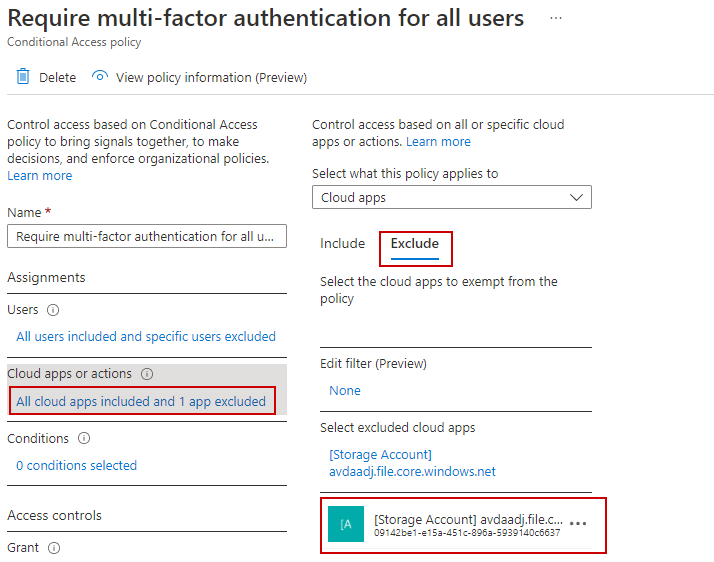
We also need to disable MFA for the storage account app. Your storage account app will have the same name as it appears in the previous steps. Make sure you exclude this from your conditional access MFA policy or the share won’t function properly:
We are almost to the point where we can set NTFS permissions on our file share, but for that, we need line-of-sight to a domain controller (details here – https://learn.microsoft.com/en-us/azure/storage/files/storage-files-identity-auth-azure-active-directory-enable?tabs=azure-portal#configure-directory-and-file-level-permissions). Remember, we only need line-of-site to a DC temporarily so we can set the permissions. So, there is no need to put a DC in Azure since our AVD hosts will be AADJ. Something else to keep in mind – if you have a DC on-prem and you want to eliminate your AD and server footprint, you can certainly move the DC into azure simply to sync identities but move all your endpoints to AADJ. Once Azure AD Kerberos removes the requirement for synced identities, it should be an easy transition to convert all user identities to cloud-managed and eliminate your DC. Anyway, let’s continue with the setup. Since I have a DC in my home lab, I’ll create a site-to-site VPN so my lab DC can see the Azure File Share. Basic VPN sku is not recommended for most production environments, but for this lab, it will work and is very affordable. There are several steps to creating the VPN, I won’t cover every detail with screenshots, but here are the steps:
- Create a new Virtual Network Gateway – for a lab, choose the basic SKU
- Create a local network gateway – This is the details for the network on the other side of Azure you wish to connect to. In my case, my home lab network. You’ll provide your public IP and your local LAN network space here.
- Under your Virtual Network Gateway, click the Connections Tab, and click Add. Select site-to-site VPN for the connection type drop-down. Select the local network gateway you created, and then provide a pre-shared key.
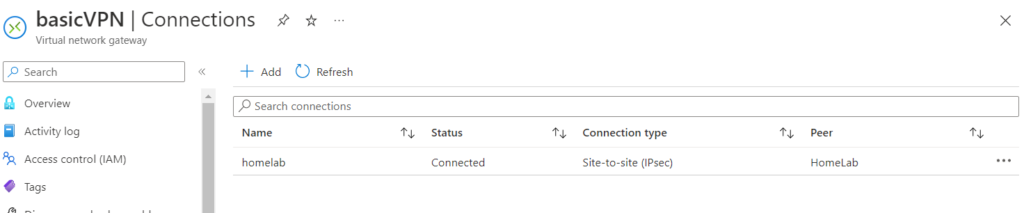
- Lastly, on your local firewall, configure a VPN connection to Azure. You can get the public IP of your VNG from the Overview tab. Shortly after you finish configuring your on-prem firewall, the VPN connection should show connected in Azure:
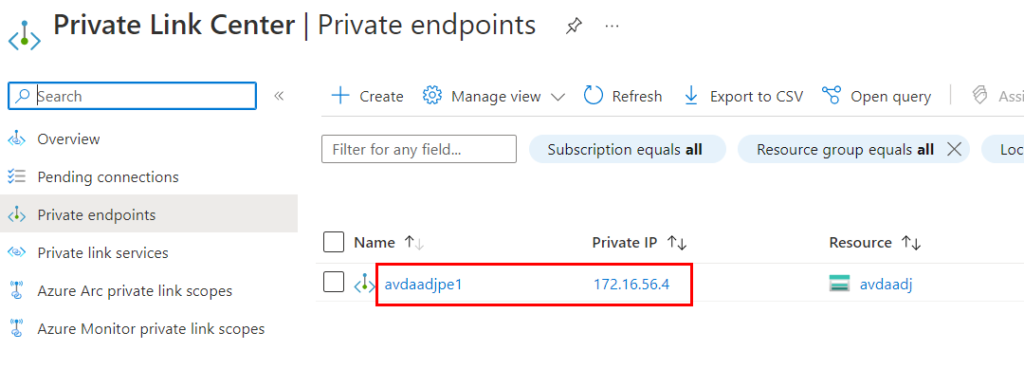
We also need to add a DNS entry in our DC (or youre on-prem DNS server) for our storage account. Our storage account’s name is avdaadj.file.core.windows.net. Making this entry in your on-prem DNS server allows you to connect via the private endpoint we created earlier. You can also edit the host file on a machine you’re going to use to set permissions on the share if you don’t want to edit DNS. To get the IP of the private endpoint. Search for Private endpoints in Azure and locate the storage account PE:
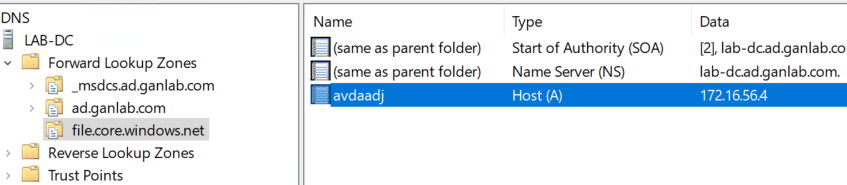
Then, edit your host file or DNS server:
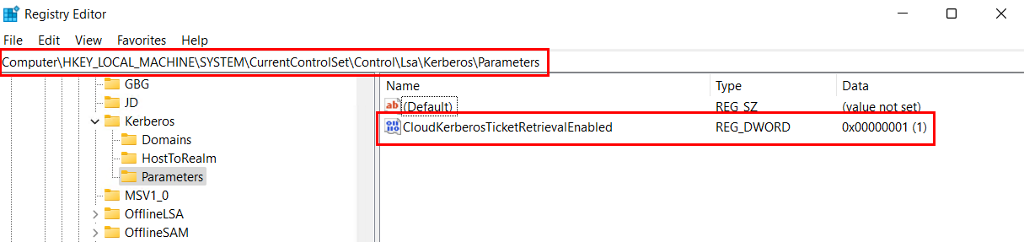
Once you have a VPN configured, you can set the NTFS level permissions on the share from a domain-joined PC with line-of-sight to your DC. First, though, we need to add a registry value to allow our devices to retrieve Azure AD Kerberos Tickets (https://learn.microsoft.com/en-us/azure/storage/files/storage-files-identity-auth-azure-active-directory-enable?tabs=azure-portal#configure-the-clients-to-retrieve-kerberos-tickets). This value will need to be added to any devices needing to retrieve AAD Kerberos tickets.
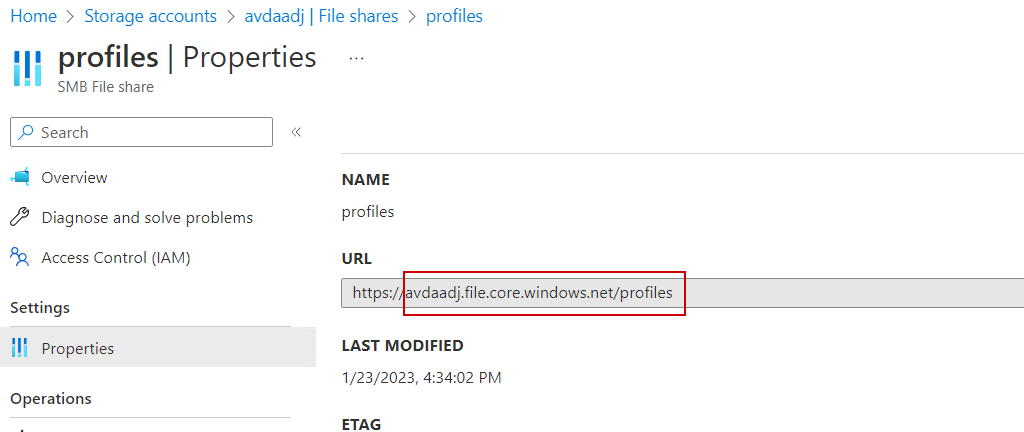
After adding the reg key, restart your PC, sign in, and navigate to the az file share. You can get the file share name by navigating to your storage account > File Shares > ShareName > Properties. Where it shows the URL, take everything after https://. Add two \\ in front and change the forward slash to a backslash. Mine is \\avdaadj.file.core.windows.net\profiles

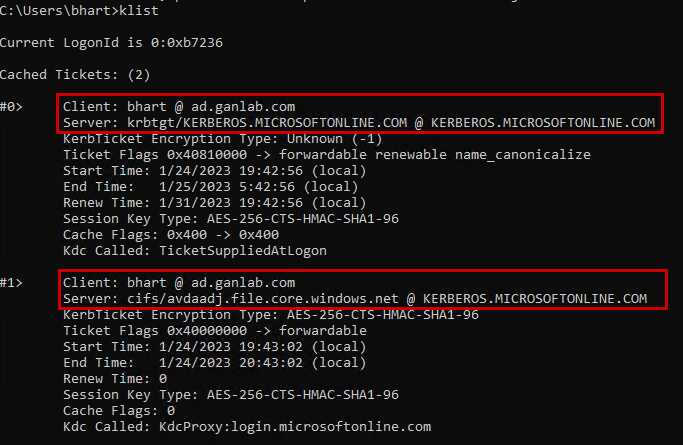
Next, open a command prompt and issue the klist command to view your kerberos tickets. We can see a CIFS kerberos ticket issued by Azure AD and see how it differs from the Kerberos ticket issued by our on-prem DC. This is how we can confirm Azure AD Kerberos is functioning properly.
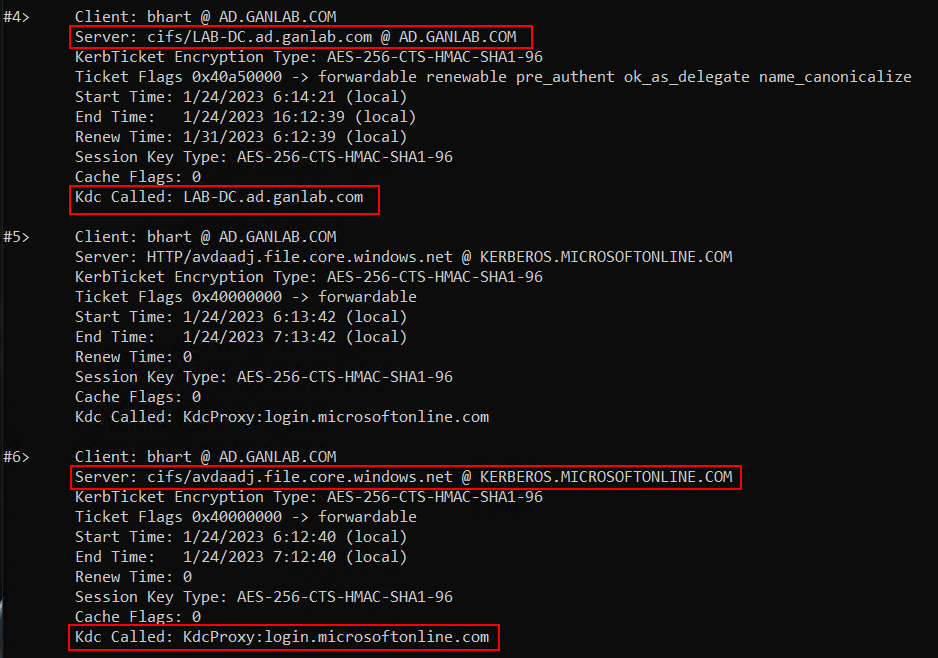
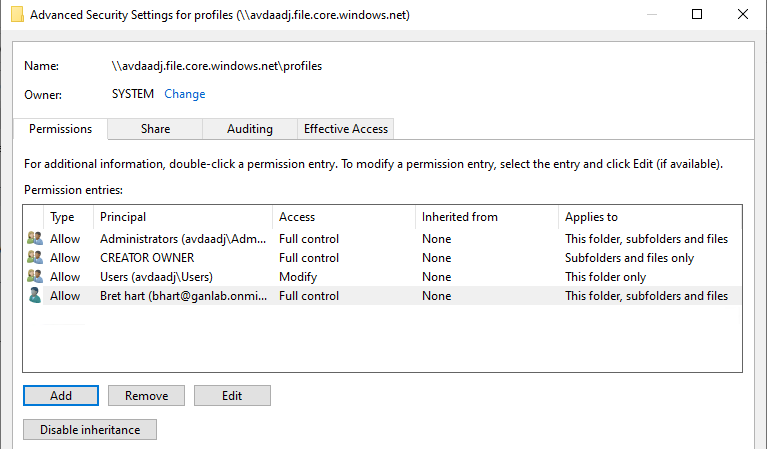
Go back to your AZ Files network share, and set NTFS permissions for FSLogix like the screenshot below. If you have an admin group or user who you want to have full NTFS permissions control, you can add that also, like my user Bret Hart.
At this point, we have fully configured our FSLogix profile share permissions and our storage account is configured for AzureAD Kerberos. If you’re using a VPN to gain line-on-site to an on-prem DC as I did, you can safely delete the Virtual Network Gateway at this point. After all, the whole point of this is to get things working with no line of sight to a DC. Next, let’s configure our FSLogix settings with Intune.
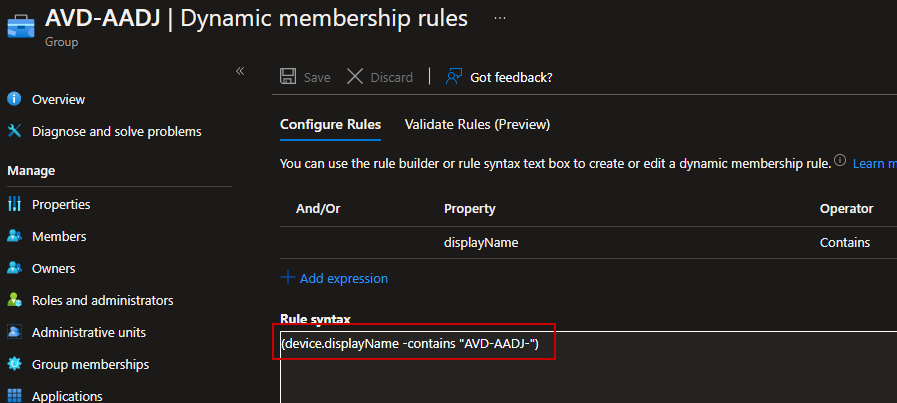
First, let’s create a dynamic device group for our AVD hosts. Since they will all use the prefix “AVD-AADJ-” we will use a dynamic group that contains that as the display name:
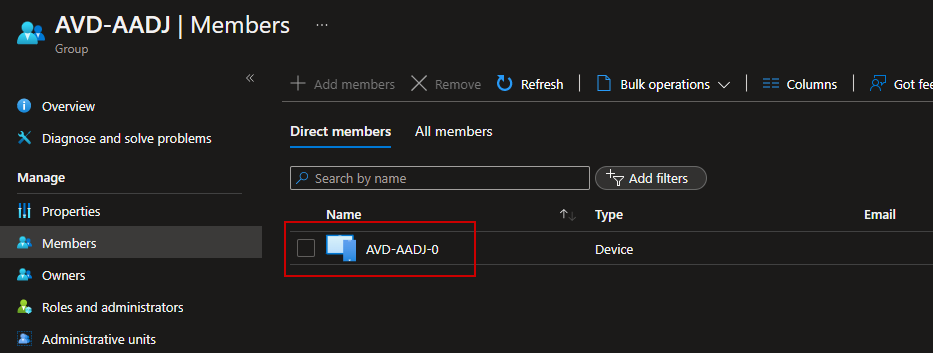
Our host will be added via the dynamic group query:
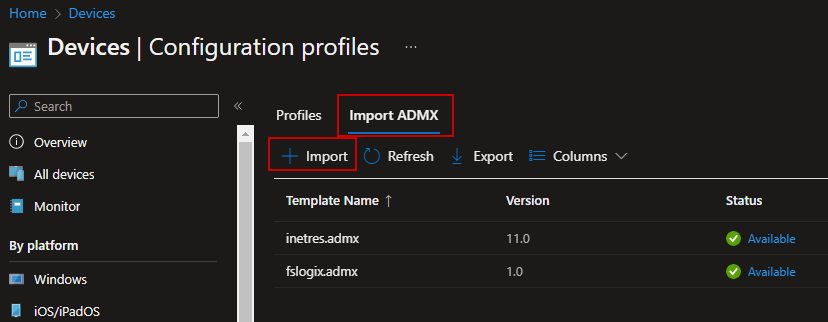
Download the FSLogix apps from here https://aka.ms/fslogix-latest. Extract the .zip, and then sign into Intune. Under device configuration profiles, select Import ADMX, and click Import:
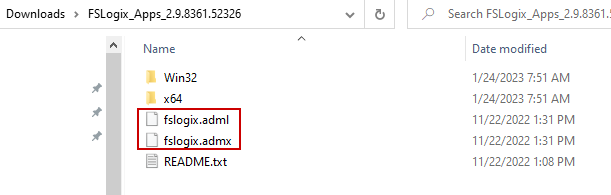
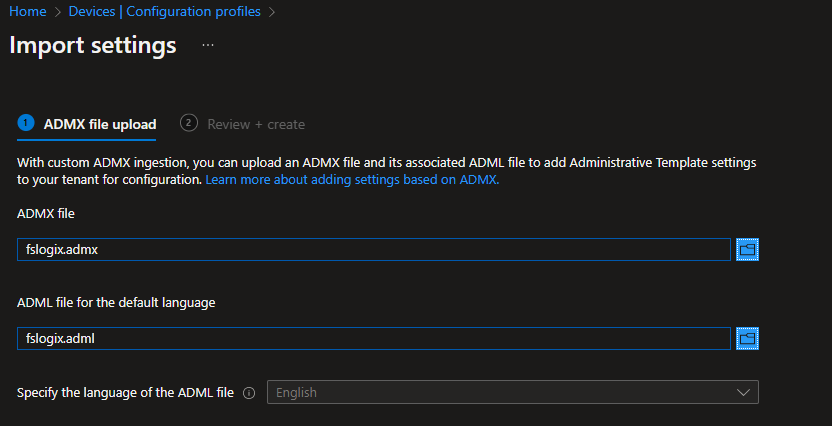
Select the ADMX and ADML files from the extracted FSLogix zip we downloaded:
Wait for the ADMX import to finish and then create a new device configuration profile. Select
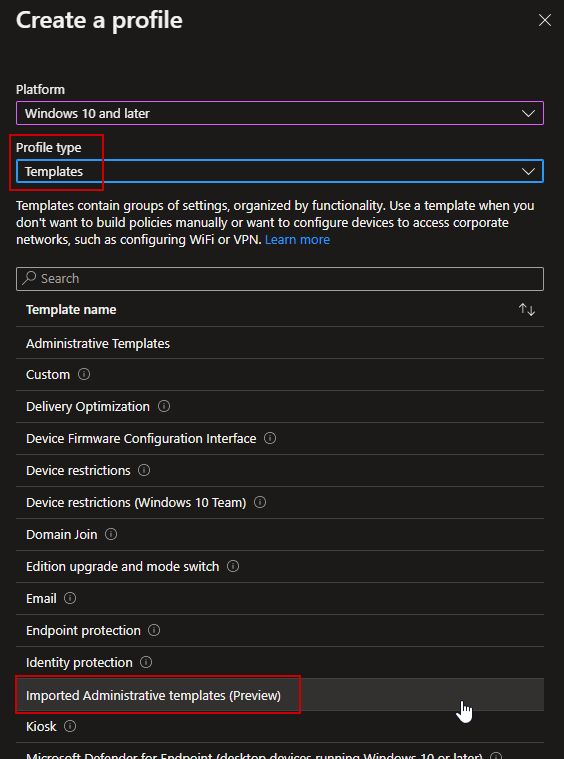
Provide a name and click next:
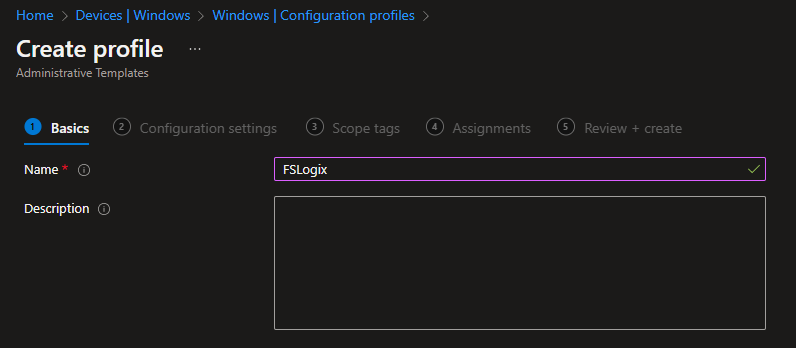
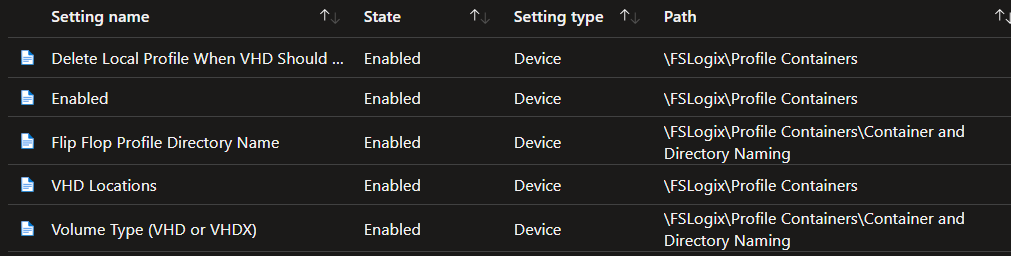
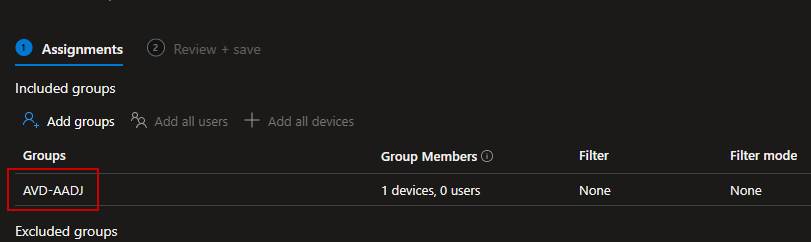
You can create your FSLogix settings how you’d like, but the basics should include what’s below. Your VHD locations will be the azfiles share, which is \\avdaadj.file.core.windows.net\profiles. And we definitely want to use VHDX files. Complete the configuration, and deploy to our dynamic group which contains all our AADJ AVD hosts.
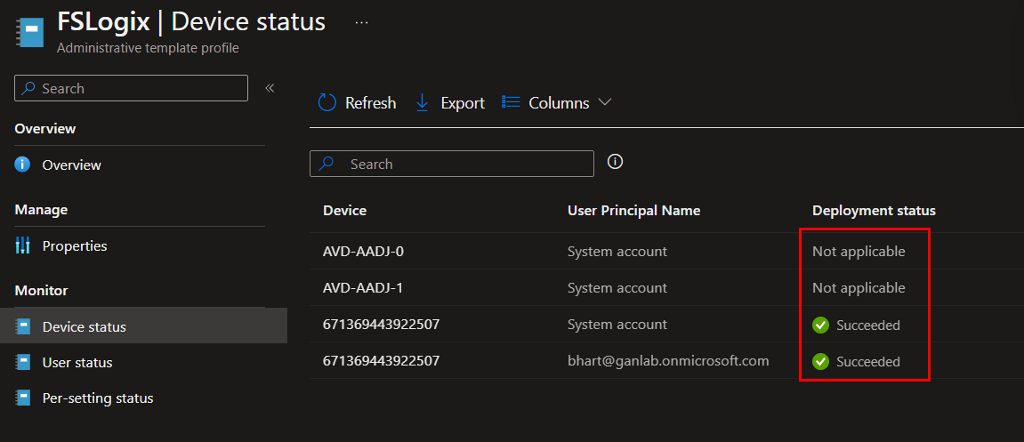
Unfortunately, this failed to apply. Some troubleshooting showed this is not compatible yet with Windows 10/11 Multi-Session versions. I tested against a Windows 10 Pro machine, and the settings were applied successfully. Hopefully, Microsoft resolves this in the future. Let’s continue our setup. I revisit alternate methods to deploy our FSLogix settings later on, after our host pool creation.
In addition, we need to push out the registry value to allow AzureADKerberos so our AVD hosts can access our FSLogix share. Microsoft shows how to do this with an OMA-URI device configuration profile here – https://learn.microsoft.com/en-us/windows/client-management/mdm/policy-csp-kerberos#kerberos-cloudkerberosticketretrievalenabled. I won’t go into detail, because this also fails to apply in the same fashion as the FSLogix ADMX import. This applied to a Windows 10 Pro device but is not applicable to the Multi-Session hosts. We will touch on deploying these settings later on.

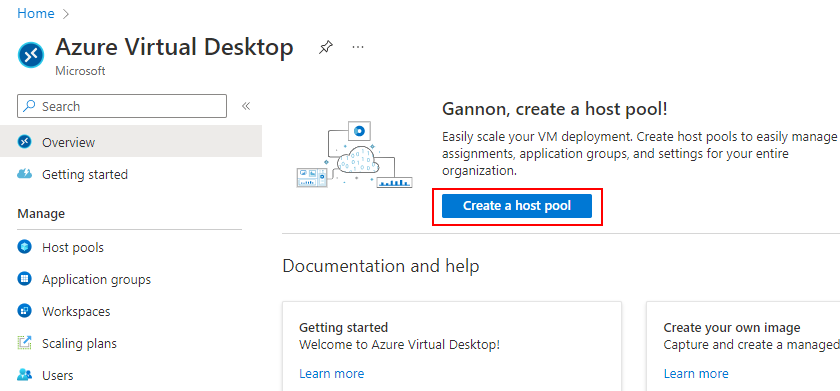
Next, let’s create our AVD host pool. Navigate to the Azure Virtual Desktop blade in Azure and click Create Host Pool:
Name your Pool and complete the required fields.

Since this is a Lab, I am only adding a single host pool to start with a D2as V4 SKU machine. You can use B series if you’d like, but for the amount of time this machine will be running in a Lab environment, your cost savings will be tiny, and the D series machines will perform much better while you do testing.
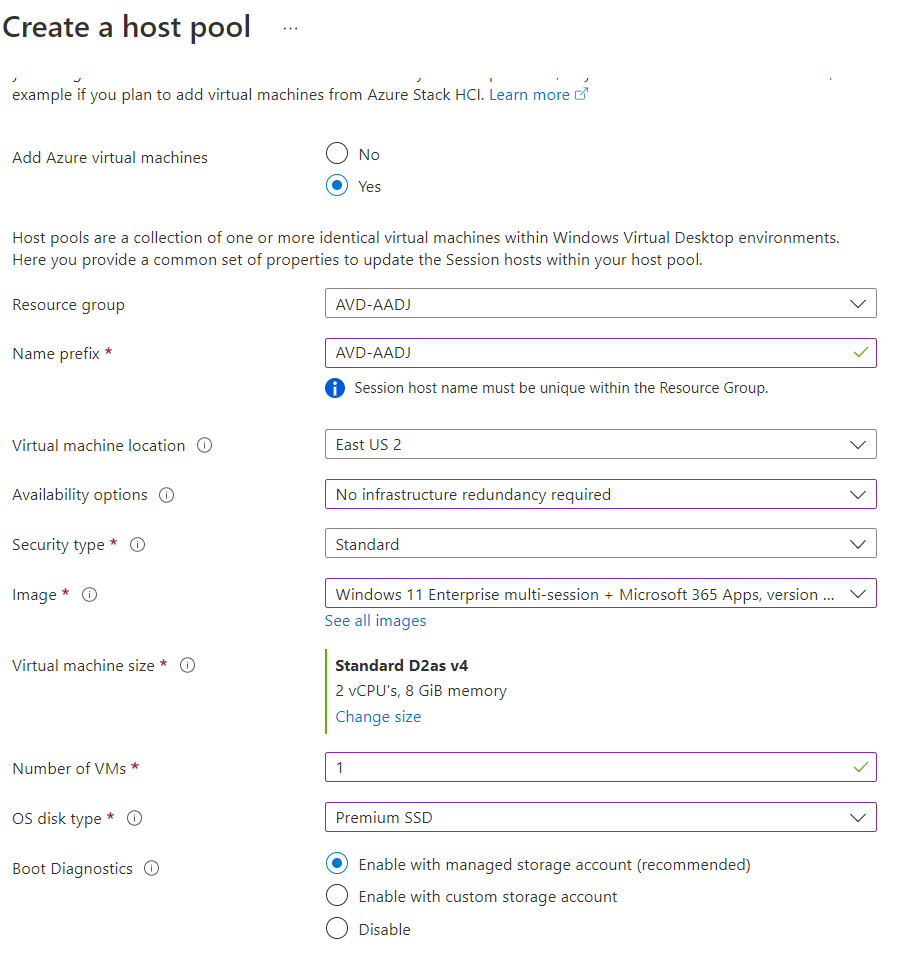
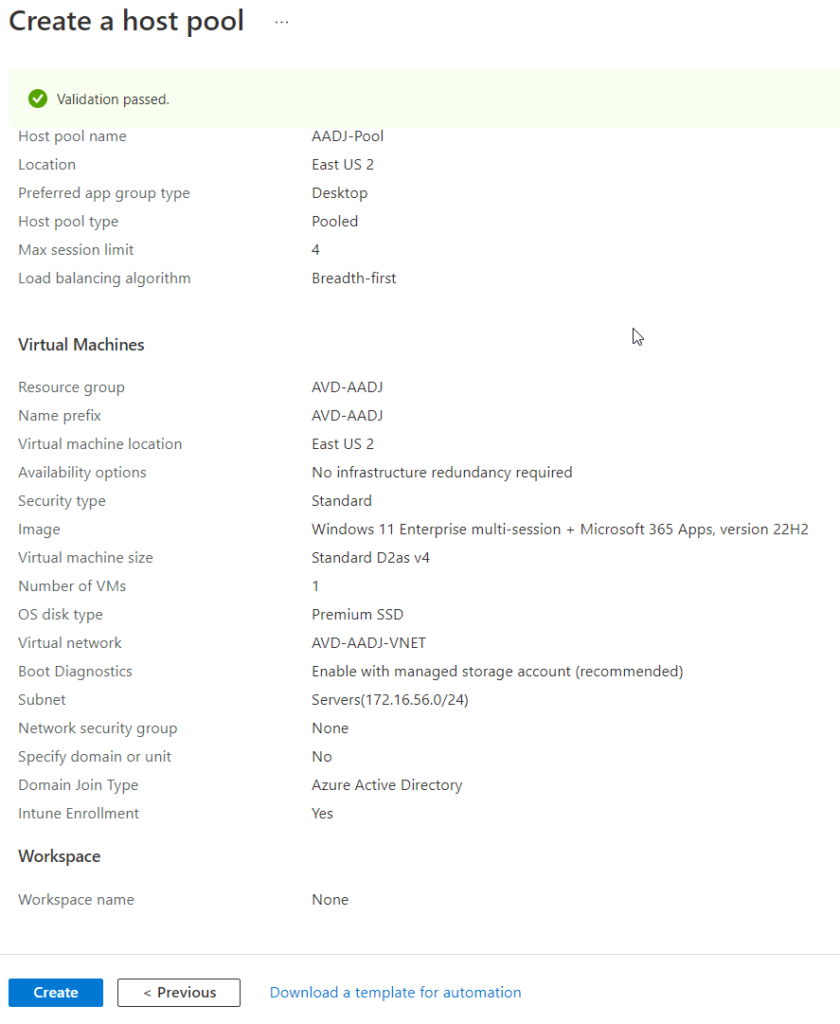
Add the machine to our Servers subnet and select Azure Active Directory as the domain to join. Also, click yes to Enroll VM with Intune:

Complete the rest of the setup. Since I don’t have a workspace created yet in this environment, we will create one later.
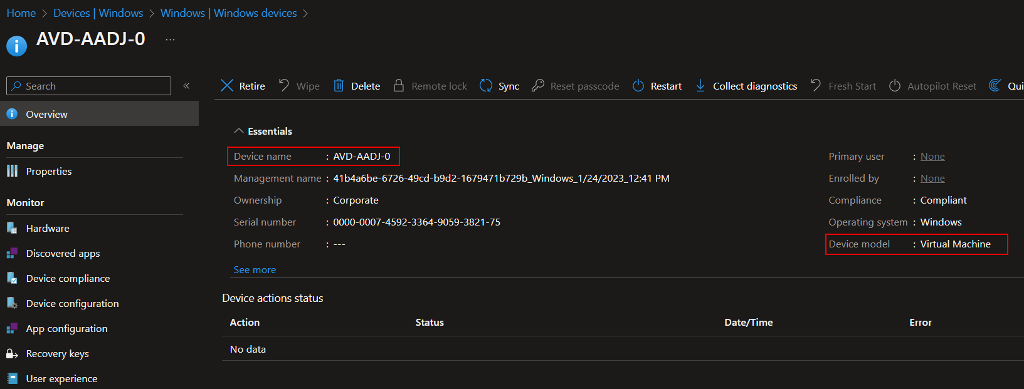
After the deployment finishes, you’ll see your VM show up in Azure AD, and in Intune shortly after. This may take a little time before it reflects in the Intune dashboard. It took mine around 10 minutes:
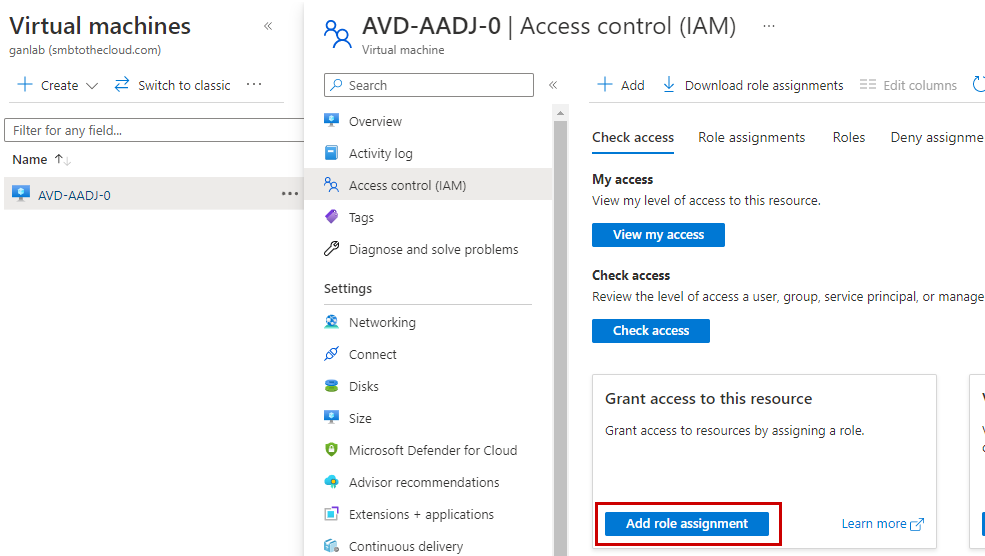
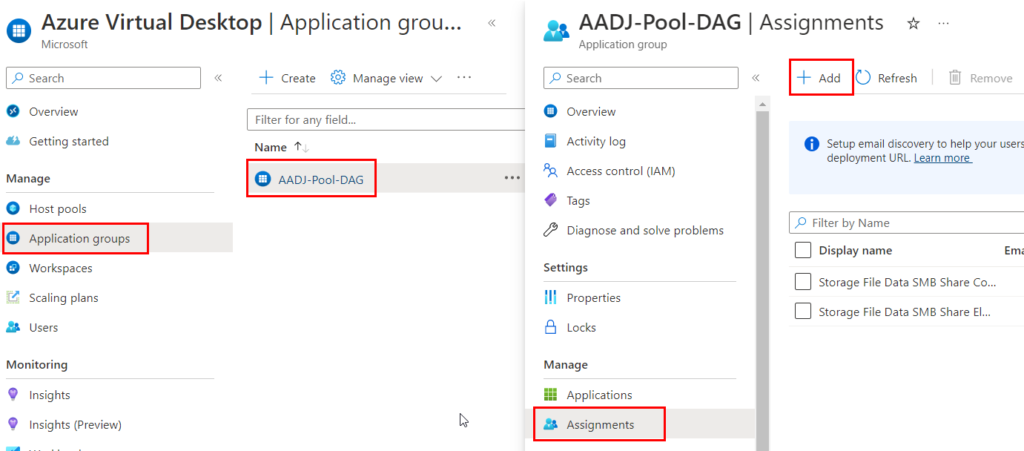
Next, there is an extra step for Azure AD Joined machines to allow remote sign-ins. We need to grant the virtual machine user login role on our hosts for the group we will assign the DAG to. For this demonstration, it’s the Storage SMB Contributor group. Navigate to our VM in Azure, and under Access Control, click Add Role Assignment:
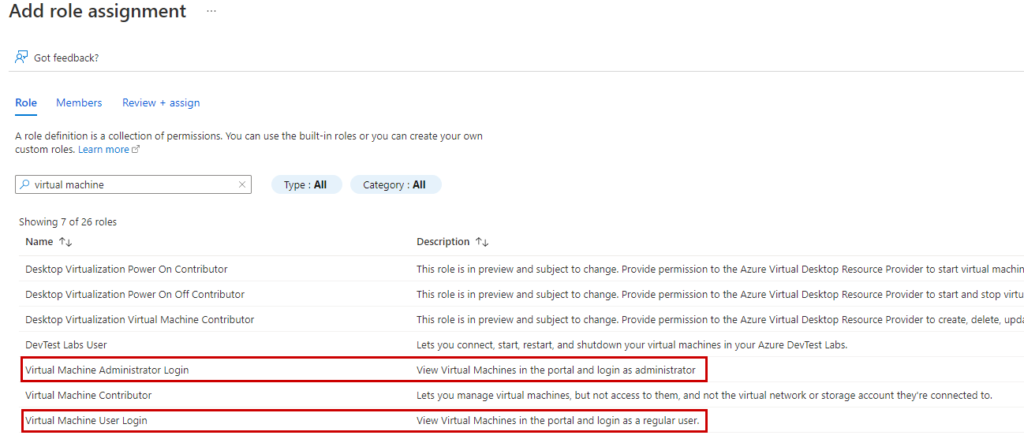
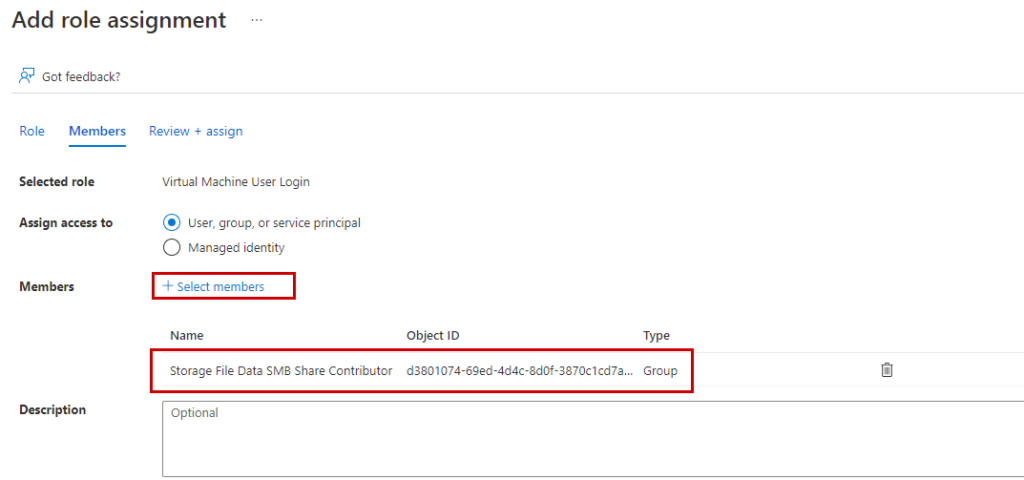
Search for virtual machine. We want our standard users assigned to the Virtual Machine User Login role. Any users who are to be Administrators should be assigned the Virtual Machine Administrator Login role, which is the same group I used for Elevated access to our SMB file share:
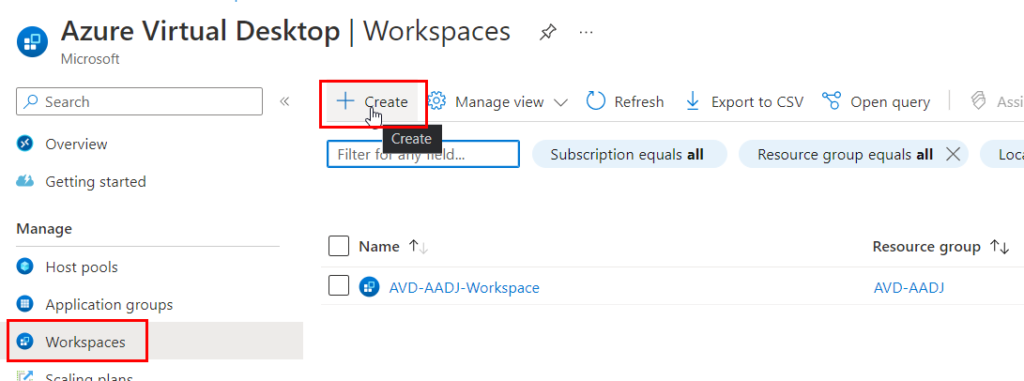
Repeat these steps for the Administrator group. Once finished, let’s create our workspace. Navigate back to Azure Virtual Desktop, click Workspaces, then create:
Add your default DAG which gets created when a host pool is created:
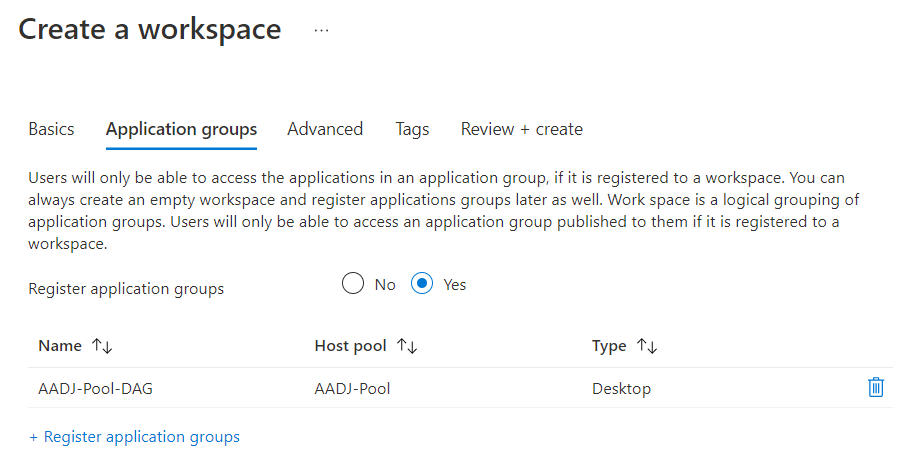
Add a deployment to your DAG application group. I’m using the initial groups I created for the SMB share permissions :
Before we try connecting, there are some specific requirements for connecting to an AADJ AVD environment. Per Microsoft:
To access the session host, your local PC must meet one of the following conditions:
- The local PC is Azure AD-joined to the same Azure AD tenant as the session host
- The local PC is hybrid Azure AD-joined to the same Azure AD tenant as the session host
- The local PC is running Windows 11 or Windows 10, version 2004 or later, and is Azure AD registered to the same Azure AD tenant as the session host
To enable access from Windows devices not joined to Azure AD, add targetisaadjoined:i:1 as a custom RDP property to the host pool. These connections are restricted to entering user name and password credentials when signing in to the session host.
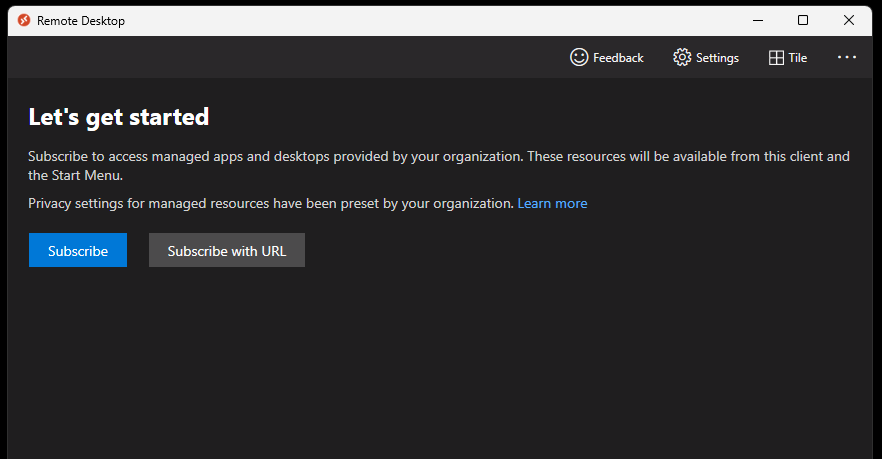
Next, open your remote desktop app on your device and subscribe with an account assigned to the DAG. Here is the link to the 64-bit version of the remote desktop client if you need to download and install – https://go.microsoft.com/fwlink/?linkid=2068602
Your workspace and DAG should show up after you subscribe:
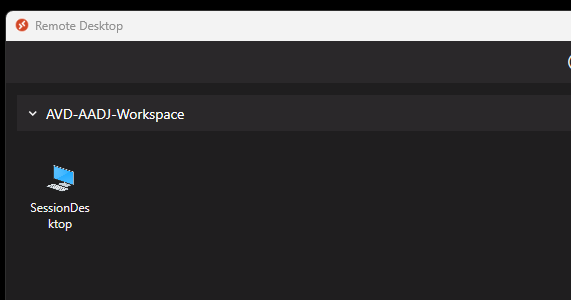
Let’s try connecting with our test user:
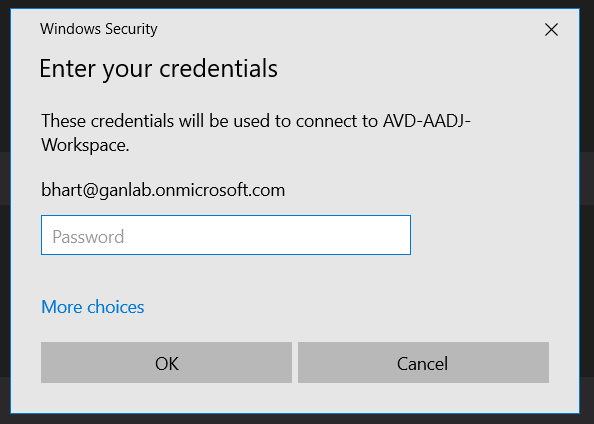
The first time I tried logging in, I received this error. The good news is you can see my Intune lockscreen/backgroud policy is already applied to this AVD host since I have it applied to all devices.
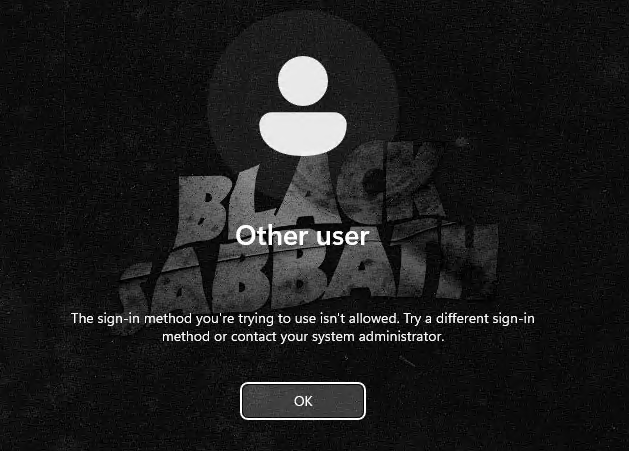
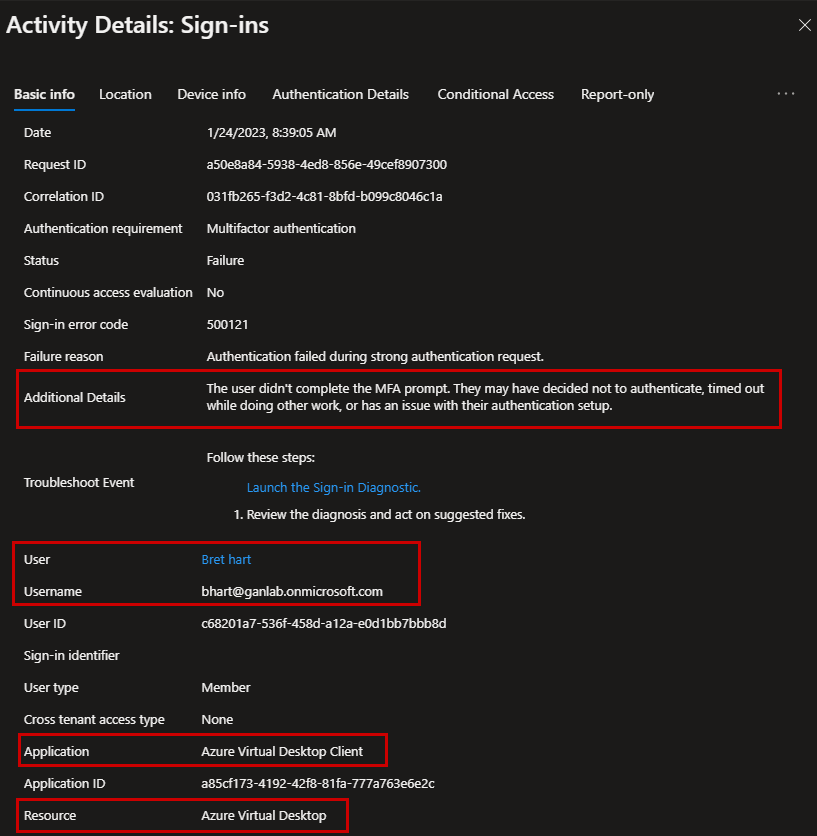
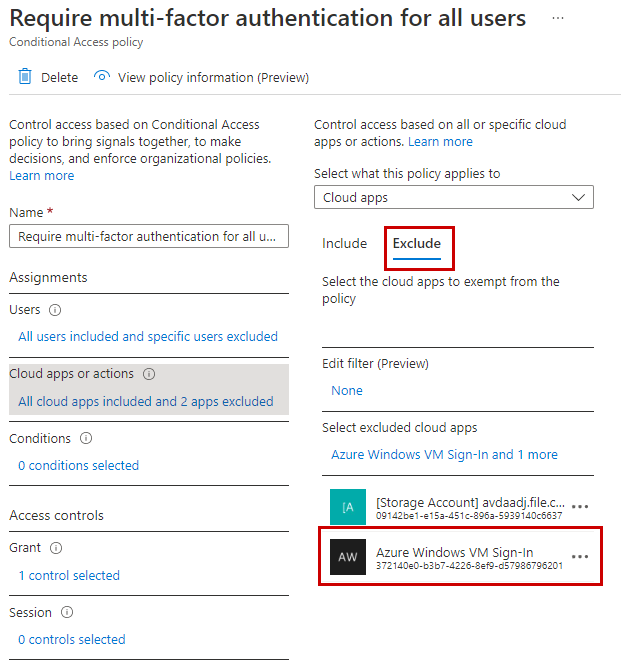
Further investigation into the error lead to my MFA policy. We need to exclude the Azure Windows VM Sign-in cloud application from our MFA policy:
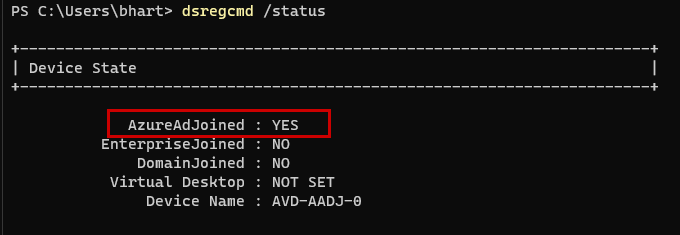
Let’s try signing in again. This time I can sign in without issues. The IME service is installed and running, and we show the host as AADJ. Now we need to address our FSLogix settings and AAD Kerberos Registry value.
Deploying AAD Kerberos & FSLogix Registry settings to our hosts
We still need to configure our hosts for AzureAD Kerberos Ticket retrieval and FSLogix. Device configuration profiles for these settings fail to apply, as we saw earlier in this post. I even tried creating an OMA-URI profile for FSLogix, but it still had the same result – Not applicable on my AVD host but succeeded on a Windows 10 Pro device. With device configuration profiles eliminated as a way to deploy our settings, we have three other options in Intune: PowerShell Script, Win32App, or Proactive Remediation. None of them are perfect solutions that will deploy the settings to our hosts instantly after enrolling, but I think a Win32 App is the best option in this case. PowerShell scripts will only run once and have no detection rules or way to confirm if the settings were applied. Proactive remediations can only be run on a fixed schedule. So, if we add hosts to the pool, we’d need to wait for the next trigger time interval. The Win32 app won’t apply immediately, but it will apply the quickest. It also has detection rules so we can confirm our settings apply. As soon as the device is enrolled and the IME service is installed, it will start looking for assigned apps and profiles from Intune. So, let’s build Win32Apps for our AAD Kerberos registry settings and FSLogix configuration. We need two scripts for each deployment (four total), one that deploys the registry values and another that removes them.
Here are our scripts – they are simple and add the registry values we need. You can edit the FSLogix script to fit your environment.
AAD-KerberosRegInstall:
$RegPath = "HKLM:\SYSTEM\CurrentControlSet\Control\Lsa\Kerberos\Parameters"
New-ItemProperty -Path $RegPath -Name "CloudKerberosTicketRetrievalEnabled" -Value 1 -PropertyType DWord
AAD-KerberosRegUninstall:
$RegPath = "HKLM:\SYSTEM\CurrentControlSet\Control\Lsa\Kerberos\Parameters"
Remove-ItemProperty -Path $RegPath -Name "CloudKerberosTicketRetrievalEnabled" -Force
FSLogixRegInstall:
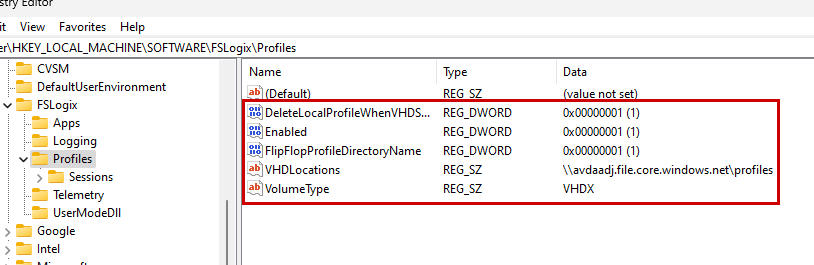
$RegPath = "HKLM:\SOFTWARE\FSLogix\Profiles"
New-ItemProperty -Path $RegPath -Name "FlipFlopProfileDirectoryName" -Value 1 -PropertyType DWord -Force
New-ItemProperty -Path $RegPath -Name "VolumeType" -Value "VHDX" -PropertyType String -Force
New-ItemProperty -Path $RegPath -Name "VHDLocations" -Value "\\avdaadj.file.core.windows.net\profiles" -PropertyType String -Force
New-ItemProperty -Path $RegPath -Name "Enabled" -Value 1 -PropertyType DWord -Force
New-ItemProperty -Path $RegPath -Name "DeleteLocalProfileWhenVHDShouldApply" -Value 1 -PropertyType DWord -Force
New-ItemProperty -Path $RegPath -Name "RedirXMLSourceFolder" -Value "\\avdaadj.file.core.windows.net\redirections" -PropertyType String -Force
FSLogixRegUninstall:
$RegPath = "HKLM:\SOFTWARE\FSLogix\Profiles"
Remove-ItemProperty -Path $RegPath -Name "FlipFlopProfileDirectoryName" -Force
Remove-ItemProperty -Path $RegPath -Name "VolumeType" -Force
Remove-ItemProperty -Path $RegPath -Name "VHDLocations" -Force
Remove-ItemProperty -Path $RegPath -Name "Enabled" -Force
Remove-ItemProperty -Path $RegPath -Name "DeleteLocalProfileWhenVHDShouldApply" -Force
Remove-ItemProperty -Path $RegPath -Name "RedirXMLSourceFolder" -Force
Place the install and uninstall scripts for each deployment in their own directory, and wrap them as an intunewin file. Then, we will create Win32apps for each configuration. Create a new Win32 app and upload your intunewin file. I’ll demonstrate some of the details for the AAD-Kerberos Reg deployment. Repeat the steps for the FSLogix deployment. Name and provide details for your app. The Install and Uninstall commands we want to use are below. Make sure to install as system:
- Install: %windir%\sysnative\WindowsPowerShell\v1.0\powershell.exe -Executionpolicy Bypass .\aad-kerberosreg.ps1
- Uninstall: %windir%\sysnative\WindowsPowerShell\v1.0\powershell.exe -Executionpolicy Bypass .\aad-kerberos-uninstall.ps1

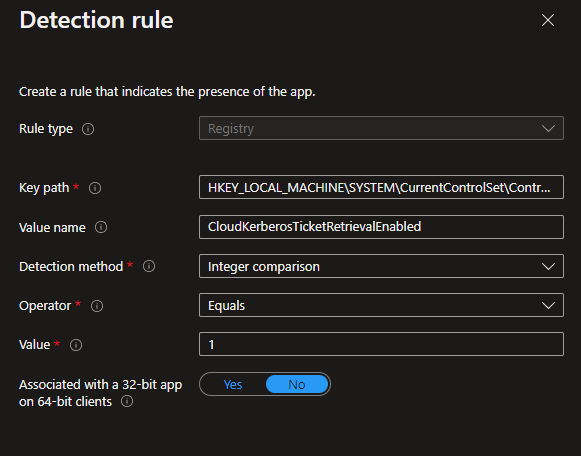
Here is our detection rule for AAD Kerberos Registry value:
- Key Path: HKLM:\SYSTEM\CurrentControlSet\Control\Lsa\Kerberos\Parameters
- Value Name: CloudKerberosTicketRetrievalEnabled
- Integer Comparison = 1
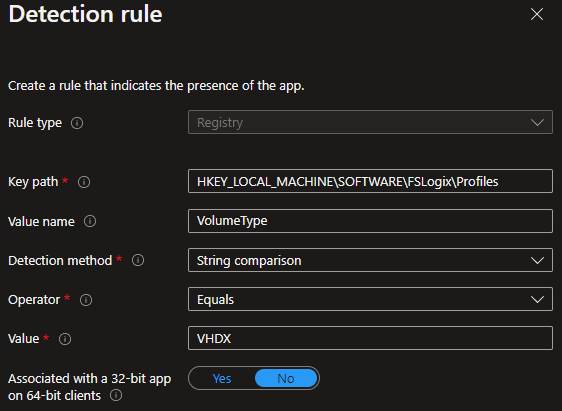
For FSLogix, we have five detection rules for each of the registry values we are adding. Use String or Integer comparisons for those values depending on if the value is a string or an integer. Example below, but complete this for the other values being added, also:
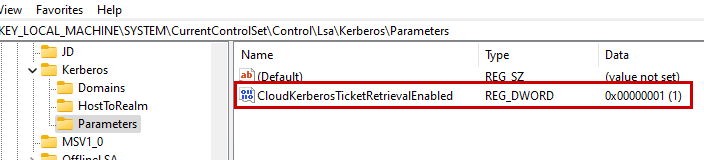
Deploy these apps to your AVD hosts. Restart the IME service or wait for your host to check-in. Shortly after, the apps will deploy and your reg values will be set:
Once you’ve confirmed the reg keys are installed, let’s sign out and sign back in with an account target for FSLogix. Once signed in, let’s open command prompt and first see if we have Kerberos tickets, which are necessary for FSLogix to function. Now we are getting Kerberos tickets from AAD since our registry value has been added:
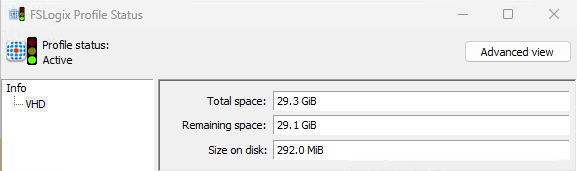
And we can navigate to the FSLogix share. If I open the profile status app, we can see the profile mounted and active:
That’s all!