Intro
I’ve written a couple of tools over the last year that automate the packaging, upload, and deployment of specific Intune Win32 applications (Hunress Intune Launchpad and PrintServerToIntune). Throughout creating those tools, I ended up doing a ton of research on Win32 packages, what’s inside of them, and how they get uploaded into Intune. This process has a lot of moving pieces, but learning how this worked was important to get the tools to behave like I wanted them to.
I’ve been working with Intune for almost nine years now and the landscape has changed when it comes to app deployment. SaaS apps, Store apps, and Enterprise App Management have taken over some use cases, but Win32 apps are still one of the most flexible and important deployment methods in Intune. Especially in the MSP space for deploying RMM, EDR, and other apps still relying on a local agent. Most people think Win32 Apps simply mean they are used for deploying applications to workstations, and that’s correct, but they can be leveraged for much more than simple app deployment. They can be used for running scripts, making regsitry changes, a workaround for remediations (for non-enterprise licensed organizations), or simply delivering some kind of payload to an endpoint.
This post is a deep dive on Win32 apps from everything I learned while creating the HuntressIntuneLaunchpad and PrintServerToIntune tools. We will take a look at what a Win32 App is, the IntuneWinAppUtil tool that packages your app, what’s inside an .intunewin file, all the Win32 App settings, how a Win32 App gets created on the back end, and how they payload gets uploaded into Intune.
What is a Win32 App
This is Microosft’s modern deployment method for MSI/EXE applications on Windows. I say Modern, because this method has been out for quite a while, but I continue to see people using MSI LOB apps when deploying MSI files. We won’t go into detail on that, but you’re missing out on a slew of features that Win32 apps offer that MSI LOB apps don’t have, and other reasons like different app delivery methods. For more, see Andrew Taylor’s post here – https://andrewstaylor.com/2025/05/08/why-not-to-mix-win32-and-msi-lob-applications-in-intune/.
We know Win32 Apps are intended to deploy applications to devices, but as we described in the Intro, they can be used for more than just app deployment. One thing to remember, is that Win32 apps will be launched in 32-bit context. This is because the Intune Management Extension is a 32-bit application, and that is what controls Win32 App deployment. That doesn’t mean its not compatible with 64-bit applications (it’s fully compatible with x86/x64/ARM64) , but depending on what you’re trying to accomplish, you may need to edit your install script to leverage a 64-bit context CMD or PowerShell. You can see in the screenshot below, that when a 32-bit context app calls cmd or PowerShell, it calls the app of the same architecture:
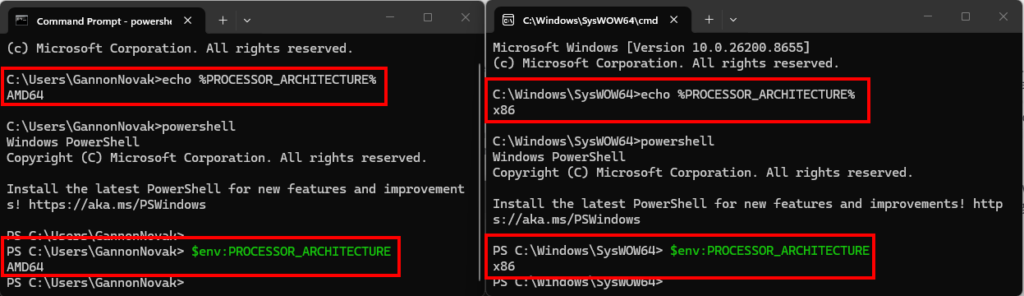
If your script needs the 64-bit registry or 64-bit system paths, call PowerShell through %SystemRoot%\Sysnative\WindowsPowerShell\v1.0\powershell.exe. More details on that in Rudy’s post – Sysnative | Intune | 64 VS 32 Bits | Wow6432node | Apps.
Circling back, the whole reason the Win32 app type exists is flexibility. Before Win32 apps, you were stuck with MSI only installers and almost no options for dependencies, pre-requisites, or detection rules. Win32 apps allow us to:
- Deploy EXE, MSI or Script installers.
- Package the installer with supporting files if your app/script requires additional files.
- Define specific detection logic
- Define specific requirement rules
- Set dependencies so apps install in the correct order
- Control return codes and install context (system/user)
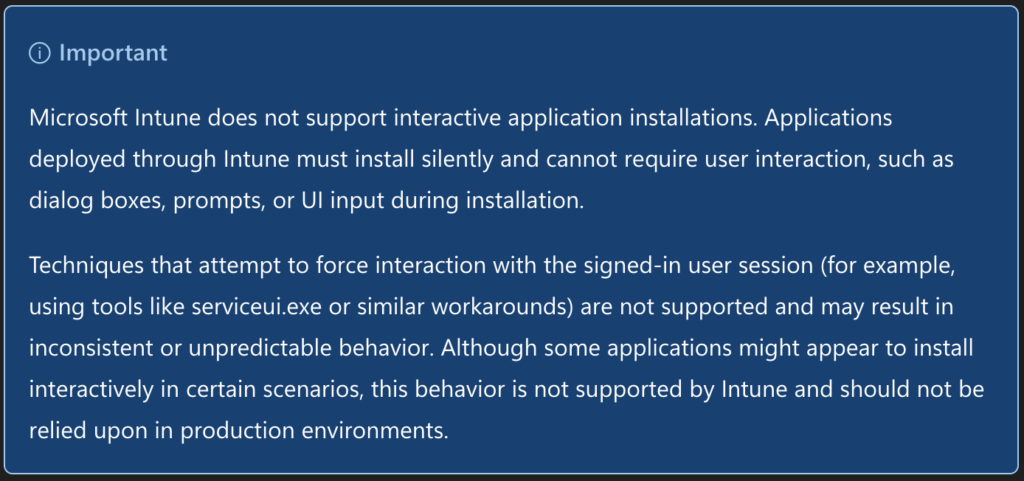
Microsoft’s official stance is that the installers for Win32 apps must support silent unattended installations. In the past, I’ve deployed apps as available that require user interaction in user context, or by using serviceUI workarounds, but Microsoft does not officially support those methods. With MSI files, this is easy since they all adhere to the same install command line options, and in general, support silent installations. However, EXE files can use their own custom install switches that the vendor should be able to provide.
When preparing to deploy a new application, you should always test your install syntax on a PC before packaging and testing deployment through Intune. It’s also important to understand user vs. system install context. This post descibes that and shows you how you can easily test your install syntax in both the user and system context – https://smbtothecloud.com/user-vs-system-install-behavior-know-what-your-scripts-are-doing-and-how-to-open-powershell-as-system/.
So, at a very high level, a Win32 app is a method of packaging an app installer or script with any supporting files, which can them be uploaded into Intune and deployed to your endpoints.
The IntuneWinAppUtil.exe tool
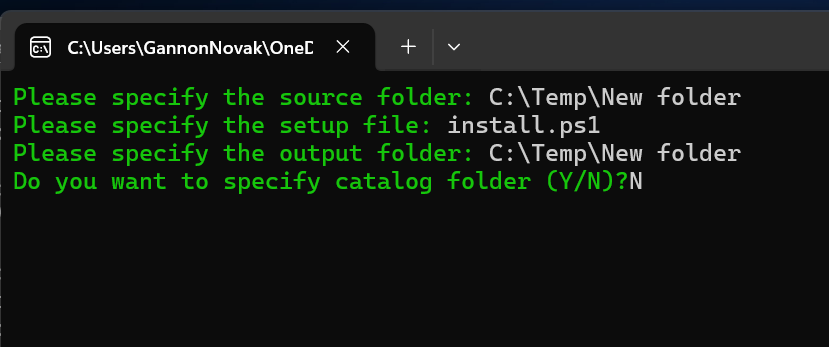
You can’t upload a raw install file to Intune when using a Win32 app. Frankly, I think this has detered many old sysadmins who are still relying on using MSI LOB apps. With only a little more effort, you can package a Win32 app which is more reliable and flexible. When packaging a Win32 App, you need the IntuneWinAppUtil tool. The IntuneWinAppUtil can be downloaded from Github. It’s a single exe file that does the magic of packaging our installer and any additional files into a .intunewin package. In most cases, you’ll probably be using the GUI, which is straightforward. You need to enter the following details after the tool is launched:
- The source folder
- This contains your installer and any additional files required for the installation. Make sure only the install and files required for the install are in this directory, or your package may be much larger than it needs to be.
- The setup file
- The EXE, MSI, or Script file that performs the install.
- The destination path of the packaged .intunewin file
- Y/N to a catalog folder. This will always be N unless for some reason you’re still making packages for Windows 10S.
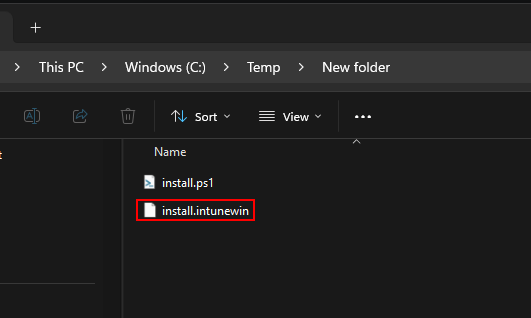
You can also leverage this tool from the command line, which is how its called in my Huntress and Print Server tools. For example, the equivilent to what we specified above would be:
IntuneWinAppUtil.exe -c "c:\temp\New Folder" -s install.ps1 -o "c:\temp\new folder" -q| Switch | Description |
| -c | Content / Source Folder |
| -s | Setup File |
| -o | Output Folder |
| -q | Quiet Mode |
| -a | Catalog folder (you won’t use this) |
| -h/-v | Help / Tool version |
There’s a 30 GB limit on your .intunewin package, but I don’t know many people who are still deploying 30+ GB packages to their endpoints. Whether you use the GUI or the command line, the result is a single .intunewin file.
What’s inside the .intunewin File?
This is where things start to get more into the weeds. If you’re using the Intune portal to manually upload your .intunewin files, all you need is the .intunewin file, and Intune will take care of everything in the background, but if you’re trying to automate Win32 App creation with PowerShell, the contents of the intunewin file are critical to the process.
All an .intunewin file really is, is a compressed encrypted version of your source files. If we crack open an .intunewin file (by extracting it with 7zip or an equivilent tool), we will see the folder and file structure below:
- IntuneWinPackage
- Contents
- IntunePackage.intunewin
- Metadata
- Detection.xml
- Contents
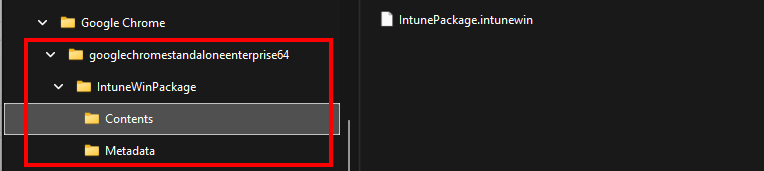
The .intunewin is a wrapper around two directories, each containing one file:
- Contents > IntunePackage.intunewin
- Yes, this is a bit weird that the .intunewin file we create contains another .intunewinfile. I’ve seen these referred to as the “outer” and “inner” intunewinfiles, repectively. With the inner intunewin file being the encrypted version of your source files and installer. The inner intunewin cannot be extracted like the outer.
- Metadata > Detection.xml
- This is what Intune relies on to validate and decrypt the inner .intunewin package. It’s a plaintext XML file that holds the metadata about the inner intunewin file, including the keys to decrypt the package.
So, peicing this together, the IntuneWinAppUtil grabs the source files specified, wraps and encrypts them into the IntunePackage.intunewin inner file located in the contents folder, then writes the metadata and encryption info for inner package as the detection.xml file located in the metadata folder. It then wraps both of those into the outer intunewin file.
Now that we know what’s in the outer intunewin, lets take a closer look at the detection.xml file. This holds all the keys and verifications Intune performs when the package is uploaded to verify the inner intunewin file is indeed valid and intact. In the example below, we can see our setup file (googlechromestandaloneenterprise64.msi) installer, but what really matters here is the unencrypted content size and the encryption info.
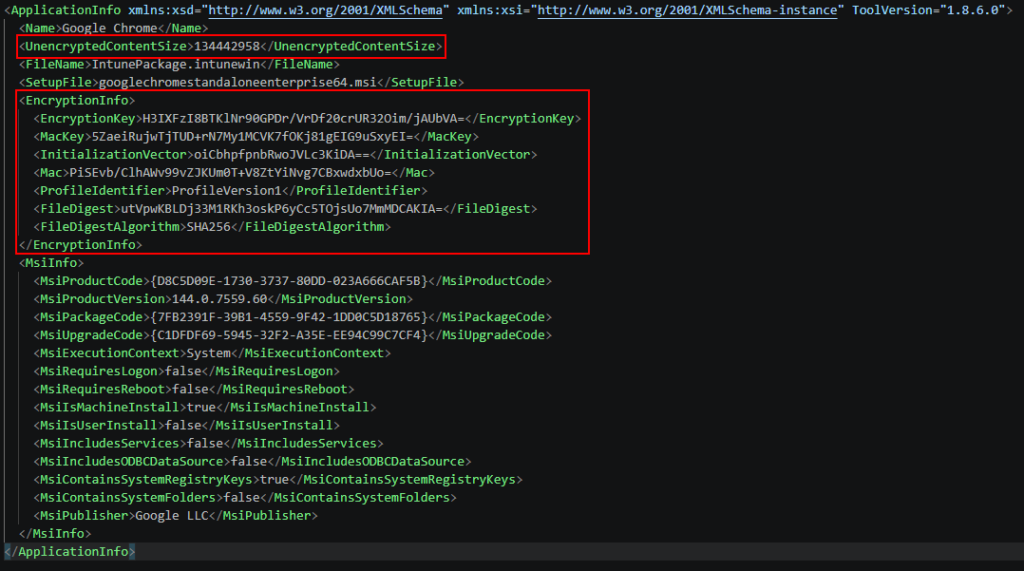
All the encryption information lives in plaintext here, so technically anyone with your intunewin file can decypt it. If you have sensitive information, such as licensing files, packaged into your intunewin files, make sure they’re stored in a secure place.
Settings to Configure in Win32 Apps
We now know what a Win32 App is, how to package an app, and what is inside of the intunewin package. Before we get into how the packages get uploaded, lets take a quick look at the different components of a Win32 app and the settings you can configure. This is where Win32 Apps are far more robust then the legacy MSI Line-of-Business app deployment method. There are seven configuration sections for a Win32 app – App Information, Program, Requirements, Detection Rules, Dependencies, Supersedence, and Assignments.

App Information
The App Information is simply asking for the .intunewin package that you created on your local device. Clicking the select app package file link will bring up file explorer so you can browse to and select your intunewin package.
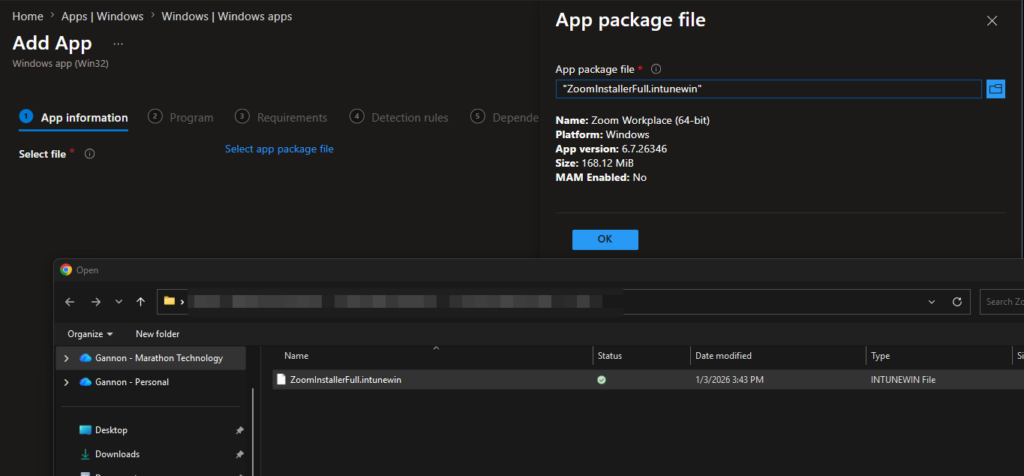
Adrer selecting your file and clicking OK, you can edit additional details if you’d like. Name, Description, and Publisher are required fields.
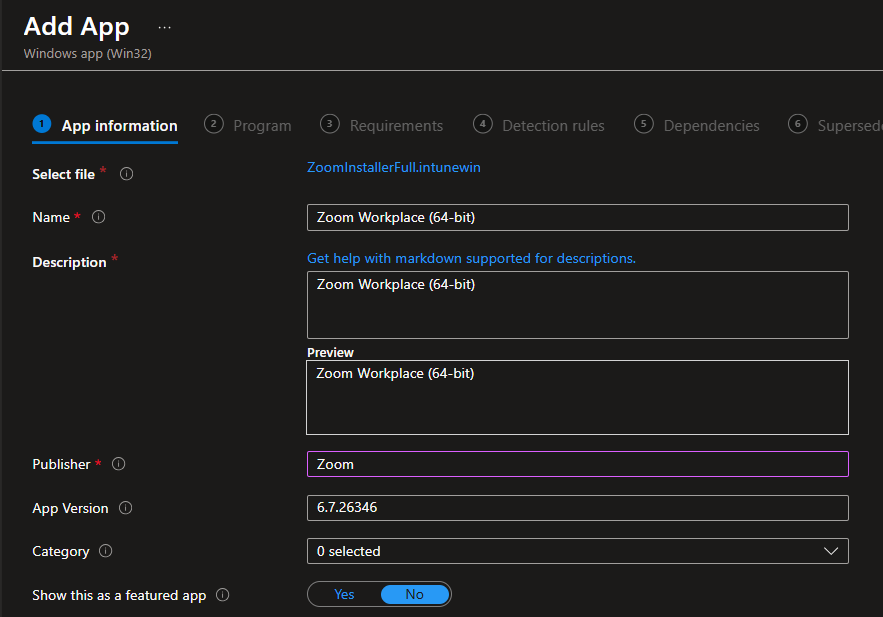
In the example above, you can see the name and app version are pre-populated. If your installer is an MSI, the IntuneWinAppUtil utility will read the properties of the MSI file and automatically add them to the app in Intune. This will include things like Name, version, and MSI package code. We can see this in the detection.xml file in the MsiInfo section. If your installer is an EXE or script, this information won’t be present.

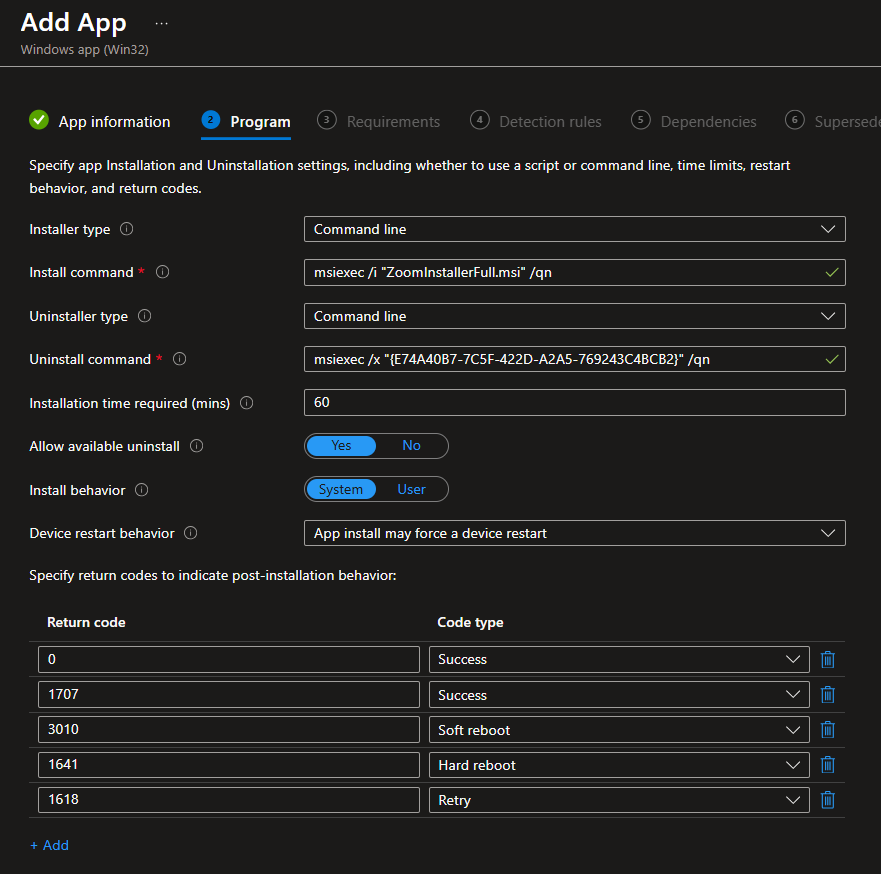
Program
The primary purpose of the program configuration is the install and uninstall commands. This is the command Intune runs to install or uninstall the app, and are executed from inside the extracted package folder. For example:
- MSI (command line): msiexec /i “installer.msi” /qn /norestart
- EXE (command line): setup.exe /S (the silent switch depends entirely on the installer)
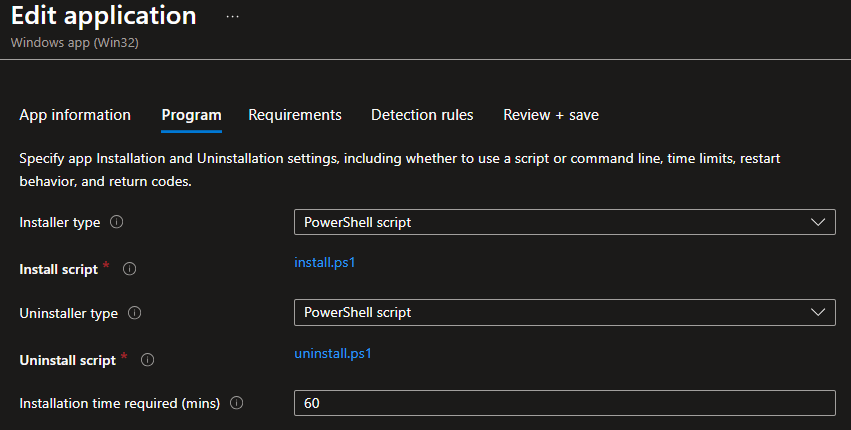
- Script-based (installer type): upload a PowerShell install script (max 50 KB) instead of a command line.
The PowerShell-script installer was added recently. The installer is a PowerShell script file, which means you can swap the logic later without re-packaging and uploading a new intunewin package. This is a huge improvement for script installers that perform all actions, such as downloading the latest installer for the app and then executing the installation. Remember what we mentioned earlier – Win32 apps launch as 32-bit CMD/PowerShell. To force 64-bit, call %SystemRoot%\Sysnative\WindowsPowerShell\v1.0\powershell.exe in your install command.
In general, you don’t need to mess with device restart behavior or return codes unless your app requires a reboot to finish installation, or if it has return codes that are out of the ordinary.
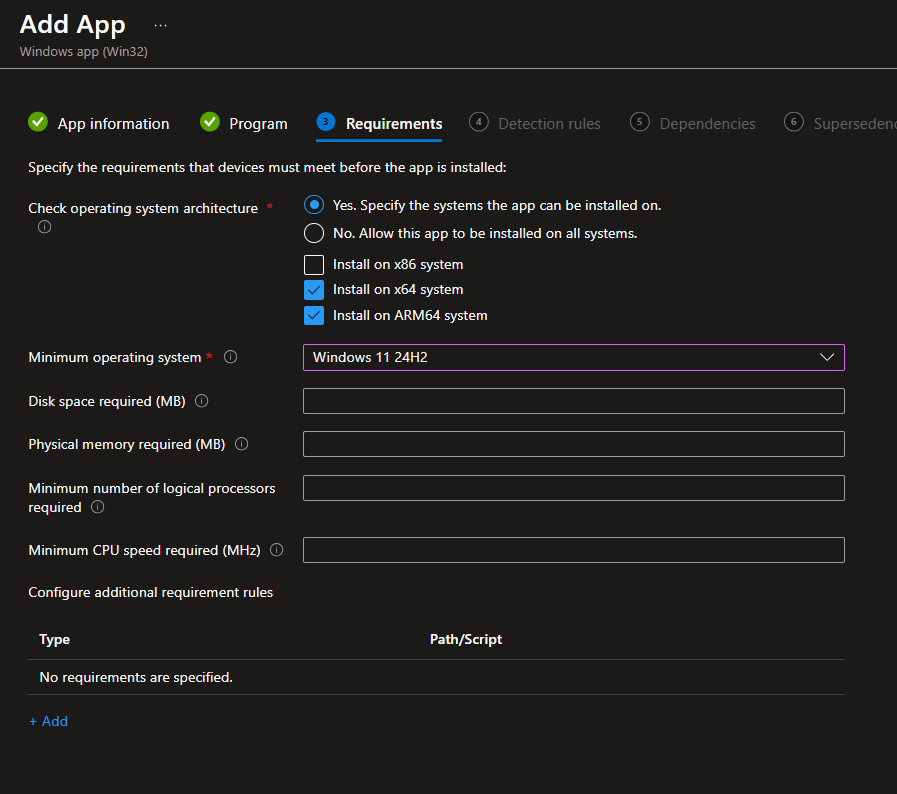
Requirements
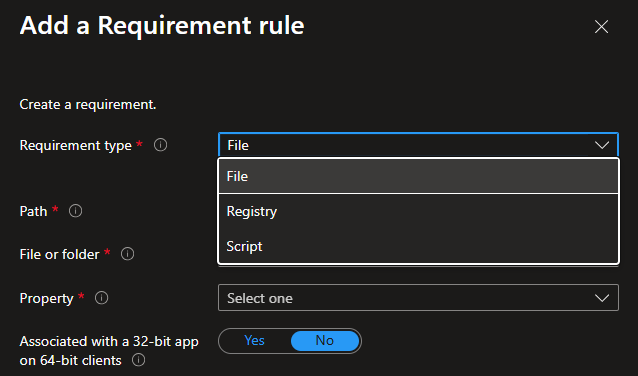
Requirements are pretty straightforward. The requirements set in this section must be met by the endpoints for the app to install. Its basically the device asking “should I receive this application?” It’s pretty rare to specify granular requirement rules, but you have some pre-defined options for OS, OS architecture, disk space, RAM, CPU cores, and CPU speed. If you need something that falls outside of that, you can add a custom requirements in the form of file, script, or registry.
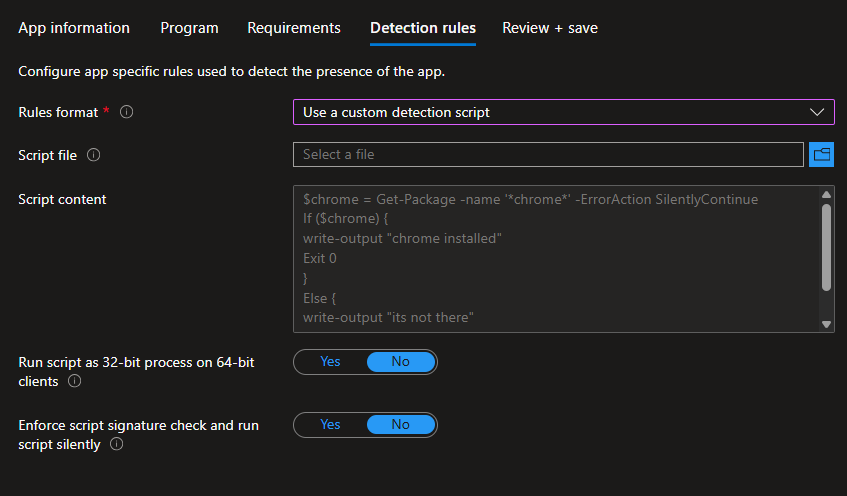
Detection Rules
Detection rules are just as important as your installer package. This is what Intune uses to determine if the app is installed or not. Simple detection rules exist for MSI Code, File/Folder path, and Registry.
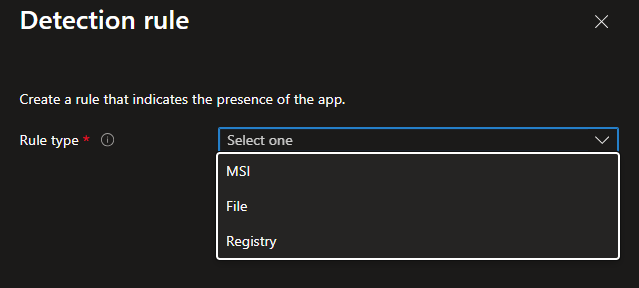
If the built-in detection methods aren’t enough for your app, you can use a custom detection script. This is essentially a PowerShell script that will run your custom logic, and the exit code the STDOUT will determine if the app is installed. For more on custom detection scripts, see Andrew Taylor’s post – https://andrewstaylor.com/2022/04/19/demystifying-intune-custom-app-detection-scripts/.
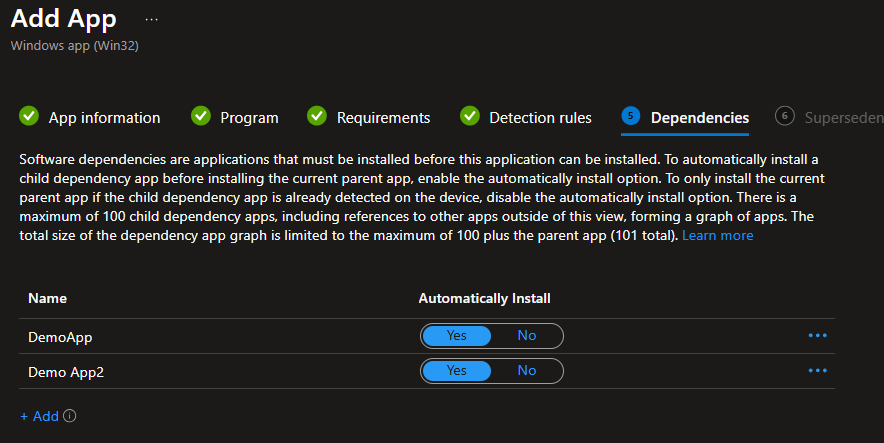
Dependencies
Dependencies is exactly what it sounds like – other apps that your app depends on. In other words, pre-requisites. You can also leverage this as a workaround if you wanted to try defining the order in which your apps are installed. Dependencies only work with other Win32 apps. You can’t select a Microsoft Store or MSI LOB app as a dependency.
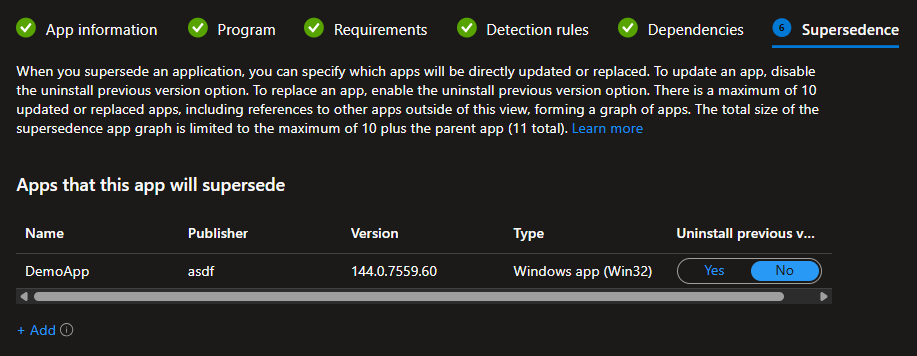
Supersedence
Supersedence allows you to define a replacement relationship between Win32 apps. A newer version of the app (the superseding app) will replace the old app (the superseded app). You can configure if the new version will update, or if the old version should be uninstalled before the superseding app is installed. I very rarely use this these days as most apps automatically update. There’s still a small use case for this if apps don’t automatically update, or apps can’t do a clean upgrade/update between versions.
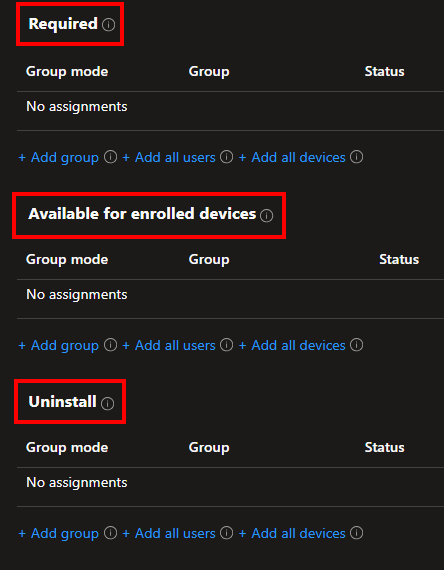
Assignments
Lastly, there’s the assignments, which behaves just like anything else in Intune with a few additional features. When it comes to the assignment types, you have three options. Required, which will force install the application. Available, which will show the app in the company portal and allow the user to install if they’d like to. Uninstall, which will uninstall the app.
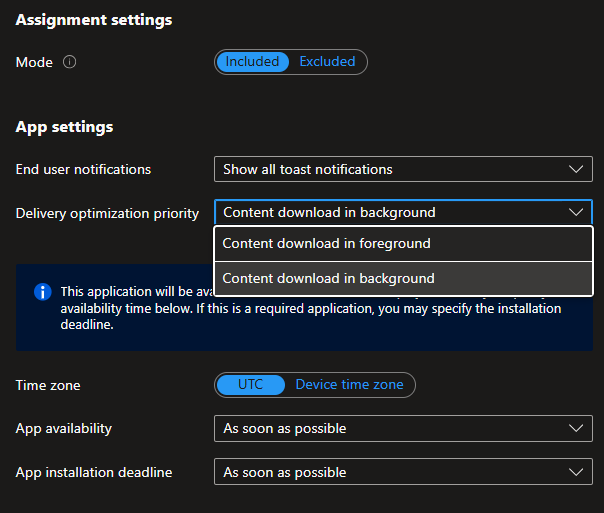
There are a few other things worth pointing out. The delivery optimization settings will default to “content download in background”, but changing this to “content download in foreground” will speed up your app download (especially if your apps are large). This will essentially bypass any delivery optimization background throttling. The downside is that it may take bandwidth from the user, but in general, this is not going to impact the user.
You can also set if the users will receive notifications or not and make an app available at a certain time. There’s also the assignment mode of Included/Excluded. Excluded will take precedence over included.
Now that we’ve reviewed the different settings, we can move on to how the Win32 app gets created and how the intunewin package gets uploaded.
How a Win32 App Actually Gets Created, and How the Intunewin Package gets Uploaded
OK, so we know how the intunewin package gets created, whats inside the intunewin package, and the different settings we need to create . Lets see what happens when we create a new Win32 app and upload our intunewin package. All Win32 apps start with the intune app shell. What I mean by that, is we build out all the settings and properties of the app prior to the intunewin package actually being uploaded. If you notce when creating a new Win32 app, the first step is to select your intunewin package, but the package doesn’t start uploading until you finish building all the app settings, such as install command, detection rules, assignments, etc.
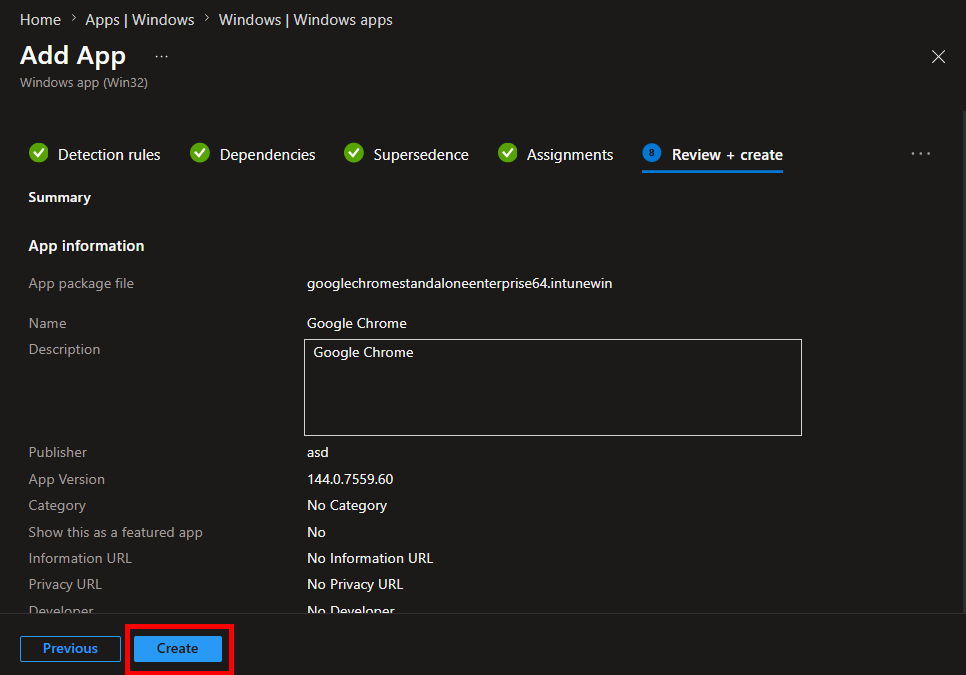
The flow and all steps for creation of a new Win32 App to when the intunewin upload completes are outlined below. All of this starts happening when you click Create on the Review + Create step when making a new Win32 App :
- 1. The app object is created via a POST to https://graph.microsoft.com/beta/deviceAppManagement/mobileApps/. It will contain the “app shell” with all your app settings.
- The full POST JSON will look something like this. You’ll see all the app settings you configured.
{
   "@odata.type":"#microsoft.graph.win32LobApp",
   "applicableArchitectures":"none",
   "allowedArchitectures":null,
   "allowAvailableUninstall":true,
   "categories":[

   ],
   "description":"Google Chrome",
   "developer":"",
   "displayName":"Demo App2",
   "displayVersion":"144.0.7559.60",
   "fileName":"googlechromestandaloneenterprise64.intunewin",
   "installCommandLine":"msiexec /i \"googlechromestandaloneenterprise64.msi\" /qn",
   "installExperience":{
      "deviceRestartBehavior":"allow",
      "maxRunTimeInMinutes":60,
      "runAsAccount":"system"
   },
   "informationUrl":"",
   "isFeatured":false,
   "roleScopeTagIds":[

   ],
   "notes":"",
   "minimumSupportedWindowsRelease":"Windows10_21H2",
   "msiInformation":{
      "packageType":"perMachine",
      "productCode":"{D8C5D09E-1730-3737-80DD-023A666CAF5B}",
      "productVersion":"144.0.7559.60",
      "requiresReboot":false,
      "upgradeCode":"{C1DFDF69-5945-32F2-A35E-EE94C99C7CF4}",
      "productName":"Google Chrome",
      "publisher":"Google LLC"
   },
   "owner":"",
   "privacyInformationUrl":"",
   "publisher":"asdf",
   "returnCodes":[
      {
         "returnCode":0,
         "type":"success"
      },
      {
         "returnCode":1707,
         "type":"success"
      },
      {
         "returnCode":3010,
         "type":"softReboot"
      },
      {
         "returnCode":1641,
         "type":"hardReboot"
      },
      {
         "returnCode":1618,
         "type":"retry"
      }
   ],
   "rules":[
      {
         "@odata.type":"#microsoft.graph.win32LobAppPowerShellScriptRule",
         "ruleType":"detection",
         "operator":"notConfigured",
         "displayName":null,
         "enforceSignatureCheck":false,
         "runAs32Bit":false,
         "runAsAccount":null,
         "scriptContent":"JGNocm9tZSA9IEdldC1QYWNrYWdlIC1uYW1lICcqY2hyb21lKicgLUVycm9yQWN0aW9uIFNpbGVudGx5Q29udGludWUNCklmICgkY2hyb21lKSB7DQp3cml0ZS1vdXRwdXQgImNocm9tZSBpbnN0YWxsZWQiDQpFeGl0IDANCn0NCkVsc2Ugew0Kd3JpdGUtb3V0cHV0ICJpdHMgbm90IHRoZXJlIg0KRXhpdCAxDQp9",
         "operationType":"notConfigured",
         "comparisonValue":null
      }
   ],
   "runAs32Bit":false,
   "setupFilePath":"googlechromestandaloneenterprise64.msi",
   "uninstallCommandLine":"msiexec /x \"{D8C5D09E-1730-3737-80DD-023A666CAF5B}\" /qn",
   "activeInstallScript":null,
   "activeUninstallScript":null
}- 2. After the POST reqest, you’ll see a GET request returning the new app ID, which is important for all remaining steps.

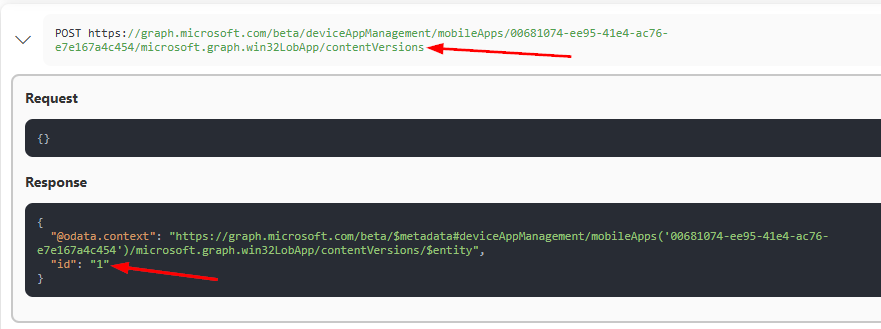
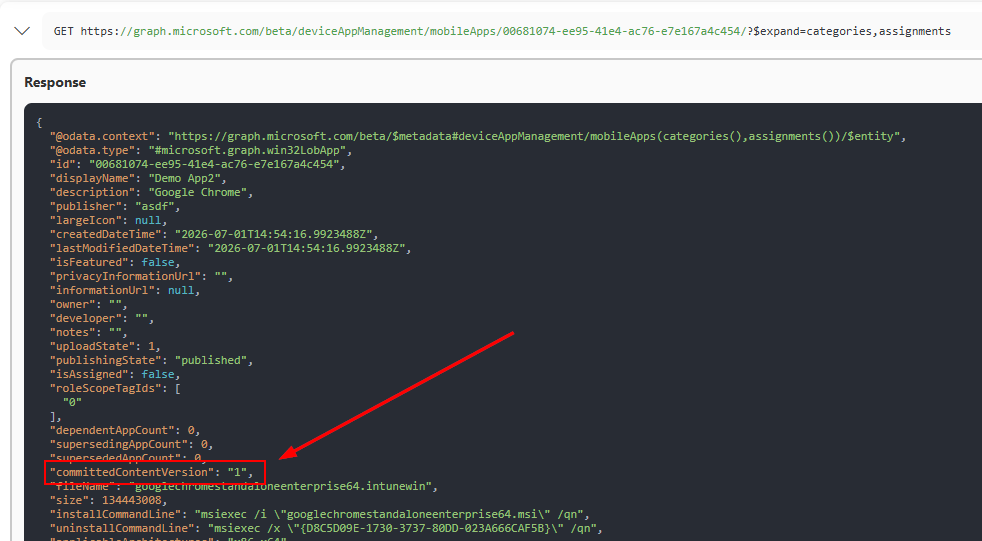
- 3. Then another POST request will respond with a “content version”, which is created everytime the intunewin package is updated for a Win32 app. The initial content version will always be 1.
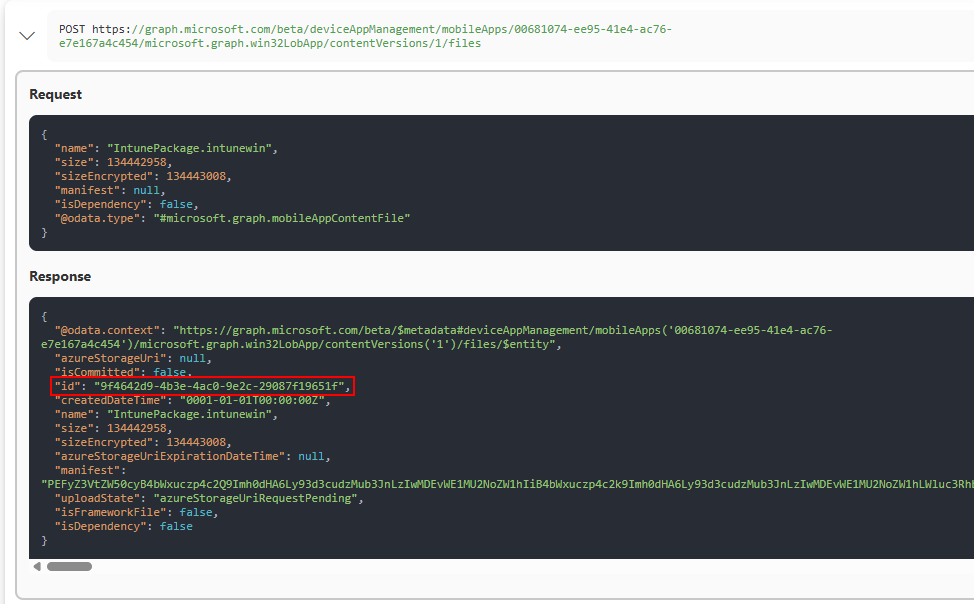
- 4. Another POST request will tell Intune some information about the incoming Win32 App package to be uploaded. The name of the inner intunewin and size are sent to Intune. The response provides a content file ID (highlighted below). This file ID will also be part of the Azure Blob path in the SAS URL returned in the next step. Intune leverages Azure Blob storage for the Win32 App packages, so the SAS URL is critical for the upload to happen.
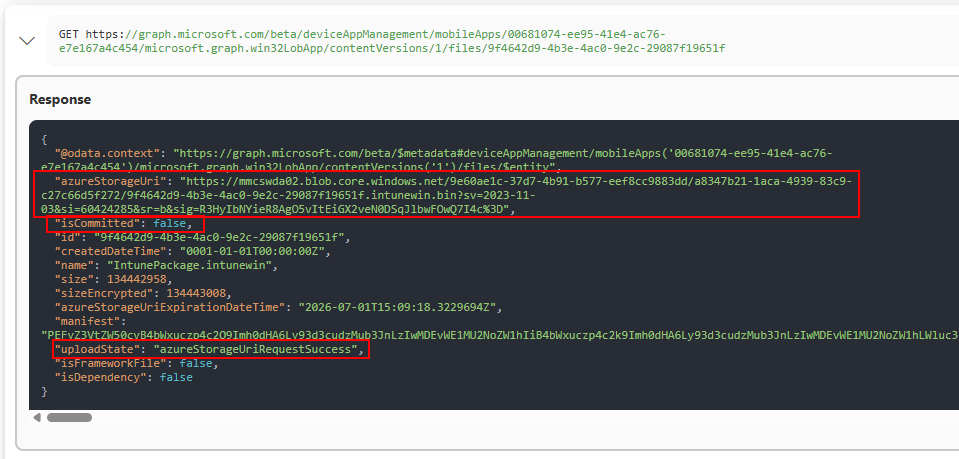
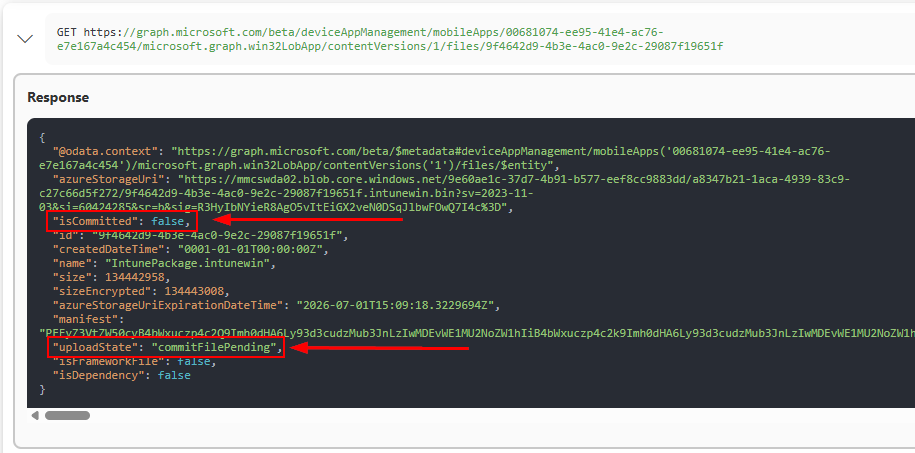
- 5. Another GET response will show the Azure Storage account SAS along with fields indicating if the file has been committed and what the upload state is:
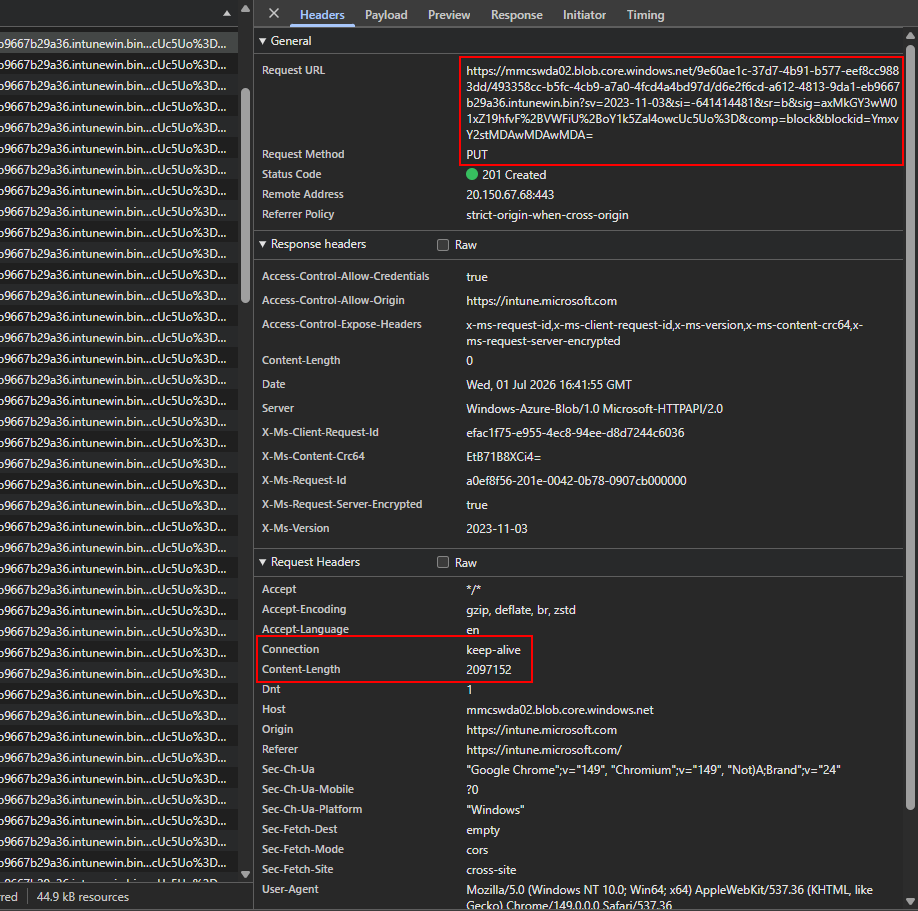
- 6. After the AzureStorageURI is present, the inner intunewin will begin uploading to Azure storage in chunks using the SAS URL. Since this is a direct upload to an Azure storage account, its not an Intune graph call. However, we can see these requests in the Edge/Chrome developer tools. You can see many of these in the list as the upload continues.
- 7. When the upload is finished, a POST request to “commit” the package is sent containing the encryption info from the detection.xml file to Intune so it can verify the package and hold the decrytion keys.
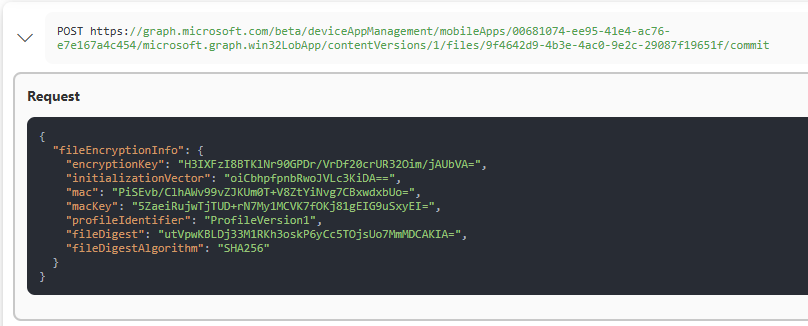
- 8. While the package is verified, you’ll see GET responses checking on the status of the file commit.
- 9. Assuming all is verified successfully with the uploaded package, the package will be commited.
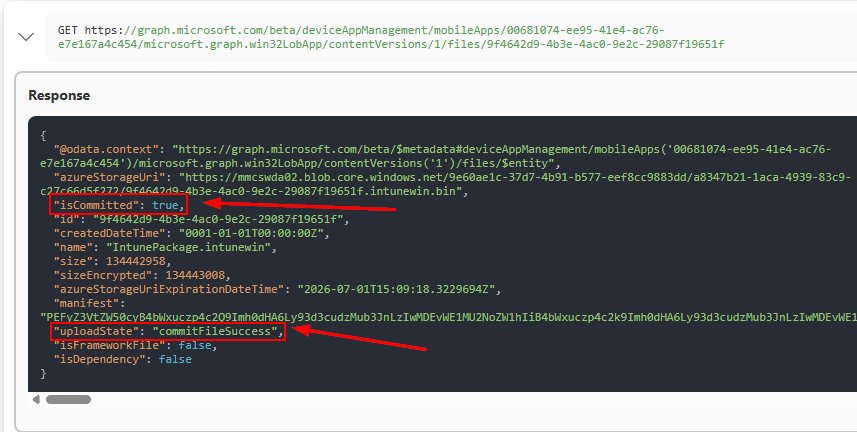
- 10. Then a PATCH request is sent to update the app to use the newly committed content version.
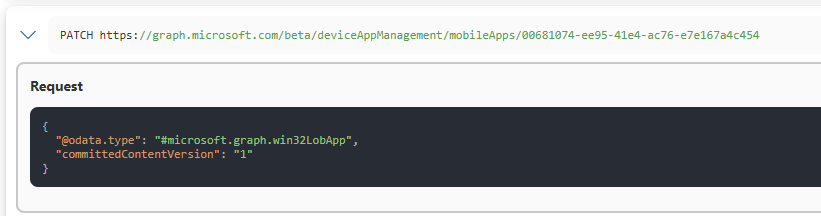
- Note that if you are updating an existing Win32 app with a new intunewin package, the patch request will contain additional info along with the updated commited content version.

- 11. Lastly, we will receive a final GET response with all the app details, including the committedcontentversion
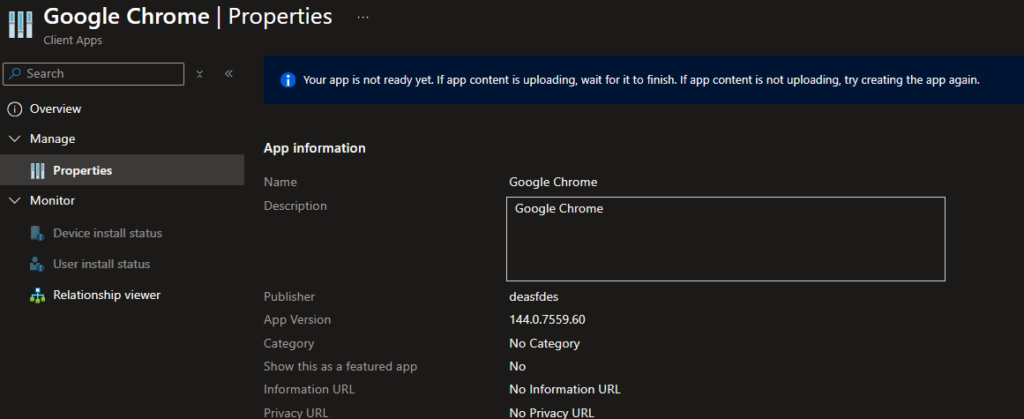
There you have it. There are lots of little moving pieces on the backend of this process. In most cases, this all happens in a matter of seconds (unless you’re uploading a very large package). If your upload fails or the package fails verification and is not committed, you’ll end up with a visible app in the Intune dashboard, but you’ll have an error banner and won’t be able to edit the app (see screenshot below). If this happens, you’ll need to delete the empty app and recreate it.
What about custom detection and requirements scripts?
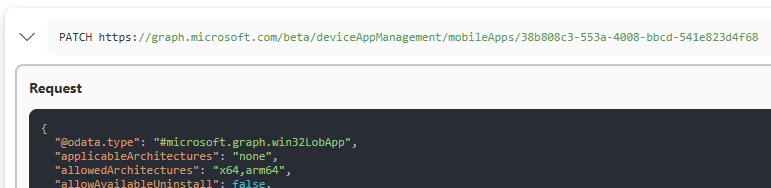
You may think that custom detection scripts or requirements scripts will need to get uploaded somewhere since we’re selecting a local file on our workstation when we add or edit these. That’s actually not the case. Although we are browsing and selecting local script files for detection or requirements scripts, they are not being uploaded into Azure blob storage like the Win32 app packages. Instead, they are read, and the script syntax is injected directly into the Win32 app object in intune as a base64 value. If its a new app, it will be contained in the initial POST when creating the app, but if its an existing Win32 app, you’ll see a PATCH request against the app ID:
Within that PATCH request, we will see details for the detection and requirements scripts. We can see the scripts as part of the scriptContent field:
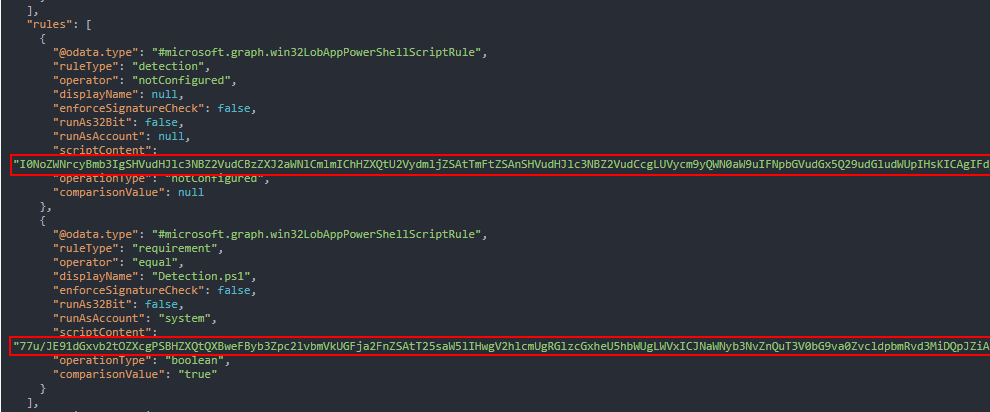
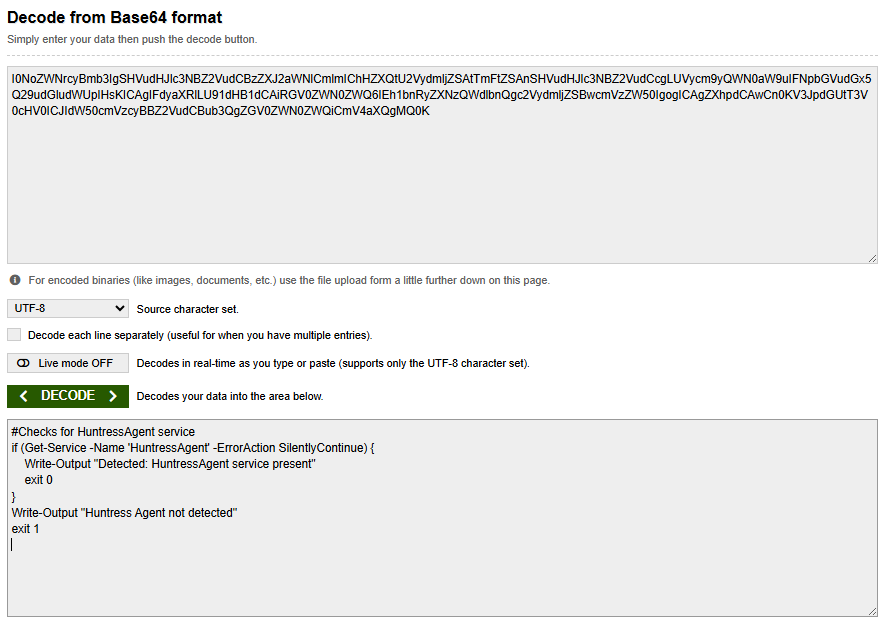
Taking the Base64 value from the script content field and decoding it will output your script:
Conclusion
Win32 apps look like a simple package upload in the Intune admin center, and they are on the surface, but there is a lot happening behind the scenes. Between the outer .intunewin file, the inner encrypted payload, the metadata, the Graph app object, the Azure Blob upload, and the final commit process, there are several moving pieces that all need to line up for everything to work. For most admins, the portal hides that complexity, but understanding the flow makes troubleshooting and automation much easier.